Lead Flow

This article explains the role LeadSnap plays in the lead flow from your websites to the point it arrives at your clients. As this is a cornerstone to the lead management module it is worth taking a few minutes to understand how this works.

Lead Flow Overview Video

In this tutorial, we show you how to create a lead flow for your site so that visitors on your website are able to connect directly to your client directly. Once you’ve connected your site to LeadSnap, you can then create a flow that enables visitors to connect directly to your end clients using LeadSnap as the middle man or conductor that’s never seen throughout this process.

Benefits of connecting your website to LeadSnap:

  • All-in-one dashboard acts as a home for tracking traffic from all sources, lead activity, information, and analyzing useful data instantly giving you real-time lead updates, how well your site is performing in real-time and in the past
  • Spam Filters completely eliminate the non-stop annoying messages from spammers giving you an accurate count on which calls are leads and which are spam making the All-in-one feature possible so you don’t have to manually check which messages are legitimate opportunities and which are spam

In the diagram shown above, you’ll notice there are two arms. These arms represent the choice for which call to action is most convenient for the visitor, a phone call, or submitting a form. Both arms have the same end goal, to connect the visitor to your client.

  1. The first and most common mode of communication is phone calls. Having a phone call as an option allows the visitor to speak directly to your client to make their experience as seamless as possible. The other option is to take the calls yourself or through your agency to ensure your clients are speaking to a qualified lead. You can input information about the lead gathered from the call by adding the lead into the Lead Intake Form in LeadSnap.
  2. The second mode is having your site visitors submit a form. In this case, rather than calling your client directly, the visitor has the option to submit a form with the following information: the visitor’s contact information, service inquiry, and other notes which is evaluated by LeadSnap whether it is an opportunity or a spam. Once it’s past the spam filter, the visitor’s inquiry is sent directly to your client.

Connect Clients and Companies

Companies are a central building block within the LeadSnap platform. When you first create a company it will not have many of the associations necessary to take full advantage of our system. One of the first connections you will want to make is the connection between the client and the company. This is a quick and simple process.  Like many things in LeadSnap, there are several ways to do things. You can either assign the client to the company or the company to the client.

Why Connect Clients and Companies

  • Leads get auto-assigned to clients as they arrive or are created.
  • Allows for auto-forwarding of leads to clients.
  • Clients can only see the leads they are assigned to when they log in.
  • Allows for automated reporting of “Leads by Client” throughout our lead management module.


Assign Company to Client

  1. Settings from the left navigation menu.
  2. Expand companies from within the settings menu on the left navigation menu.
  3. Select All Companies.
  4. Select the Edit button next to the company for which you would like to assign a client.
  5. Click into the “Assign Clients” box and you should see a list of the clients you have created within LeadSnap.
    1. If your client is not listed here, please see the help article on creating new clients. 
  6. Click Update at the bottom of the screen to save your changes.

Assign Client to Company

  1. Settings from the left navigation menu.
  2. Expand Users from within the settings menu on the left navigation menu.
  3. Select All Users.
  4. Select the View button next to the user for which you would like to assign a company.
  5. In the top right corner select the “Edit User” button.
  6. Click the “Companies List” button and click the checkboxes next to the companies you would like to associate with this user.
    1. Note if you do not see your company here than you need to see the help article on creating new companies. 
    2. If you do not have the Assign Companies button, check to make sure the user is not an Admin user as this button will not be visible for admin users. Admin users can see all companies within your account. 
  7. Click Update at the bottom of the screen to save your changes.

Zapier Website Connection

Zapier is a third-party company, that integrates with more than 2,000 different applications and can extend the functionality of LeadSnap in many directions. To get started you must have a Zapier account, you can sign up here: https://zapier.com.  Zapier works on triggers for events. So the basic is, you create an action or a series of actions that happen when a certain event is triggered, in our case here that will be an email arriving. It’s a very powerful system, you can use conditional logic, make exceptions, do calculations. If you want to do something where there is predictable data there is a good chance that Zapier can automate the process for you.

What is Zapier

While LeadSnap supports integrations with many platforms, we do not support them all. With the help of a Zapier integration, you can bring leads into LeadSnap from any website that is capable of sending an email.

To make this happen we will be using both Zapier and an email parser built into Zapier which you can find here: https://parser.zapier.com. An email parser is simply a tool that can look at an existing email and understand the format.

Zapier Email Parser

Workflow from Zapier to LeadSnap

  1. Your form submission is forwarded to your custom email box for the associated zap.
  2. Your Zapier email account is constantly listening for new emails and when it receives one it can trigger a zap (a custom action or series of actions from any supported application, like LeadSnap).
  3. Zap is triggered and creates the lead in LeadSnap for the company using the custom settings from your zap.

Step By Step Guide

  1. Before gettings started please watch the Zapier Email Parser video on this page.
  2. Create and log in to your Zapier account: https://zapier.com/app/login
  3. Create and log in to your Zapier account: https://parser.zapier.com/
    1. For some reason, these are separate accounts but they work together.
  4. Click the “Create Mailbox” button in the top right corner.
  5. Choose the “skip waiting” link to go to the open up the mailbox settings page.
  6. Change the name of your mailbox to something that will remind you of the purpose of this zap. Make sure this is unique, we recommend adding some random numbers after the mailbox name.
    1. Example: Towing Boston Website 3121
  7. Click the button in the that says “Save Address and Template”.
  8. Copay the email address of the newly created Zapier email address.
    1. Example: [email protected]
  9. Update the form on your website to send the leads to the new email box that you created within Zapier.
    1. Example send form submissions to [email protected]
  10. Send a test lead to Zapier email parser by submitting a form submission as if you were a customer from the public part of your website (not the admin area).
    1. Make sure to identify that this is a test if you have a client receiving these leads directly from your website currently.
  11. Return to Zapier email parser and click the view emails button next to the associated email box.
  12. Click the create template button to create a template for your email according to the email format from your website.
    1. If you have different email formats for other forms on your website you made need to create multiple emails or templates.
  13. Highlight and name the data from the test lead you submitted to create variables that can be used in your Zap.
  14. Click the button that says “Save the address and template”.
  15. Return to Zapier (not Zapier email parser).
  16. Click the “Make A Zap” button.
  17. For the first step type and select Zapier Email Parser.
  18. For the second step type LeadSnap. If you don’t see it, try using the link below. You may need to accept permission as a part of this process.
    1. LeadSnap Zapier Link
  19. You can use the names that you chose during the Zapier Email Template to customize the Zap to align with your associated company within LeadSnap.

Add a new company

Companies are a central building block within LeadSnap system. The Lead Management and Reputation Management modules both work on a company level. Google My Business or GMB locations have an association with companies as well. There are no charges or credits needed to create companies. Each company can have only one website associated with it. If you are new to LeadSnap creating your first company is a great starting spot.

Step by Step Guide

Opening the New Company Wizard

On the left navigation menu, click to expand the “Settings” item, then “Companies” and select “Add New Company”. This can also be achieved by clicking the “Add New Company” button in the “All Companies” screen.

Adding Company Details

Complete the required fields as recommended below:

  1. Company Name – Enter a name that will help you identify this company. We recommend using some name that will help you associate your company with your website such as variation of URL.
  2. Website URL – Enter the URL or website address for the website associated with the company.
  3. Website Form – This is the form you wish to use within LeadSnap. This allows for the mapping of the fields of your website to fields within LeadSnap. If you have not already created one for your company then select the “Default” form. You can follow the “Add New Website Form” support guide at a later date.
  4. Timezone – Select the timezone for your company. This most likely is the city where your website is located.

Click on the “Submit” button. This will will create the new company in LeadSnap and take you to it’s Dashboard.

Activating Lead Management and Reputation Modules

You will also be presented with a pop-up box telling you the Company was created successfully and asking if you wish to activate additional the Lead Management and Reputation modules.

LeadSnap modules work on a credit basis, so it is up to you if you wish to activate them now or later. You can click on the “View Plans” button to see the associated costs.

To do this later then click on the “No Thanks” button and you will be returned to the company Dashboard.

To activate them now, tick the checkboxes and click the “Activate” button.

You will be presented with “Features Activated Successfully” messagebox. Click “OK” and you will be returned to your new Company Dashboard.

Edit Company

The edit company screen allows you to edit any of the settings associated with a company such as:

  • Company Name
  • Website Address
  • Assigned Client
  • Lead Intake Form
  • Timezones
  • Auto-forwarding settings
  • Phone mapping settings
  • Qualified call filters

The edit company screen can be accessed in a lot of different ways. Below are two different ways.

From the company dashboard, you will see an edit button in the top right corner.

Through Company Dashboard

Click on a company’s name anywhere within the application to get the company dashboard. From the company dashboard click the edit button in the top right corner.

Through All Companies Page

  1. Expand settings from the left navigation menu
  2. All Companies
  3. Choose Edit next to the company you wish to edit

All Companies

This support guide explains the functionality and how to use the All Companies section of the Reputation Management module.

Step by Step Guide

To access this section, click on the Reputation Module header in the left hand navigational menu. This will then expand the module and display all the sections available to you. The very first one is “All Companies”, click on this and the system will then display the list of all activated companies that you have created.

If the company you want to use is not listed, make sure you have set it up correctly by following the Add New Company support guide.

Connecting a Google Account

You can connect a new Google Account by clicking on the “Connect Company” button at the top right hand of the screen. This will take you to the “Reputation Management Integrations” screen. Here you will be able to connect via Google or Facebook (Facebook is currently in development). You can then connect your Google account by following the Connect Google Account support guide.

When you click on “Save Changes” you may get directed to a “Sign in with Google” screen like the one below. Simply choose the Gmail account you want to connect to. If it is not listed then choose “Use another account” option and you will be presented with the familiar Google sign in screens.

You will then be redirected back to the LeadSnap console and your new Google Account will be listed in the Google – Google Accounts section of the navigational menu.

Returning to the “All Companies” screen, you will see that it gives you an overview of the current status of your company and it’s reputation, if it has been activated or not, the number of connected review sites, the review sites that are connected (e.g. Google), the average rating, the number of reviews, the date of the last review and a column of actions. All the fields are non-editable, as most of them are simply displaying information from other sections, except the “Actions” column which will have either an “Activate” or “View” button shown.

Activating Company

Before you can use any of the other sections, you must Activate your company’s Reputation Management access via this section. This will require the use of 1 Reputation Credit. To activate your company for use in the Reputation module, go to the far right hand column labelled “Actions”. In the row for the company you wish to activate, you will see a red button titled “Activate” with a down arrow on the left hand side of it.

When you click the Activate button, you will be presented with an information box asking “Are you sure you want to activate this feature?” along with a message telling you how many monthly credits you have left for the module and that activating this company will decrease your balance by one. You are then offered the chance to “Cancel” this if you change your mind or “Confirm” if you decide to go ahead with it. If you choose “Cancel” then you will simply be returned to the All Companies list without any changes being made.

When you select “Confirm”, the system will then activate your company and tells you it has been successful in another pop-up information box with a circle ticked. The screen will then automatically refresh and you will notice the red “Activate” button in the far right hand column has now been replaced with a light blue “View” button with an eye icon to the left of it.

You have now successfully activated your company for use with the Reputation Management module of LeadSnap system. If you now click on the “View” button in the “Actions” column you will be taken to the Reputation Dashboard.

Review Funnel

This support guide explains the functionality and how to use the Funnel section of the Reputation Management module.

Step by Step Guide

To access this section, click on the Reputation Module header in the left hand navigational menu. This will then expand the module and display all the sections available to you. The very first one is “Funnel”, click on this and the system will then display the Funnel template.

Overview

The Funnel section is the beating heart of the Reputation module and allows you to configure how you want positive and negative reviews to be handled. We will walk you through how to configure each section but the overall essence is to protect your businesses reputation online and prevent negative or unfounded comments being published without your knowledge.

This component is the where you can configure the look and feel of the review requests you send out, what type of review system you want to use and at what point you want reviews to not be published before you have a chance to address any issues and potentially gain a positive review instead.

Selecting the Company

First you need to ensure you are working on the correct company’s Review Funnel. To change the company you need to go to the top right hand corner of the screen and click on the arrow in the dropdown menu, scroll down and click on the company you wish to configure.

You can change the company you are working on from all three of the component screens (Review Funnel; Feedback Funnel and Review Sites) in the Funnel section.
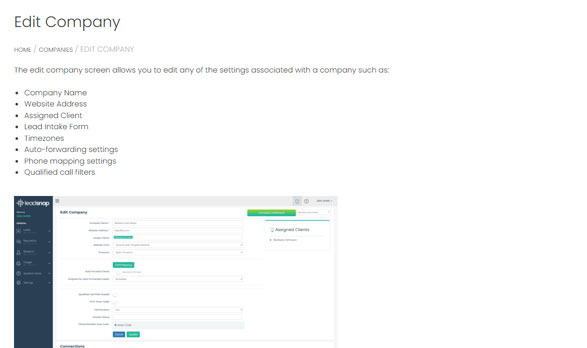
Editing the Company

Once selected, you now also have the option of editing the company information from the Funnel. This can also be done from any of the component screens in this section.

Clicking the button will take you directly to the Edit Company screen that you can would normally have to navigate to via the “Settings-Companies-All Companies” navigational menu.

Once you have updated your company information, you will need to click on the Update button. A green banner at the top of the screen will indicate that the information has been updated successfully.

To return to the Funnel section, you will need to go through the navigational menu again by selection “Reputation – Funnel”.

Configuring the Header

Your next step should be to setup the header to your Review Funnel request form. At the top right of the header section you will see a pencil icon. By clicking this it will open a pop-up screen that will give you the option of editing the Heading Text; Subtext and the colour of the heading banner.

Once you have made the changes then you need to click the “Save Changes” button to apply them to the Review Funnel template. If you decide you want to make further changes then simply click on the pencil icon again and make them, remembering to click the “Save Changes” button.

Configuring the Welcome Message and Logo

The next section you can edit allows you to add your logo and welcome message that is displayed underneath the review rating.

To change the logo you can either upload a file from your computer or drag it into the space outlined for the image. Once uploaded, or dragged into place, it will preview the image.

You can then edit the Welcome Message to make it reflects the image of your company and is of the tone that will appeal to your audience.

Once you have updated these components you will need to click “Save Changes” to apply them and return to the Review Funnel template. If you decide you want to make further changes then simply click on the pencil icon again and make them, remembering to click the “Save Changes” button.

*Logo Dimensions: 124 x 124 pixels

Configuring the Review Rating System

The final piece of the Review Funnel template is the review rating buttons, layout and text selection and configuration.

Click on the Pencil Icon next to the 5 Stars below the Logo.

By default LeadSnap sets you up using the star rating system. You will see this indicated by the 5 stars on the left in the “Selected Layout” box and in the “Choose Button Layout” drop down list. On the right hand side of the screen you will see that each of the 5 stars has a Text and Action box assigned. You can change the Text to say whatever you want to align with your company’s image and the tone best suited for your audience.

The Action drop down list allows you to select “Review” or “Feedback”. This is where you can control what type of reviews you want to be published versus the ones you want to gain more feedback on in an attempt to rectify the issues and obtain a more positive review.

For example, If you only wanted 4 and 5 star reviews being published without any intervention, simply select “Review” for those two options. For the rest you will then select “Feedback” and the user will be directed to the Feedback Funnel screen and asked to provide more detail. They will not know the difference and it will be seamless to them but will save your company’s reputation from a negative review being published and affecting your rankings and future business.

Remember, no matter what you do online, the biggest selling tool on the planet is word of mouth. It can also be the biggest business killer.

Website Forms Overview

Website Forms play an important role in the lead management module of LeadSnap. While the system is very user friendly, this is one place where there is a potential opportunity for confusion. We recommend that you watch the video overview and read this document to get a firm grasp on the role website from play.

For information about connecting the forms on your website please check out one of the following articles:
WordPress Website Connection
Embedded Form (Any Website Platform)
Zapier Website Connection (Any Website Platform)

Video Overview

Website Forms Purpose

Incoming Lead Organization

Website forms serve as a connector between your website and LeadSnap. We named this way because they connect to your website forms on your websites. As form submissions flow from your website through LeadSnap to your clients the website forms help to organize things and make sure the data is sorted into the correct columns within our system.

Embedded Forms

There are a few different methods for connecting your website to LeadSnap. This connection allows your form submissions to be instantly available in LeadSnap for analysis. Additionally, as form submissions flow through our system they are passed through our powerful spam filters. One of the website connection methods is to embed a custom form on your website which is designed within LeadSnap. The website forms play an important role in this process. Refer to this document for more on embedding a form on your website.

Manual Lead Intake Form

There are several ways to get leads into LeadSnap. One of them is to add a lead manually. Perhaps your client is using LeadSnap to add leads to the system as they come into their phone or someone from your team is fielding the calls. To manually add a lead expand Leads from the left navigation and selecting Add New Lead. On the next screen select the company and click next. You will be taken to the website form that is associated with your selected company.

Field Mapping

Website forms play an important role in the field mapping process. After making the connection between your website and LeadSnap any form submissions will appear in our system immediately. As the leads flow into our system we need to know where to store things. We refer to the process of teaching LeadSnap where to store the information from your form submissions as field mapping. Website forms allow us to create those places for the data to be mapped.

In the picture below, let’s pretend this form is a form on your website that you use to collect new leads for your business. You can see in the graphic, that the form is submitted and then it arrives inside of LeadSnap. As the arrows indicate the fields on your form are aligned with the fields inside of LeadSnap. The mapping process is what makes this possible. During the mapping process, you tell LeadSnap exactly which field you want to store the data from each field within our system.

Important Considerations

There are some very important things to keep in mind with website forms.

  • Every company has a website form. When you first created your company there was an option to select an existing form.
  • You can create as many website forms as you like.
  • You can use the same website form for as many companies as you like or have a unique one for each company.

Form Builder

  • Each field you create within the website forms form builder creates a new column. Avoid making duplicate columns as this can lead to confusion when viewing and searching columns.
  • Use the pre-defined fields whenever possible.
  • Custom fields have different icons and IDs associated with them.

Where are Website Forms?

Website forms are a part of the lead management module, so you can find them under the leads menu on the left side navigation.

  1. Expand Leads from the left navigation
  2. Select Website Forms 
  3. Select All Forms

Create a Website Form

There are two different ways you can create a new website form. You can start from scratch or you can duplicate an existing website form and then edit the new form.

Add a new website form:

  1. Expand Leads from the left side navigation
  2. Expand Website Forms 
  3. Click Add New Form


Duplicate website form:

  1. Expand Leads from the left side navigation
  2. Expand Website Forms 
  3. Click All Forms
  4. Click Duplicate next to the form you would like to copy

Edit a Website Form

  1. Expand Leads from the left side navigation
  2. Expand Website Forms 
  3. Click All Forms
  4. Click the Edit button next to the form you would like to edit.

This launches the form builder for the associated form.

Which Form Is My Company Using?

  1. Expand Settings from the left side navigation
  2. Expand Companies
  3. Click All Companies
  4. Click the Edit button next to the associated company.
  5. The form being used by this company is listed in the Website Form box.

Switch Website Forms

  1. Expand Settings from the left side navigation
  2. Expand Companies
  3. Click All Companies
  4. Click the Edit button next to the associated company.
  5. Select a new form from the Website Form dropdown box.

GMB Management Overview

The GMB (Google My Business) management module allows you to manage almost all aspects of your GMB from one centralized dashboard.

What Does GMB Management Include?

  • Updating your GMB details from within LeadSnap.
  • Add and removing photos.
  • Replying to reviews.
  • Replying to questions and answers.
  • Making and scheduling posts.

Is the GMB Management Module safe?

Making changes to your GMB through LeadSnap GMB management module is considerably safer than using the normal Google My Business dashboard. We are an approved Google My Business API vendor and we adhere to all of Google’s guidelines for functionality and usage.

Client User Access

You can provide your clients access to LeadSnap which can be a nice value add for both providing transparencies, reporting and giving your clients a CRM they can use to stay organized with their business. Clients are given access on a company level. As you GMBs are associated with companies, if you have provided your clients with the access and you have an active subscription to a GMB location they will be able to see your GMB when they log in.

In order to prevent clients from accidentally creating a suspension issue, we have removed their ability to edit any of the information on the GMB details tab. Clients do have the ability to add photos, reply to reviews, answer questions and answers as well as make, schedule, and edit posts. This should allow you and your client to work as a team and improve the visibility of your GMB with accurate responses to questions, personalized responses to reviews, and real photos from the field (geotagged to their locations).

Step By Step Guides

For step by step guides and a deep dive into all the bells and whistles of the GMB management module check out the tutorials in the sections below.

To get started you will need to have added the associated Google account with your GMB to LeadSnap. If you need some instruction on this process check out the Connect Google Account article in our help section.

Expand Google from the left side navigation menu and choose Google Accounts.

To view the locations that are associated with this account click the “view locations” button. This screen will show you all the locations that are associated with the selected account.

There are two important steps that should be completed to take full advantage of your newly added location.

  1. Attach the GMB to a company.
  2. Activate the GMB.

Attaching the GMB to a company creates a connection between the location and a company within your account. This connection is used in many parts of the application such as the reputation and lead management modules.

To attach the company the click the blue button that says attach company and type the first few letters of the company which is associated with this location. As you type you should see a list of the companies that have text that match what you have typed. Select the company from the list and click save changes.

If you have not created the company yet. Please create the company and return to this screen to make the connection.

After the company has been attached you will notice the blue attach company button in the company column has been replaced by the name of the company that you attached if you ever need to change the company or you made a mistake and chose the wrong company you can edit that within the location details of this GMB.

In order to start using the GMB management for a location, you must activate the location. This requires a subscription which can be purchased in a few different ways. We sell subscriptions for GMB management in individual units or as a part of a package plan. Check out the LeadSnap store for the latest options. When you activate a GMB location you are making the association between the location and a subscription. If you have credits for this module the activation will use one of these credits.

To activate the location choose the activate button and then click the confirm button.

The first screen you will arrive at after clicking view location is the location details tab.

This tab shows you all the details that are associated with your Google My Business. All of these can be edited from within this screen.

Each time you access the location details screen we sync your live information from your Google My Business with the information we have stored in our system.

Location Status

You can check the status of your GMB by looking in the top right corner. You will see one of these three options:

Client Access

As mentioned above, clients can view but not edit the details of this tab if all of the following conditions are met:

  • You have an active subscription for a GMB location.
  • You have granted your client access to the company associated with the GMB.

Making Edits

Notice each section has it’s own edit button. If you see some information in one of the sections that needs updated you can select the edit button and it will open up a popup menu where you can adjust the associated information.

Most changes to the GMB will NOT trigger a re-verification, but there are a few which will. We have provided multiple warning messages around the ones that we suspect might cause this. LeadSnap is not responsible for changes you make that trigger a new verification from Google. 

A re-verification will require requesting a new postcard from Google (usually 3-5 business days) and entering the code within the postcard. During this time period, your GMB will not be visible in searches. We have built-in multiple confirmation steps on the GMB location details that are likely to trigger a new verification. 

No changes are submitted to Google until you confirm both warning messages. We have put these systems in place to avoid any accidental changes that could cause trouble for you or your Google My Business Location.

Location Details

The location details section displays and allows editing of the following areas:

Name – this is the name associated with the GMB.

Phone – the phone number associated with the GMB.

LeadSnap Company – this is the company that you attached the location to. If you need to make assign your location to another company within your LeadSnap account click the edit button on the right side of the menu.

Primary Category – the associated category of your Google My Business. For more information on Google’s business categories check out Google’s documentation.

Secondary Category – if your business covers more than just one category you can select a second business category.

Address Details

Making any changes to the fields in this area will almost certainly trigger a re-verification from Google. 

Address– The street address of the location where the GMB is set up. This is where the postcard will be mailed if you make a change to this setting. 

Postal Code– the postal code associated with the GMB location.

City– City where the GMB is located.

State/RegionThe state or region associated with the location of this GMB.

Working Hours

This area allows you to view and adjust the working hours of your Google My Business location. To edit these hours click the edit button in the top right corner of this section. The toggle switch on the left side allows you to set whether the business is open or closed on that day. The boxes on the right side allow you to set the open and close time for the specified day.

Special Hours

Just to the right of the working hours, you can set special hours which are exceptions to the normal hours. This is often used to set holiday hours or other events that are an exception to the normal working hours.

Business Description

From the business description area, you can adjust the settings for the following items.

Opening Date – this is the opening date of this location for your business.

Services Areas – this is where you can set the geographical areas that this location can service.

Business Description – this area allows you to provide a description of the business that you provide. It is common practice to weave some of the terms you would like your GMB to rank for in this area. The business description is limited to 750 characters by Google.

Website URL/IDs

This area of the details displays your website URL along with a few other things that can be hard to find such as your Google Place ID, your Google Maps link, and a link to where you can request reviews. If you choose to edit this section you will notice the only area that you have access to edit here is the website URL field. The others are all assigned by Google and they do not provide a way to edit these.

The media section allows you to view, delete, edit photo categories, and upload additional images directly to your GMB.

You will notice on the right side there is a list of photo categories. These categories vary based on a few different variables for your business such as the business type.

Uploading Photos

To upload a photo or photos choose the Add photos button from the top right corner. Choose the desired category for your new photo.

Next, you can drag and drop a photo onto the Upload Image square or you click in the center of the square to browse the files on your computer and select a photo or photos.

If you are image or images uploaded correctly you should see them in the window just above the drag and drop box.

Uploading a photo does not guarantee Google will accept your photo. Google always has the final say on what they choose to approve. There may be a delay before the photos you upload are visible on the internet as Google has its own approval process. In many cases Google will reject photos, this is beyond our control. If you do not see your photos after a few days please check the Google photo specifications or try another photo.

If you are satisfied with the image or images and you have selected the correct category you can click the save button to start the Google approval process.

Editing Photos

If you would like to edit any of the photo categories you can do so by choosing the pencil icon which is located just to the right of the delete button in the top right corner of each photo. After clicking the photo you would like to edit you can select the category you would like to move the photo to and click the save button to apply the change.

Deleting Photos

If you decide that you no longer want a photo to be a part of this Google My Business Location you can remove the photo by clicking the x in the top right corner of the photo than confirming that you want to remove it on the popup menu.

To access the review section of the GMB management click the reviews tab at the top of the screen.

The Google Reviews tab allows you to see the list of reviews associated with your Google My Business location and reply to reviews. The reviews are listed in reverse order of the date they were created with the newest reviews being listed at the top.

Reply To Review

To reply to a review click the reply button and type your reply. off to the right side click the “post reply” button.

After replying to a review your reply will not be made live right away as Google has a review process that must take place before the review is live. This process usually only takes a few minutes but it could longer depending on Google’s reply approval process. You will notice there is a pending message that appears while we wait for the reply to go live.

After replying to a review your reply will not be made live right away as Google has a review process that must take place before the review is live. This process usually only takes a few minutes but it could longer depending on Google’s reply approval process. You will notice there is a pending message that appears while we wait for the reply to go live.

To access the Questions and Answers section click the “Questions and Answers” tab from the top navigation menu.

Very similar to the reviews this section allows you to reply to questions that have been asked by people on your Google My Business listing.

Due to Covid-19 Google has temporarily removed this functionality. 

To access the posts section of the GMB management click the Posts tab from the top navigation.

You can publish your offers, events, products, and services directly to Google Search and maps by creating posts here. For more information about  Google, posts check out their help article: Post On Google as a local business.

Client Onboarding Overview

Video Overview

The Client on-boarding or questionnaire module allows you to collect information from your clients in a professional organized way.  Requests are sent to the client by email and stored in our system on the client’s user dashboard under the questionnaires tab. Using the form builder you have the freedom to build the questionnaire with all the information you decide is important.

Why Use This Module?

  • Very professional start to a new client. This let’s them know from the start that you have done this enough times that you wanted a system to help with the process.
  • Keep everything organized in one place. Adds to the client profile for you and your entire team. These questionnaires can always be called upon later when you details on the specifics of a clients business. As your list of clients continues to grow you will need a system to keep their info straight.
  • Never ask the same question twice.
  • Never forget to ask a question.
  • Unlimited questionnaires for your clients.

Create a new questionnaire

  1. On the left menu, expand the “Client On-boarding” item and then choose “create questionnaire”.
  2. Questionnaire Name – an internal field that is just used for you to identify your questionnaire.
  3. Email Subject – sets the subject of the questionnaire invitation email sent to your client.
  4. Email Content – sets the email body message for the client invitation.
  5. Sender Email – set the email address the invitation for the questionnaire was sent from.
  6. Sender Name – sets the name of the person sending the invitation to the client.
  7. Create the form by adding fields from the right side to the left side. Check out the form builder documentation area for in-depth instructions on how the form builder works.
  8. Click save to save your new form.

Send Questionnaire invitation to a client

  1. On the left menu, expand the “Client On-boarding” item and choose “All Questionnaires”.
  2. Select the invite by email button next to the questionnaire you would like to send to your client.
  3. Enter your client’s first name. If you have already created the client within LeadSnap it will pull up their name and auto-fill their email address. When they complete the questionnaire the questionnaire will automatically have the association with your client.  
  4. Enter the email address where you would like to send the questionnaire to.
  5. If you chose an existing client, the questionnaire will be available in the questionnaires tab of the associated user dashboard.

View Completed Submissions

  1. On the left menu, expand the “Client On-boarding” item and choose “All Questionnaires”.
  2. Select the view submissions button next to the questionnaire you would like to check the associated submissions.
  3. The next page will display a list of users that have completed the associated questionnaire. If you do not see the user you are looking for on this screen they have not completed the questionnaire you sent them.