Add New Website Form

This support guide explains the functionality and how to use the Website Forms section of the Leads Management module.

Step by Step Guide

To access this section, click on the Leads header in the left hand navigational menu. This will then expand the module and display all the sections available to you. Click on “Website Forms” and this will expand to display the options available to you.

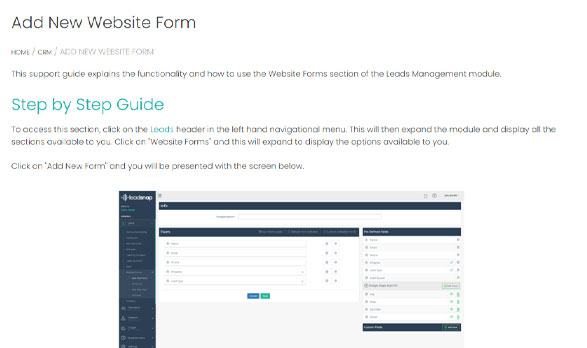
Click on “Add New Form” and you will be presented with the screen below.

Template Name

The first thing you will need to do is to name the template so it can be assigned to Companies to use on their sites.

This is done in the “Info” area at the top of the screen. The Template Name field is the only field situated in the middle of the screen. Enter the name you wish to identify this form. The name would usually reference the company you are going to associate it with, to make it easier to search for and find in the dropdown list.

Form

This area displays all the fields that this form will capture for the company it is assigned to. There are three types of fields and they each have an icon so you can easily recognise them.

  • Non-Removable – These are always on the form by default and cannot be removed
  • Default Non-Editable – These are standard Pre-Defined fields who’s usage and names cannot be altered
  • Custom Editable Fields – These are fields created by you and can be edited and renamed according to yours or the companies changing requirements

The legend is also on the title bar of the area for reference.

Edit Field Settings

Each field has four settings that are configurable, regardless of their type. These are used to determine if the fields are visible to the clients, editable by the clients, included in the lead email that is forwarded and if it is included in the embedded form that appears on the site.

All except one work independently of each other and can be toggled on/off by clicking on the circular button. When the button has a green area showing to the left of the button, the setting is Enabled. When the button has a white area showing to the right of the button, the setting is Disabled.

The “Visible to Clients” setting is the only one that can affect another automatically. If you disable this, and the “Allow Client Editing” is enabled, the it will automatically disable the “Allow Client Editing” as well. This is because it is a logical step to do so. However, it will not enable the client editing when doing the reverse as this is not necessarily a logical step.

Adding Pre-Defined Fields

Pre-defined fields, or system generated fields, are standard for all forms, for example Name or Phone. To ensure the stability and consistency of the system they are also non-editable. They cover your basic information as well as data from Google Maps, which are automatically filled.

You will see a list of the Pre-defined fields on the right hand side of the screen.

To add a pre-defined field you need to click the green circled + sign. This will add it to the bottom of the current list of fields in the Form area. The + will be altered to a grey circled

When a pre-defined field is added, you will see it listed under the Form area and in the Pre-Defined Fields listing you will see a circled tick. This indicates it is now listed on the Form.

Adding Google Maps Group

The group of Google Maps Auto Fill fields have the ability to be added all by the click of a single button. On the group title bar there is an “Add Group” button on the far right.

Adding Custom Fields

Custom Fields allows you the opportunity to create and add niche specific fields to capture data in. The list of these can be found underneath the Pre-Defined Fields on the right hand side of the screen.

When you create your first form, your list of Custom Fields will be blank. Once you’ve added new custom fields, they will be available for you to use across all future forms.

To create a new custom field, you will first need to click on the “Add New” button. This is located at the far right of the Custom Fields header bar.

The Create Field pop-up window will display the options you have to choose from.

Choosing a new Text Field as an example, you are then presented with the configurable attributes related to that field type. For a text field you have the following:

  • Required – Checkbox to enable/disable if this field should be mandatory
  • Label – The title or name given to the field e.g. “Phone”
  • Help Text – Information to the customer to help them add the correct information that sits underneath the field
  • Placeholder – This is the instruction text that will sit in the field but disappear as soon as the customer begins typing
  • Value – Optional default value
  • Sub Type – What type of Text field is it. Standard Text, Email, Password etc

Once you have set all of the attributes, click on Save and the new Custom Field will be added to your list on the right hand side of the screen. If you already have some then the new one will be added to the bottom of the existing list.

To add the new custom field you simply click on the green circled + as per the Pre-Defined Fields. It will be added to the bottom of the Form list and then have a grey circled tick next to it in the list.

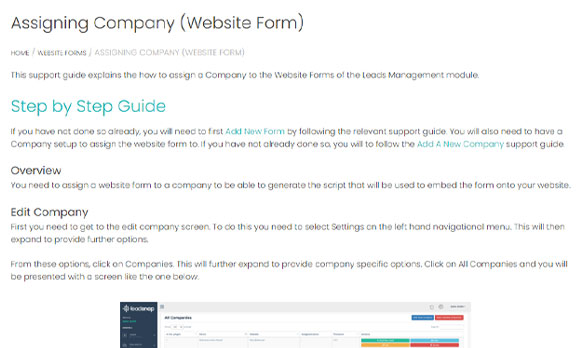
With the form now completed as required, click the Save button. This will save the form and redirect you to the All Forms list under Website Forms menu module.

Embed Form

Google is incorrectly identifying our embedded form as malicious software which can cause your ads to be suspended. Please refrain from using our Embedded Forms with Google Ads until we have a resolution.
Sorry for the inconvenience, we are working hard to get this resolved ASAP. For now, the workaround is using this Zapier Connection.
Sincerely, LeadSnap Support Team

This guide is an overview of the embed form option. The process is pretty simple, first, you build and customize a form within LeadSnap. Next, you copy a small piece of code and it onto your website. Wherever you paste the code that is where your form will appear. This creates a direct connection to LeadSnap. As users fill out the form on your website their submissions will be available immediately within our system.

Video Overview

Benefits of the Embed Form Option

  • Can work with any type of website
  • Quick and easy to set up
  • No software conflicts with Google Ads
  • Allows country-level IP address filtering
  • Form submissions instantly available within LeadSnap

Website Forms

Before we dive into the embed form option, it is necessary to have a good understanding of website forms. We will cover it briefly here but it is recommended that you read through the website forms documentation to gain a solid understanding of the role they play within the lead management module and how they relate to embedded forms.

Every company has an associated website form. When you first created your company you were given a choice of which form to use. You can create, edit, or change the website form at any time. Your website form is composed of fields, these fields align with the fields on your website. For each new field that you create on a website form, it creates a column, similar to a column on a spreadsheet to store values from your website. These columns are able to searched, filtered, sorted, and used in reports throughout the lead management module. It is recommended to reuse the same fields in different forms whenever possible.

The website form associated with your company is the starting point of your embedded form. From the edit form page, you can customize the visibility of the fields as well as the types of fields and their options. The integrations page will allow you to further control the behavior of the embedded form and styling through the use of custom HTML or CSS.

Step by Step Guide


Creating an Embed Code

You will first need to go to the Integrations module in the left-hand navigational menu. Click on Settings, this will expand and provide you further options. Then click on Integrations and you will see a screen similar to the one below.

Click on the EMBED FORM button on the Embed box. This will take you to the Create Embed Code screen

You need to first select the Company you wish to create an embed code key for. Click on the dropdown arrow at the far right hand side of the Company field.

This will present you with a list of all the companies you have setup. Scroll down to the one you want and select it.

With the company selected you will now need to click the Submit button to create a new embed code key.

A dialog box will pop up offering you three options. This is where you choose how the site should respond to the customer once they have completed and submitted your form.

The Redirect URL allows you to the page you would like to send users to have they submit a form, such as a thank you page.

For something more simple, the Success Message will simply display the text you enter here in place of the form when they have submitted it.

You only can add ONE of these options. You must not only complete the field but click on the option you want to use so that you have a blue circle next to it.

If you do not select any of the options, or you skip this part, the system will provide you with a generic “Thank you for Submitting” message.

For the purposes of this support guide, we will use the Success Message.

Finally, for those code gurus out there, you have the option of adding some HTML and CSS to further customize the style of the form.

When you click on the Save button you will then be presented with a Create Embed Code pop up screen. This will have your newly created embed code key and instructions on how to use it.

Click on the Copy Script button will put the script into your system clipboard. It will also display a “Script copied Successfully!” message underneath the script window.

Embedding Code in Site

Now you have created the form and the embed script, you need to add it to your site.

Weebly

Scroll down the tools in the left hand side until you find the “</> Embed Code” widget. Drag this onto your page. Clicking on it will bring up the Custom HTML options. Select “Edit Custom HTML”, this will enable you to add the embed code you created earlier.

Paste the embed script from your form into the script area and click outside of the box. This will save the editing and connect to the LeadSnap system and fetch the form you created.

Don’t forget to publish your changes so you don’t lose them.

WordPress

Click on Pages and select the page you want to embed the form on.

Select the “Text” tab and paste the embed form code into the text field.

Finally Click on the “Save Draft”, “Save as Pending” or “Update” button, depending what state your current page is in development, to make sure you don’t lose the changes.

Click on Preview and you will now be presented with your page displaying the new embedded form.

Assigning Company (Website Form)

This support guide explains the how to assign a Company to the Website Forms of the Leads Management module.

Step by Step Guide

If you have not done so already, you will need to first Add New Form by following the relevant support guide. You will also need to have a Company setup to assign the website form to. If you have not already done so, you will to follow the Add A New Company support guide.

Overview

You need to assign a website form to a company to be able to generate the script that will be used to embed the form onto your website.

Edit Company

First you need to get to the edit company screen. To do this you need to select Settings on the left hand navigational menu. This will then expand to provide further options.

From these options, click on Companies. This will further expand to provide company specific options. Click on All Companies and you will be presented with a screen like the one below.

Scroll down and find the company you wish to assign the website form to. You will need to click on the Edit button at the far right hand side of company’s row.

You will now need to click the dropdown arrow on the Website Form field. This will present you with the list of forms you have created.

Select the form you wish to assign to the company. To save this you will have to click the Update button towards the bottom of the screen.

Returning to the All Forms listing, via Settings on the left hand navigational menu, you will now see the form has the company associated.

Feedback Funnel

This support guide explains the functionality and how to use the Feedback Funnel component of the Funnel section in the Reputation Management module.

Step by Step Guide

To access this section, click on the Reputation Module header in the left hand navigational menu. This will then expand the module and display all the sections available to you. The very first one is “Funnel”, click on this and the default Review Funnel will be displayed. Click on the Feedback Funnel option at the top left of the screen.

Overview

The importance and impact of positives reviews is obvious. What is equally important though is the impact of a negative review. A negative reputation sticks in the mind of customers more than a positive one.

Let’s put this into something tangible for you to consider:

  • It is estimated that 90% of people are more likely to trust and buy from a brand recommended by a friend
  • a satisfied customer will tell approximately 4 to 6 people
  • a dissatisfied customer will tell approximately 9 to 15 people

And it is the last point that the Feedback Funnel aims to address. Instead of allowing the customer to leave a negative response to the Review Request, it will instead direct them to the Feedback Funnel. This enables you and the client to intervene, prevent the negative review going public and have a chance of rectifying the issues with a view to gaining a more positive review.

Selecting the Company

First you need to ensure you are working on the correct company’s Feedback Funnel. To change the company you need to go to the top right hand corner of the screen and click on the arrow in the dropdown menu, scroll down and click on the company you wish to configure.

You can change the company you are working on from all three of the component screens (Review Funnel; Feedback Funnel and Review Sites) in the Funnel section.

Editing the Company

Once selected, you now also have the option of editing the company information from the Funnel. This can also be done from any of the component screens in this section.

Clicking the button will take you directly to the Edit Company screen that you can would normally have to navigate to via the “Settings-Companies-All Companies” navigational menu.

Once you have updated your company information, you will need to click on the Update button. A green banner at the top of the screen will indicate that the information has been updated successfully.

To return to the Funnel section, you will need to go through the navigational menu again by selection “Reputation – Funnel” and select the Feedback Funnel from the menu at the top left of the screen.

Configuring the Header

Your next step should be to setup the header to your Feedback Funnel request form. At the top right of the header section you will see a pencil icon. By clicking this it will open a pop-up screen that will give you the option of editing the Heading Text; Subtext and the colour of the heading banner.

Once you have made the changes then you need to click the “Save Changes” button to apply them to the Feedback Funnel template. If you decide you want to make further changes then simply click on the pencil icon again and make them, remembering to click the “Save Changes” button.

Configuring Heading and Subtext

The next section you can edit is the call to action text on the page. At the top right of the central text field you will see a pencil icon. By clicking this it will open a pop-up screen that will give you the option of editing the Heading Text and Subtext.

Once you have updated these components you will need to click “Save Changes” to apply them and return to the Review Funnel template. If you decide you want to make further changes then simply click on the pencil icon again and make them, remembering to click the “Save Changes” button.

You have now completed the Feedback Funnel setup. If you are configuring this company’s Funnel for the first time then you will need to complete the Funnel setup by following the “Review Sites” detailed support guide.

Review Sites

This support guide explains the functionality and how to use the Review Sites component of the Funnel section in the Reputation Management module.

Step by Step Guide

To access this section, click on the Reputation Module header in the left hand navigational menu. This will then expand the module and display all the sections available to you. The very first one is “Funnel”, click on this and the default Review Funnel will be displayed. Click on the Review Sites option at the top left of the screen.

Overview

The final piece to the Funnel component is adding the Review Sites you wish to direct the Leads to. You MUST remember to set this up because failing to do so will leave your Leads with nowhere to leave a review and this could turn a positive experience into a negative one.

The review sites are most often your Facebook Page, GMB or a directory listing such as Yelp. These three sites are listed for you and the Icons will be displayed when you add your specific link.

You can also add Custom Links for other review sites you may be using, such as TripAdvisor for example.

Selecting the Company

First you need to ensure you are working on the correct company’s Review Sites. To change the company you need to go to the top right hand corner of the screen and click on the arrow in the dropdown menu, scroll down and click on the company you wish to configure.

You can change the company you are working on from all three of the component screens (Review Funnel; Feedback Funnel and Review Sites) in the Funnel section.

Editing the Company

Once selected, you now also have the option of editing the company information from the Funnel. This can also be done from any of the component screens in this section.

Clicking the button will take you directly to the Edit Company screen that you can would normally have to navigate to via the “Settings-Companies-All Companies” navigational menu.

Once you have updated your company information, you will need to click on the Update button. A green banner at the top of the screen will indicate that the information has been updated successfully.

To return to the Funnel section, you will need to go through the navigational menu again by selection “Reputation – Funnel” and select the Review Sites from the menu at the top left of the screen.

Configuring the Header

Your next step should be to setup the header to your Review Sites request form. At the top right of the header section you will see a pencil icon. By clicking this it will open a pop-up screen that will give you the option of editing the Heading Text; Subtext and the colour of the heading banner.

Once you have made the changes then you need to click the “Save Changes” button to apply them to the Review Sites template. If you decide you want to make further changes then simply click on the pencil icon again and make them, remembering to click the “Save Changes” button.

Adding Review Websites

You will initially see a message stating “No Websites Added” and a dotted rectangle with a plus sign in a circle below it. To begin adding review websites, click on the Plus sign.

Facebook/Google and Yelp Review Sites

The above 3 sites are already configures in terms of image file and name. All you have to do is enter your Company’s specific Review Link and it will added as a site option for the lead when adding a positive review.

Custom Review Sites

You can add any review site you are using for your company by using the “Custom Link” button on the Adding Review Sites dialog box. You will need to name the site appropriately, so leads can recognise the site clearly, and a logo file so that they can visualise it easily.

Connect Google Account

In this tutorial, we will show how to connect your Google account with LeadSnap. This connection will allow you to manage all aspects of your Google My Business or GMB from within our platform. You can make edits, upload photos, respond reviews, view questions, schedule GMB posts, view the data from Google Insights as well as get real time notifications on any GMB event such as a review or suspension.

In addition to managing your GMB this connection also provides additional functionality within our reputation management and heat map modules. Regardless of how you plan to take advantage of this connection make sure you have the company created within Leads Generated before getting started.

Video Walkthrough

Step-by-Step Guide

1 . To connect your account expand the Google menu item from the left navigation and select Google Accounts.

2. In the top right corner click the button that says Add new account.

3. In this popup window enter the email address associated with the account you would like to connect to our system and click save.

4. Now you will have to re-enter the same email address and click on the Next button.

5. The following screen will request that you enter your password for this email account.

6. On the next screen you will need to give Leads Generated permission to manage your google my business account. Note this does not give permission to your email account in any way, only your Google My business. Click the allow button, some of you may have an extra step to authenticate depending on your google settings.

7. Your Google account has now been connected with LeadSnap and will be listed at the top. Click the view locations button from the right side to view the GMB locations associated with this account.

8. In this case, we only have one location associated with this email account. If you do not see a location listed here, please login to the associated gmail account.

9. Assuming you have a GMB associated with your email account the next step is to associate this location to a company within leadsnap. To do this click the attach company button in company column on the left

10. Type in the first few letters of the company, select the company you wish to associate with this GMB and click on the Save Changes button.

Notice the attach company button has been replaced with the company name in the company column. Before you can take advantage of GMB management you must activate your GMB within our system. To activate it, you will need a subscription for this GMB or a plan that includes GMB management.

11.  Assuming that is the case, click the Activate button and then choose confirm.

12. Your location is now activated, and you can click on the new View button to begin any GMB management tasks. This will also enable your location at many other parts within the app assuming you have the associated modules.

13.  Congratulations! You are fully connected and can now manage your GMB location within LeadSnap.

Check out the videos in our help section for GMB and Reputation management for additional information on how your connected GMBs can be used within these modules.