Differences between user roles

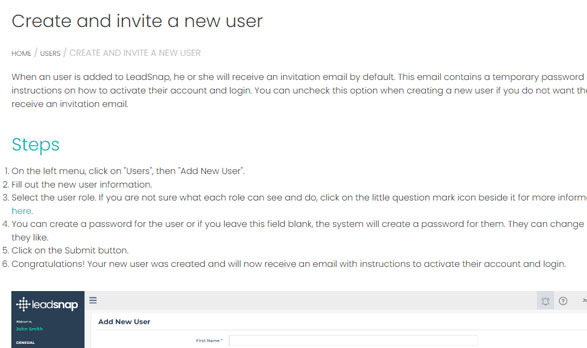
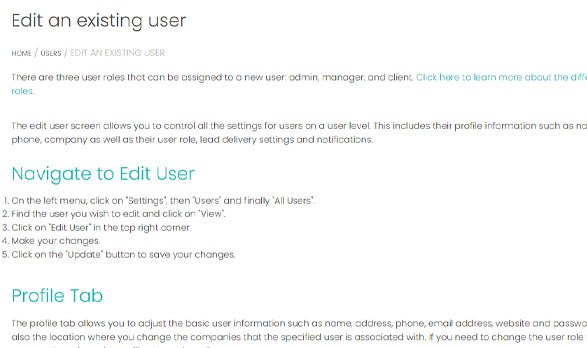
LeadSnap has three different user roles that can be assigned.
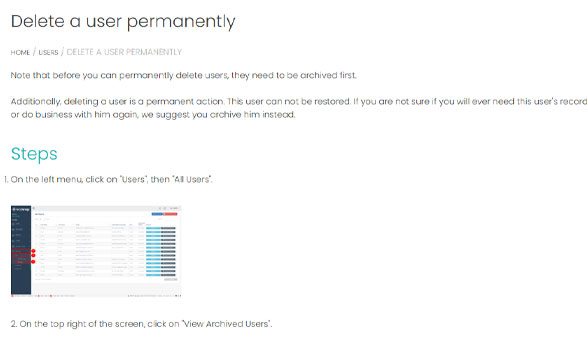
Admin

The admin user role has is the account owner and has full capabilities within the account. Admins have the ability to change the details of the account, create new users of any role as well as deleting users.

Manager

Managers are part of your agency with access that can be limited on a company basis. Your managers will have the ability to perform any of the following tasks within the companies that have been assigned to them.

  • Add clients
  • Can edit other managers and client accounts
  • Edit assigned companies
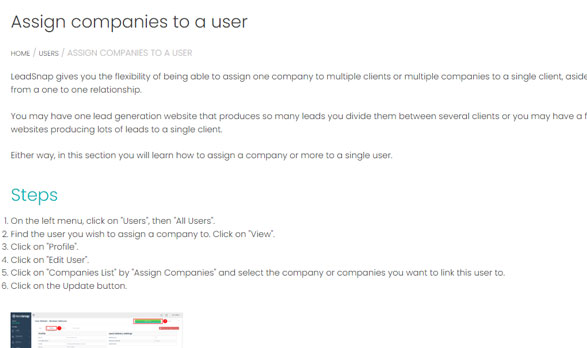
  • Assign a company to a manager or client
  • Add new leads (within assigned companies)
  • View leads (within assigned companies)
  • Edit existing leads (within assigned companies)
  • Delete leads (within assigned companies)
  • Assign leads (to assigned companies)

Client

The client role provides access to the clients of the account owner or admin. The client role is the role with the least amount of privileges.  This role has the ability to login and see the leads that have been assigned to their user role.

  • Add new lead
  • View assigned leads
  • Edit existing leads assigned to their account.
  • Delete leads assigned to their account.

Edit an existing user

There are three user roles that can be assigned to a new user: admin, manager, and client. Click here to learn more about the different user roles.

The edit user screen allows you to control all the settings for users on a user level. This includes their profile information such as name, email, phone, company as well as their user role, lead delivery settings and notifications.

Navigate to Edit User

  1. On the left menu, click on “Settings”, then “Users” and finally “All Users”.
  2. Find the user you wish to edit and click on “View”.
  3. Click on “Edit User” in the top right corner.
  4. Make your changes.
  5. Click on the “Update” button to save your changes.

Profile Tab

The profile tab allows you to adjust the basic user information such as name, address, phone, email address, website and password. This is also the location where you change the companies that the specified user is associated with. If you need to change the user role for a user, you can do so from the profile tab on the edit user screen.

Lead Delivery Settings Tab

This tab is only available for the client user role. Any companies that are assigned to the user will be listed on this screen.

Auto-Forwarding – From this screen you can adjust the auto-forwarding settings for a user on a company level. You an make this same adjust on a user level from the edit company screen.

Email Leads – The email leads box allows you to designate the receiving email address for leads associated with this client. By default we will select the email address provided for the client when the client is created however you can adjust that here. It is required to have at least one email address for this field. As many clients like to have their leads sent to multiple email addresses you do have the option to add several email addresses to this field.

Notification Settings Tab

The notifications tab allows you to set notifications for companies and GMB on a user level. Users have the ability to manage their notifications and admins also have the option to manage the notifications for users. In-App notifications will trigger the notification bell in the top right corner and the email notification will send an email to the email address associated with the user’s profile tab.

Notification Bell

Assign companies to a user

LeadSnap gives you the flexibility of being able to assign one company to multiple clients or multiple companies to a single client, aside from a one to one relationship.

You may have one lead generation website that produces so many leads you divide them between several clients or you may have a few websites producing lots of leads to a single client.

Either way, in this section you will learn how to assign a company or more to a single user.

Steps

  1. On the left menu, click on “Users”, then “All Users”.
  2. Find the user you wish to assign a company to. Click on “View”.
  3. Click on “Profile”.
  4. Click on “Edit User”.
  5. Click on “Companies List” by “Assign Companies” and select the company or companies you want to link this user to.
  6. Click on the Update button.

Video Tutorial

Need more details or just want to see how it’s done? Watch the video below.

Archive a user

You can archive and permanently delete users. Leads associated with an archived user will also be archived. Archived users can be restored and leads that were previously assigned to them will also be restored at that point.

Leads assigned to permanently deleted users will remain in the system as their main association is with the company they are linked to.

Steps

  1. On the left menu, click on “Settings”, then “Users” and finally “All Users”.

2. Find the user you wish to archive. Then click on “View”.

3. On the top right of the screen, click on “Archive”.

4. A popup window will show up to confirm you really want to archive this user. Note that if you archive a user leads associated with him or her will also be archived.
Click on the “Confirm” button to go ahead and archive this user.

Delete a user permanently

Note that before you can permanently delete users, they need to be archived first.

Additionally, deleting a user is a permanent action. This user can not be restored. If you are not sure if you will ever need this user’s records or do business with him again, we suggest you archive him instead.

Steps

  1. On the left menu, click on “Users”, then “All Users”.

2. On the top right of the screen, click on “View Archived Users”.

3. Find the user you wish to delete then click on the “Delete Permanently” button.

4.  A popup window will show up to confirm this action.

5. Click on the “Confirm” button.

Video Tutorial

Need more details or just want to see how it’s done? Watch the video below.

Connect Clients and Companies

Companies are a central building block within the LeadSnap platform. When you first create a company it will not have many of the associations necessary to take full advantage of our system. One of the first connections you will want to make is the connection between the client and the company. This is a quick and simple process.  Like many things in LeadSnap, there are several ways to do things. You can either assign the client to the company or the company to the client.

Why Connect Clients and Companies

  • Leads get auto-assigned to clients as they arrive or are created.
  • Allows for auto-forwarding of leads to clients.
  • Clients can only see the leads they are assigned to when they log in.
  • Allows for automated reporting of “Leads by Client” throughout our lead management module.


Assign Company to Client

  1. Settings from the left navigation menu.
  2. Expand companies from within the settings menu on the left navigation menu.
  3. Select All Companies.
  4. Select the Edit button next to the company for which you would like to assign a client.
  5. Click into the “Assign Clients” box and you should see a list of the clients you have created within LeadSnap.
    1. If your client is not listed here, please see the help article on creating new clients. 
  6. Click Update at the bottom of the screen to save your changes.

Assign Client to Company

  1. Settings from the left navigation menu.
  2. Expand Users from within the settings menu on the left navigation menu.
  3. Select All Users.
  4. Select the View button next to the user for which you would like to assign a company.
  5. In the top right corner select the “Edit User” button.
  6. Click the “Companies List” button and click the checkboxes next to the companies you would like to associate with this user.
    1. Note if you do not see your company here than you need to see the help article on creating new companies. 
    2. If you do not have the Assign Companies button, check to make sure the user is not an Admin user as this button will not be visible for admin users. Admin users can see all companies within your account. 
  7. Click Update at the bottom of the screen to save your changes.