White Label Setup

White Label Overview

White labeling LeadSnap allows you to customize the domain address, colors, logos, and branding of LeadSnap to match your own branding. We have divided the setup process into 4 areas:

  1. Domain Setup – rather than your users visiting leadsnap.com to access the platform they will be able to access it through your own domain or subdomain. Setup time: 5 minutes.
  2. Email Account Setup – every white label account is required to have an email account. Since emails will no longer be coming from a LeaSnap email account you must authenticate an email account so messages can be sent to users without exposing the LeadSnap domain. setup time: 3 minutes.
  3. Login Page – This is the page used to log in to the white label version of the platform. These configuration settings on this page allow you to set the logo, text color, button color, background color, and background photo.
  4. System Settings – These settings apply to what the user will see within the platform after logging in through the login page. Through the configuration settings, you can just adjust the logo, favicon, and navigation colors as well as the colors for the buttons and icons throughout the application.Please read within the individual sections below for more detailed instructions on how to adjust each of these areas.

Domain Set Up

  1. Expand settings from the left-side navigation.
  2. Select White Label.
  3. Enter the domain or subdomain into the domain settings box on the domain settings tab.
    1. example: crm.domain.com
  4. Open up your DNS provider which often time will be your domain registrar such as GoDaddy, Namecheap, etc.
  5. Create a CNAME record.
    1. enter the full record into the name field
      1. example: crm.domain.com
    2. enter the following into the target field
      1. cname.leadsnap.com
    3. if you have the option disable “Proxy Status”
    4. Save your settings.
  6. Wait 5 minutes for the update to propagate.
  7. Load the website address you have entered for the white label to test things.

Configure White Label Email Account

To prevent the exposure of the LeadSnap domain to your white label users an email account is required. You can select which email address you use as your default email for communications from the system to your users. There are two things you need to do in order to set up an email account. First, you must add the email account, and second, you must select the email account you have added as the default email for your white label instance.

Part 1: Adding an email account

Please refer to the following article for instructions on adding an email account.

Part 2: Assign email account as default for white label

  1. Expand settings from the left navigation.
  2. Select White Label from the settings menu.
  3. Select the email settings tab from the top horizontal navigation.
  4. Select the email address from the dropdown menu that you would like to use for white label communications.
  5. Click the save settings button.

Configure Login Page:

These settings allow you to configure the login page of your white-labeled version of LeadSnap. You can change the background color, text color, sign-in button color, and even add a background photo.

  1. Expand settings from the left navigation.
  2. Select the White Label option from the settings menu.
  3. Select the Login Page tab from the horizontal menu across the top.
  4. Upload your logo from your computer.
  5. Select the text color, button color, and background color by clicking the color clicker or typing in a color code.

Configure System Settings:

These settings allow you to configure the area within the application after a user logs in. You can adjust the entire branding look and feel of the application. You will notice there are 4 sections that allow you to make adjustments. You can change the logo, favicon (icon inside the browser tab) as well as the left navigation color, text, and background items as well as the buttons and icons throughout the application.

  1. Expand settings from the left navigation.
  2. Select the White Label option from the settings menu.
  3. Select the System Settings tab from the horizontal menu across the top.
  4. Select your desired branding and click update.
  5. Check your updates and adjust.

Logo
this will change the logo in the top left corner and in several other areas. Upload your logo from your computer.

Favicon

The favicon is the small icon that appears within the tab in your browser. Upload the favicon from your computer.

Left navigation/Header menus

  • Text – this is the text color of the selected item in the left navigation menu.
  • Text On Hover – this is the text color when you hover your mouse over an item in the left navigation menu.
  • Background – This is the background color of the left navigation area.

Active Items

  • Background – The background color of the selected item within the left navigation.
  • Text – The text color of the selected item within the left navigation.

Buttons/Icons

  • Background – changes the background color of the buttons.
  • Text – changes the color of the text within the buttons.
  • Icons – changes the color of icons within the buttons.

Importing Contacts

The import contacts feature allows you to import thousands of contacts into our system with a few button clicks. This is great if you have a customer list for reputation management or if you are migrating from a different CRM.

  1. Expand CRM from the left-side navigation.
  2. Select contacts.
  3. In the top right corner of the contact list page, you will see a button that says Template. Click this button to download the contact template spreadsheet.
  4. Add your contacts to the template spreadsheet by filling in their information. It is not necessary to have information in each field however some fields like first name and company are required.
    1. The company must already be created and you must match the company name exactly with how you have it within LeadSnap.
  5. After you have added all the contacts to your template spreadsheet, click save to save your changes to the spreadsheet.
  6. Click the blue import button in the top right to open up the import menu.
  7. Choose the select button from the pop-up menu and navigate to the location of your template spreadsheet that you downloaded on your computer. Select the file and click open.
  8. After the file is selected click import to import the new file.

If successful you should see your new contacts within the contact list.

Check out the video below for a step by step walkthrough on how to import contacts to LeadSnap

Why Are My Calls Not in All Leads?

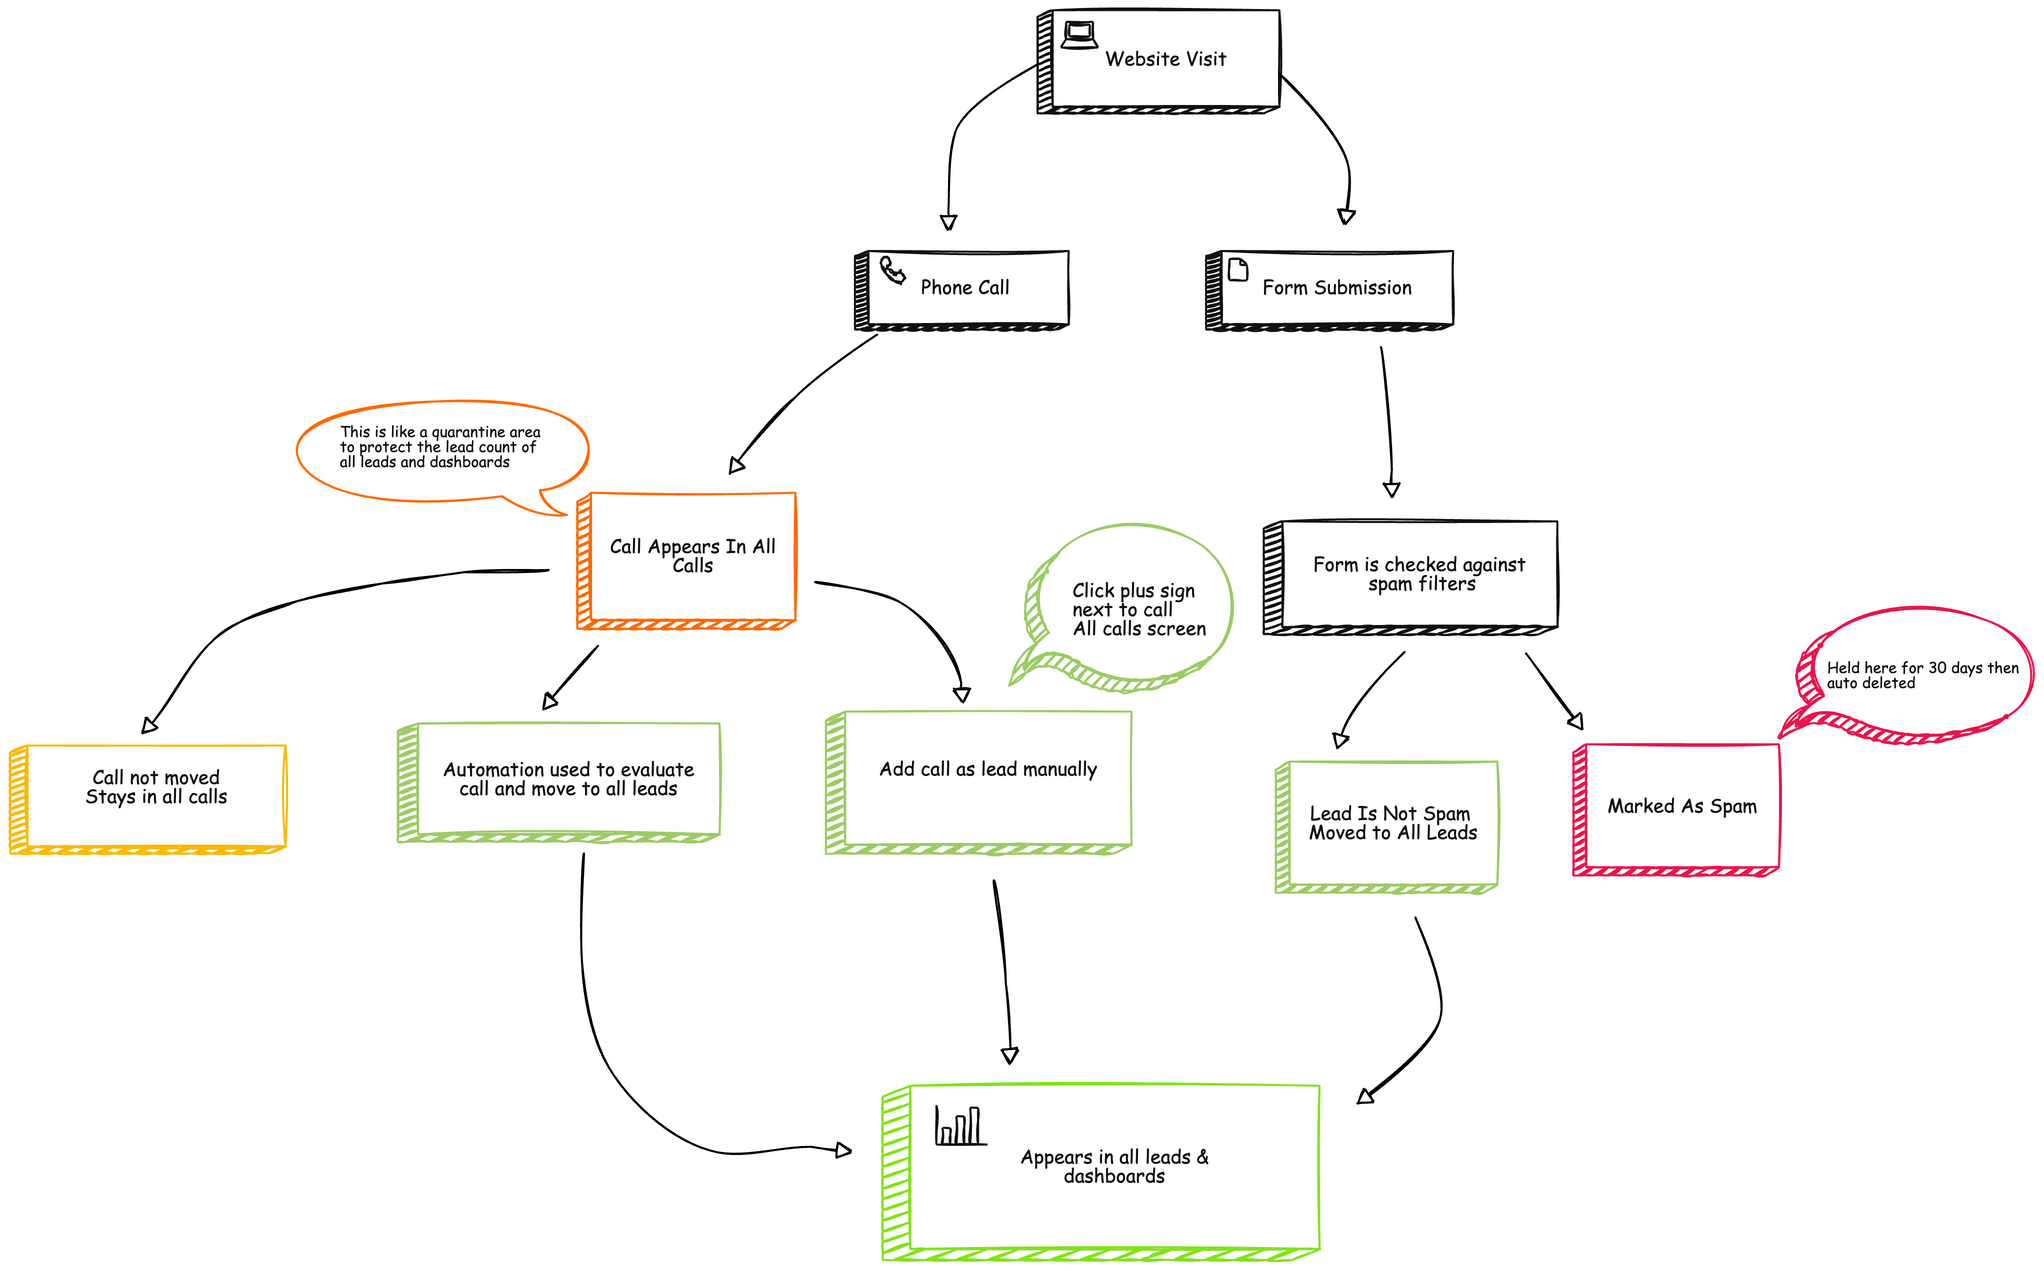
Your calls are showing up within the all calls area but they are not on the various dashboards or all leads area. This has been a point of confusion that we are working to simply. Until then we created this article to help explain how things work and why we did it this way.

With the relentless robocallers and telemarketers we were concerned that the all leads area and dashboards would water down the lead count causing an inaccurate representation of leads. To help combat this issue do not move phone calls to the all leads area by default. This behavior can easily be changed if you prefer it to work this way. The default behavior is to have calls stored in the “all calls” area until approved and moved to the leads area.

The form submission that arrive in the all leads area have been evaluated by our spam filters which help protect the lead count from spammers but without this quarantine the lead count would be inaccurate because of the telemarketers.

The video below will explain this in more detail and show you the two most common ways to move a phone call over to the leads area.

CallRail Integration

What is CallRail?

CallRail is a third party voice over IP phone system that allows you to purchase local phone numbers from around the world and create dynamic workflows for how the calls are handled. While we support the integration with CallRail we highly recommend considering the internal LeadSnap phone system which offers more competitive pricing and additional features throughout the LeadSnap platform that are not available within the CallRail integration.

What Does The Integration Provide?

The integration to CallRail allows phone calls to be brought into LeadSnap in real time for analysis and reporting. You can playback phone calls and have them sorted according to the company mapping.

Before You Start

Before you get started there a few things you should have in place.

  • Active CallRail account with access to said account.
  • You must have the companies created within LeadSnap from your CallRail account in order to map the CallRail companies to LeadSnap. For more information on how to create a company please check out this support article: create company.
  • Your companies within LeadSnap must be activated with the CRM system.

Get the CallRail API Key

Login to your CallRail account.

Select the Settings icon from the left side navigation.

Select Integrations from the top navigation.

CallRail Integrations

Select API Keys from the center menu option.

CallRail API Key

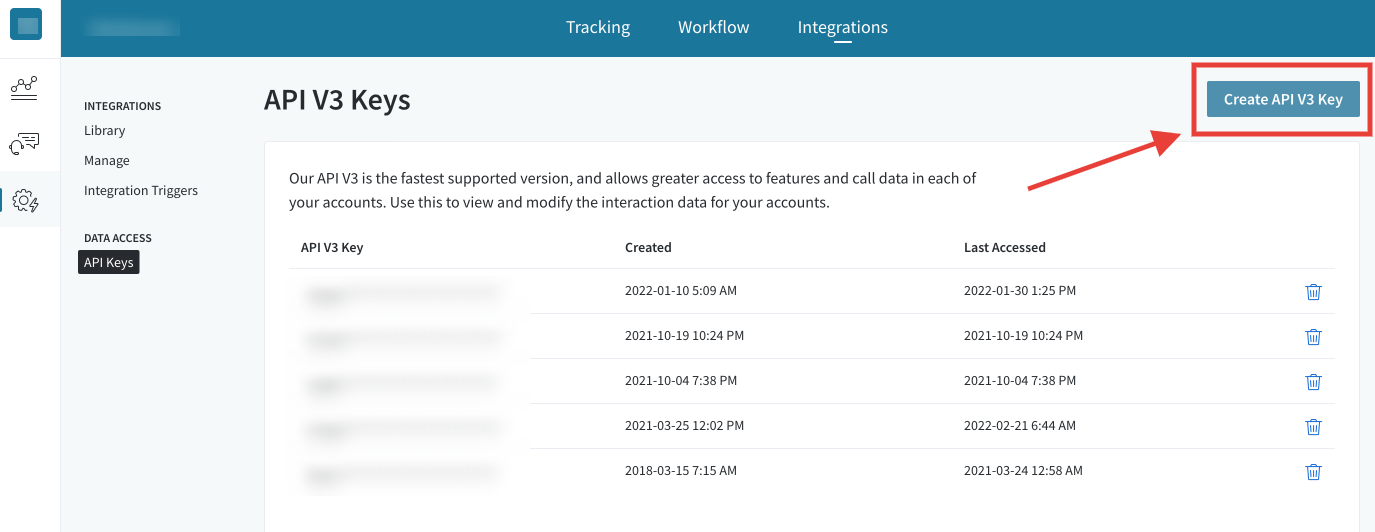
Click the button in the top right that says “Create API V3 Key”.

CallRail Create API Key

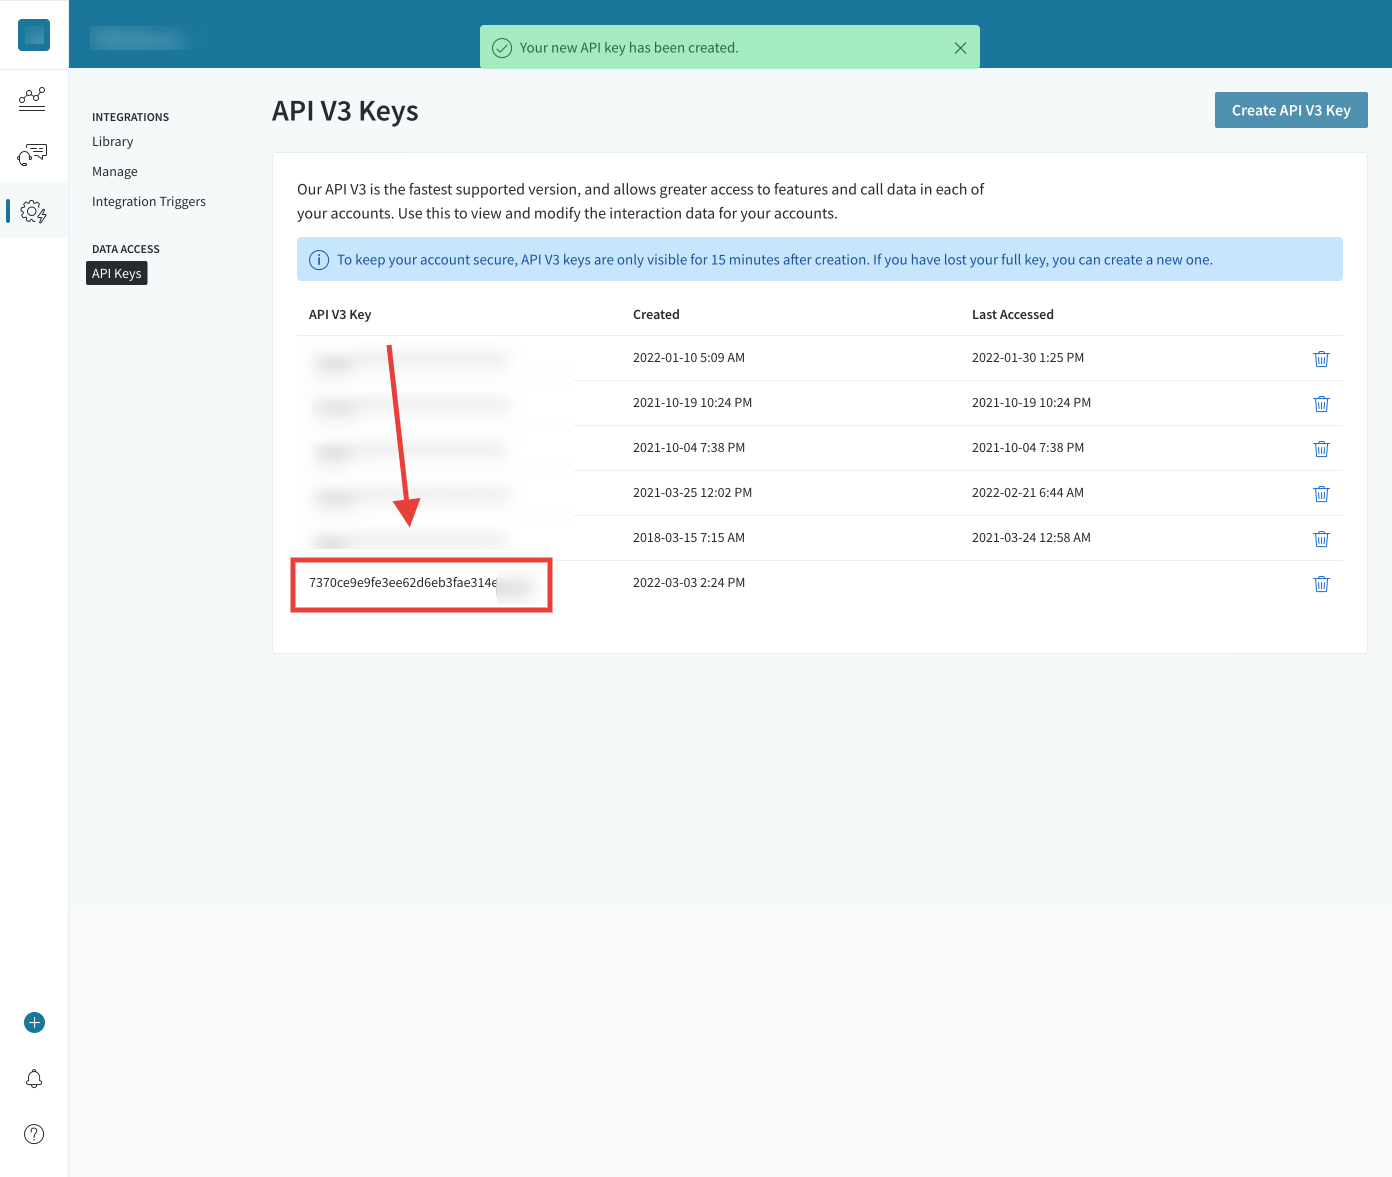
Copy the new API key which should be visible within the API V3 Key Column.

CallRail Copy API Key

Connect CallRail To LeadSnap

Login to LeadSnap

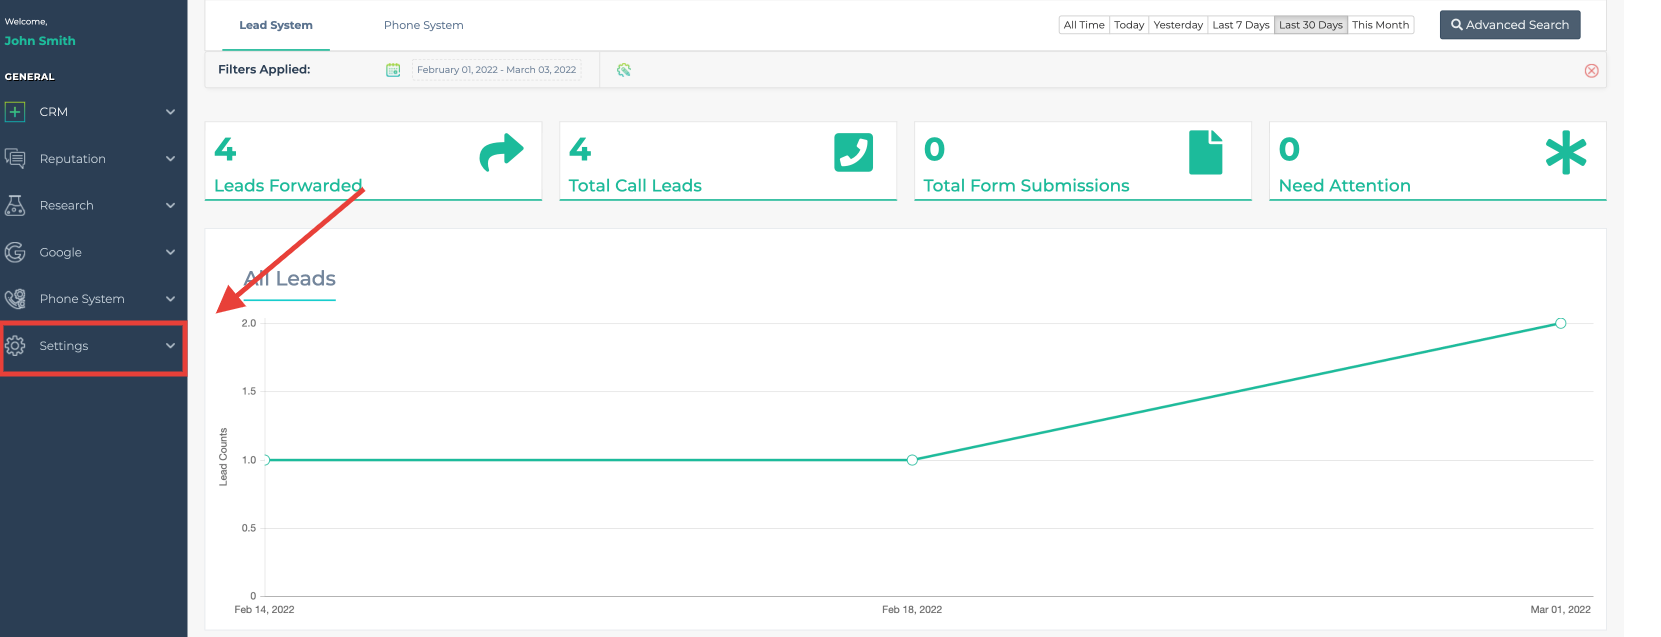
Expand Settings from the left navigation.

CRM Settings

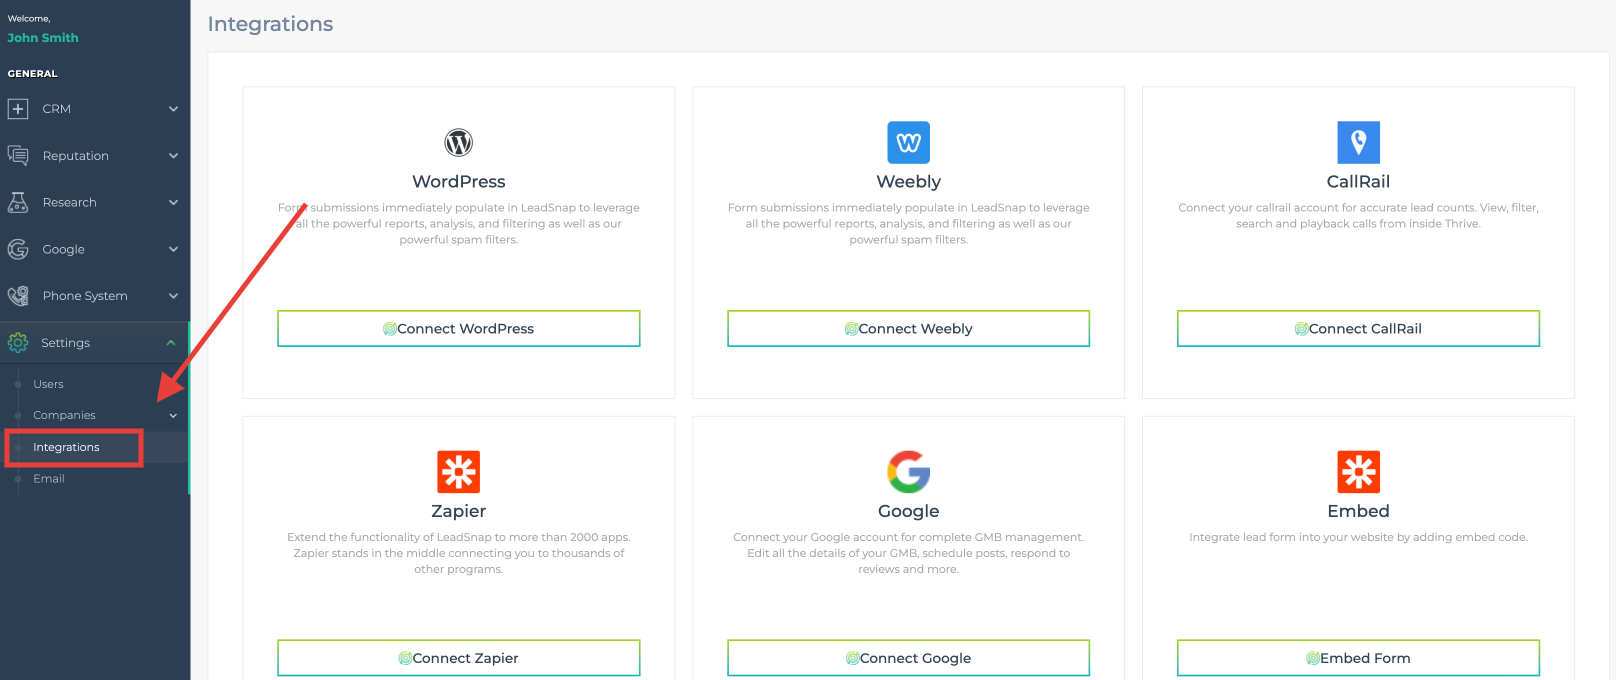
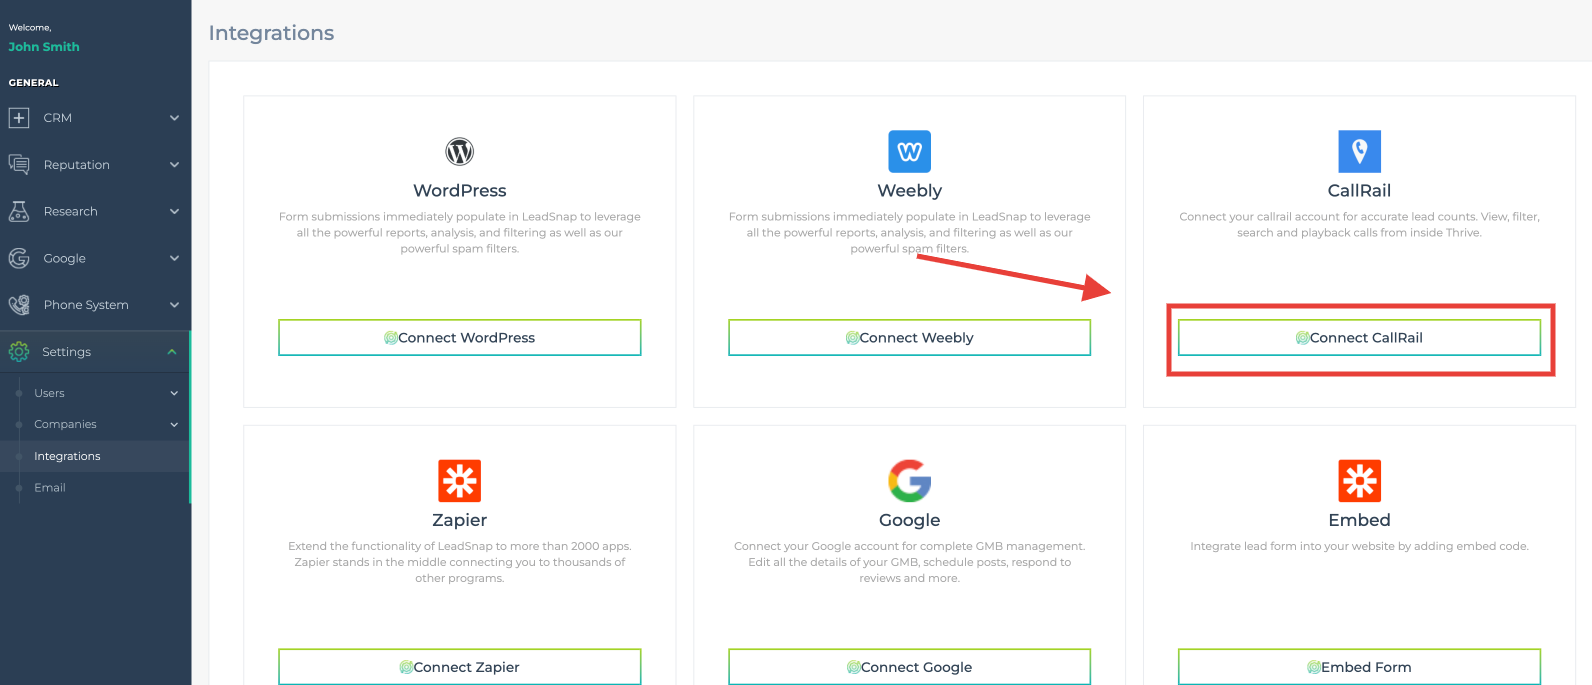
Select Integrations.

CRM Integrations

Select CallRail.

Connect CallRail

Select Connect CallRail.

Paste API Key

Paste In the API key copied from CallRail.

Submit API Key

Click the Submit button.

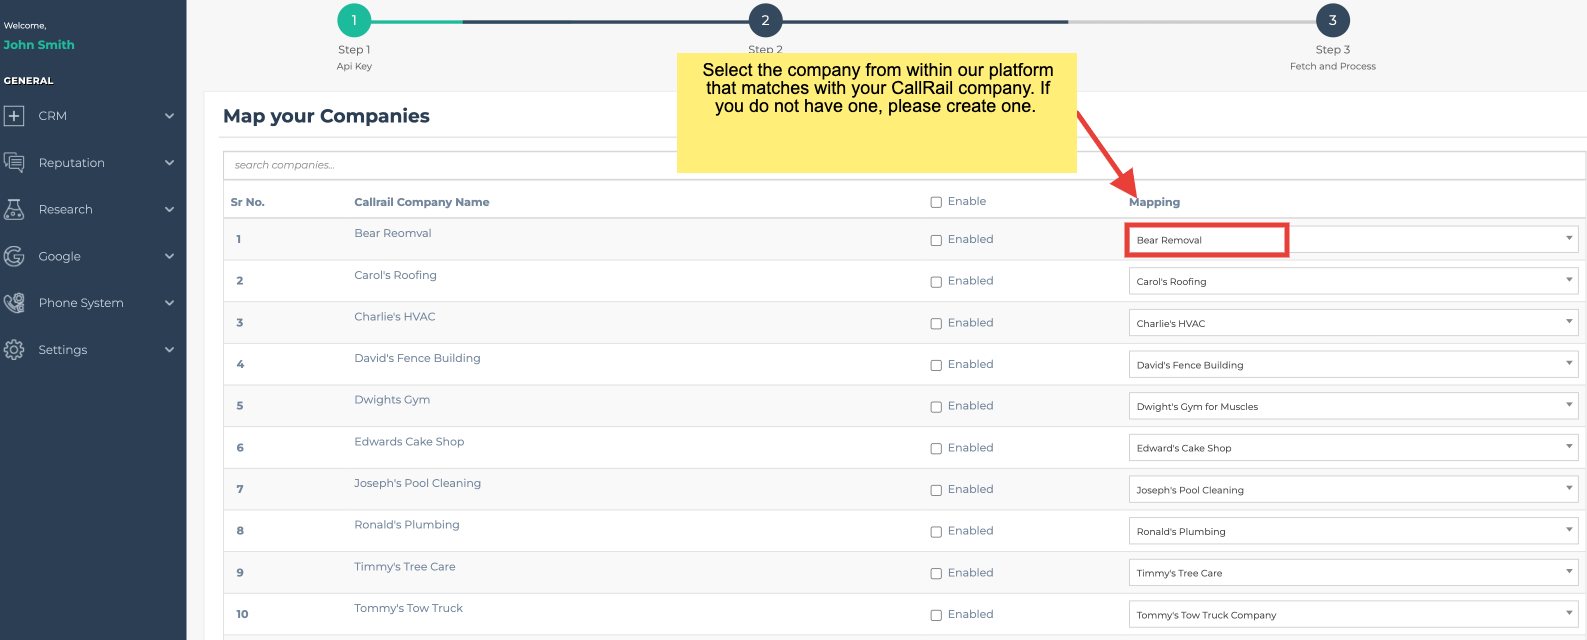
CRM Map Companies

Map CallRail to LeadSnap

This screen will allow you to map the companies from CallRail (left side) with the companies that you have within LeadSnap (right side). If you do not have a company created within LeadSnap you will need to create your company before continuing. Select the LeadSnap company from the dropdown on the right side that you would like to associate with your CallRail company on the left side.

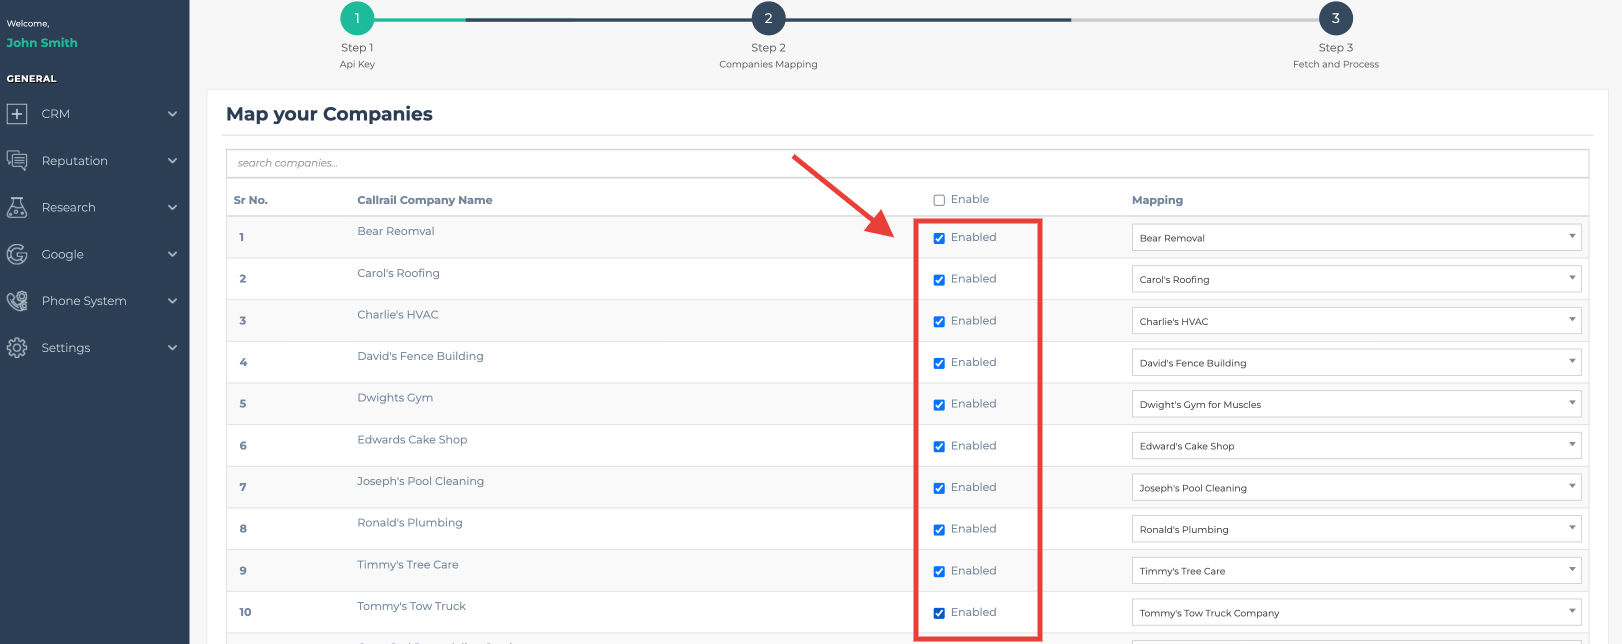
CRM Enable Companies

After making all of the mappings it is time to enable the companies. Our integration will grab all of the companies in your CallRail account, it is not required that you use all of them. If for whatever reason you would not like to sync the data for a company you can simply leave it disabled. To enable syncing the calls from CallRail for each company click the enable box.

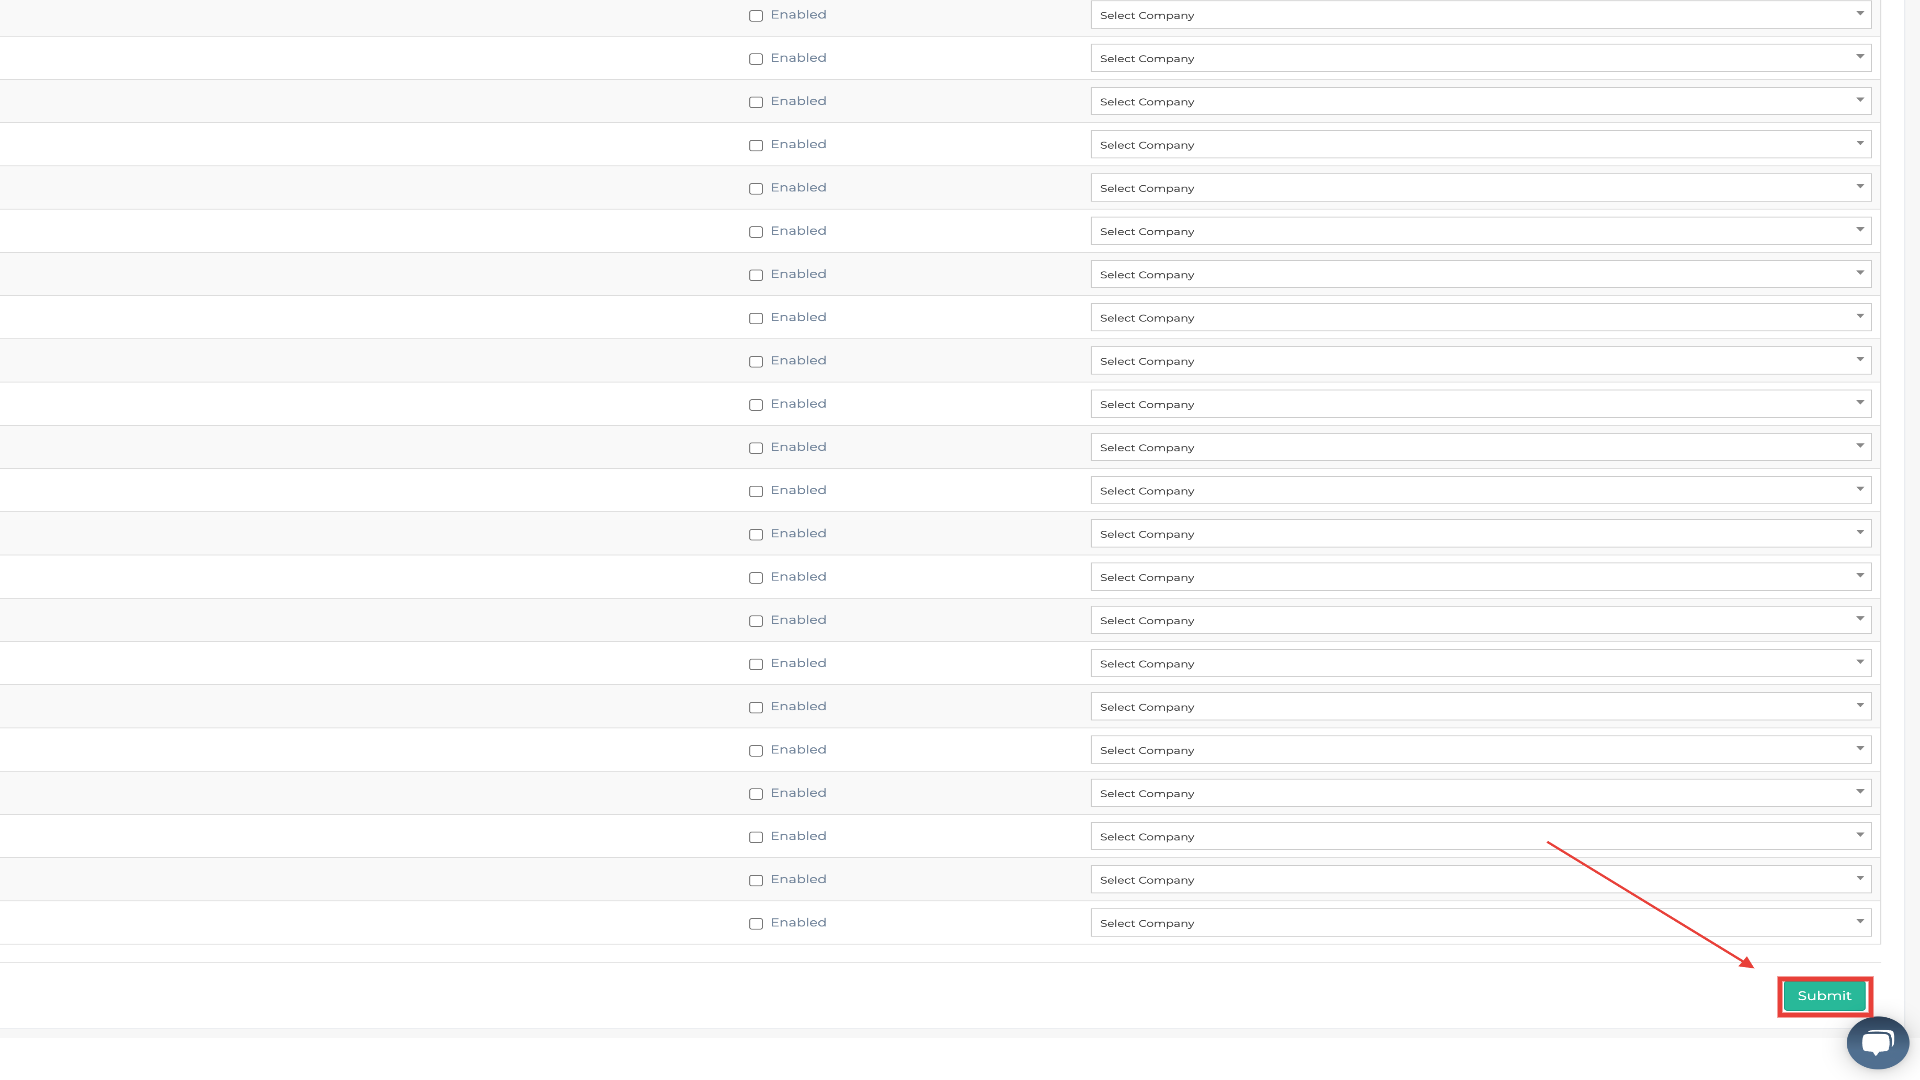
CRM Submit Mapping

Now that you have mapped your CallRail companies and enabled the selected companies to sync you can click the submit button in the bottom right corner. If you have many companies you may need to scroll down a little bit so the button is visible.

CRM Fetch Call Data

The final step is to the fetch the latest call data from CallRail. Our system will fetch the last 200 phone calls from CallRail. It is important that you do not leave this page during the fetch process. This make take several minutes while we transfer the data from CallRail to your LeadSnap account.

Congrats you have completed the CallRail integration

Purchase Phone Number

The LeadSnap phone system is powerful and flexible. For our system to function properly it is required to have your phone numbers within our system. You have two options on how you can get phones into our system. You can port phone numbers (transfer phone numbers into our system from another carrier) or you can purchase the phone numbers directly from within LeadSnap. In this article we will take you through the process of purchasing phone numbers from within our system.

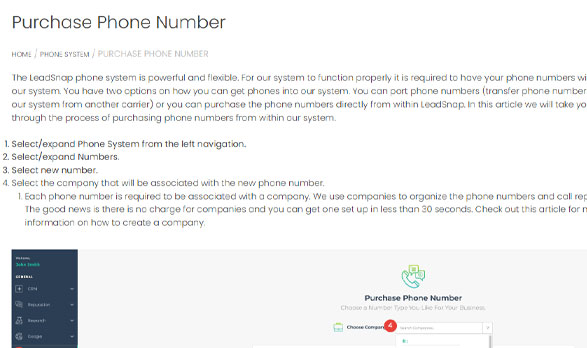
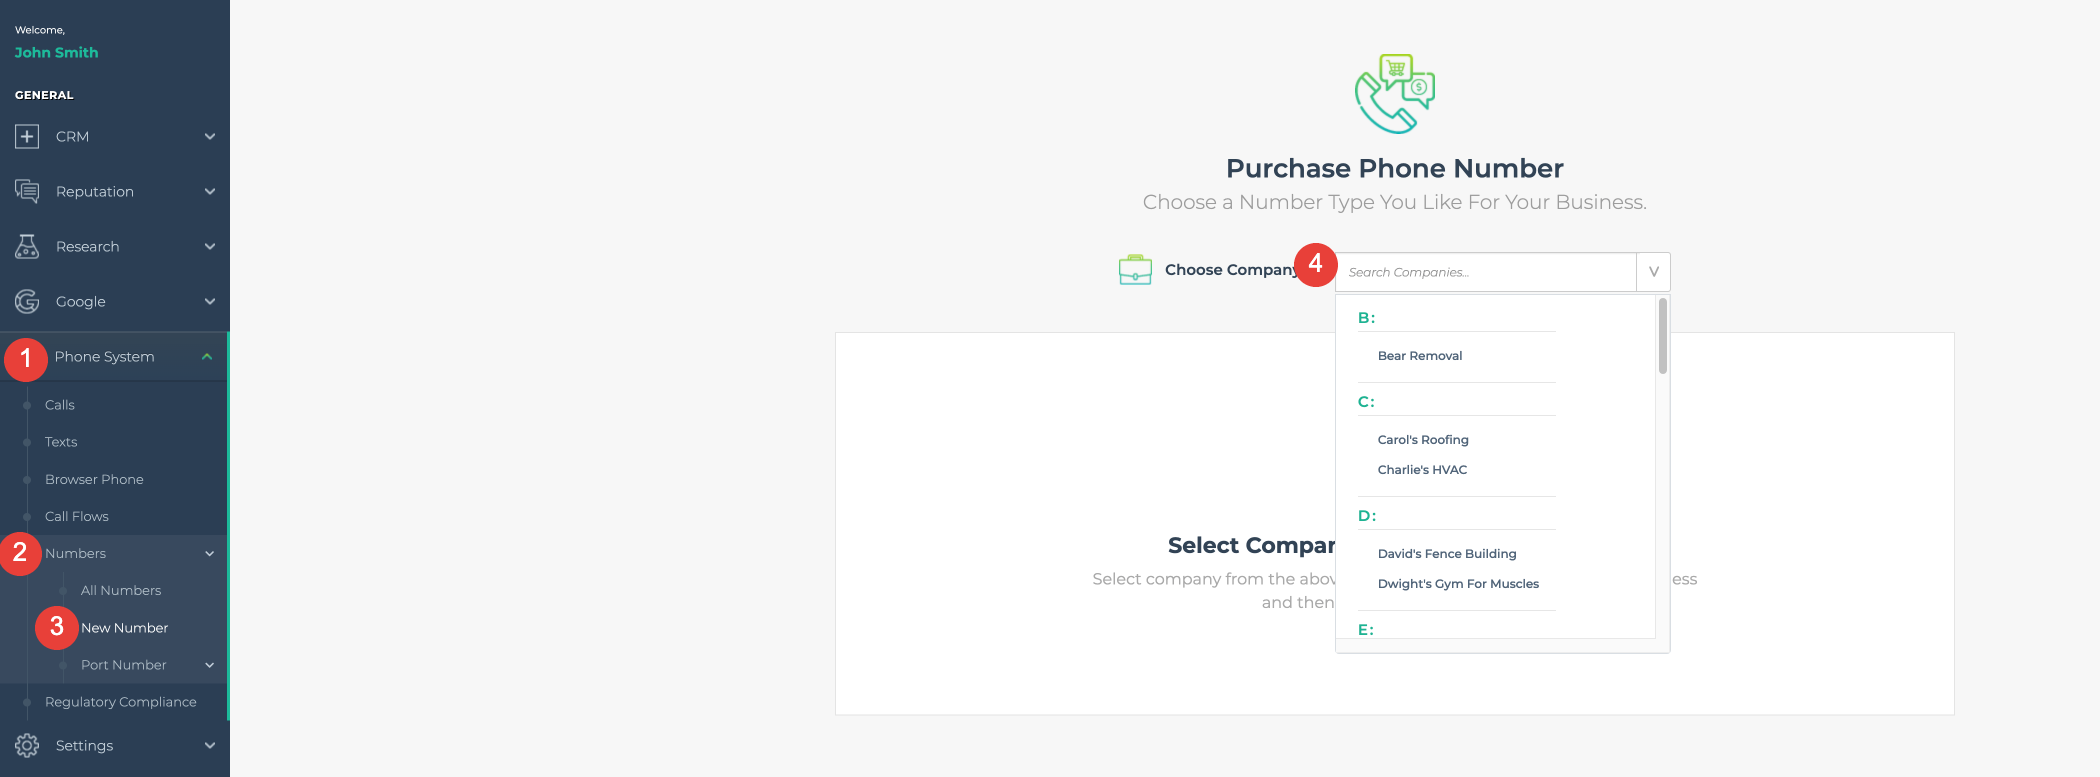
  1. Select/expand Phone System from the left navigation. 
  2. Select/expand Numbers. 
  3. Select new number.
  4. Select the company that will be associated with the new phone number.
    1. Each phone number is required to be associated with a company. We use companies to organize the phone numbers and call reports. The good news is there is no charge for companies and you can get one set up in less than 30 seconds. Check out this article for more information on how to create a company.
Purchase Phone Number

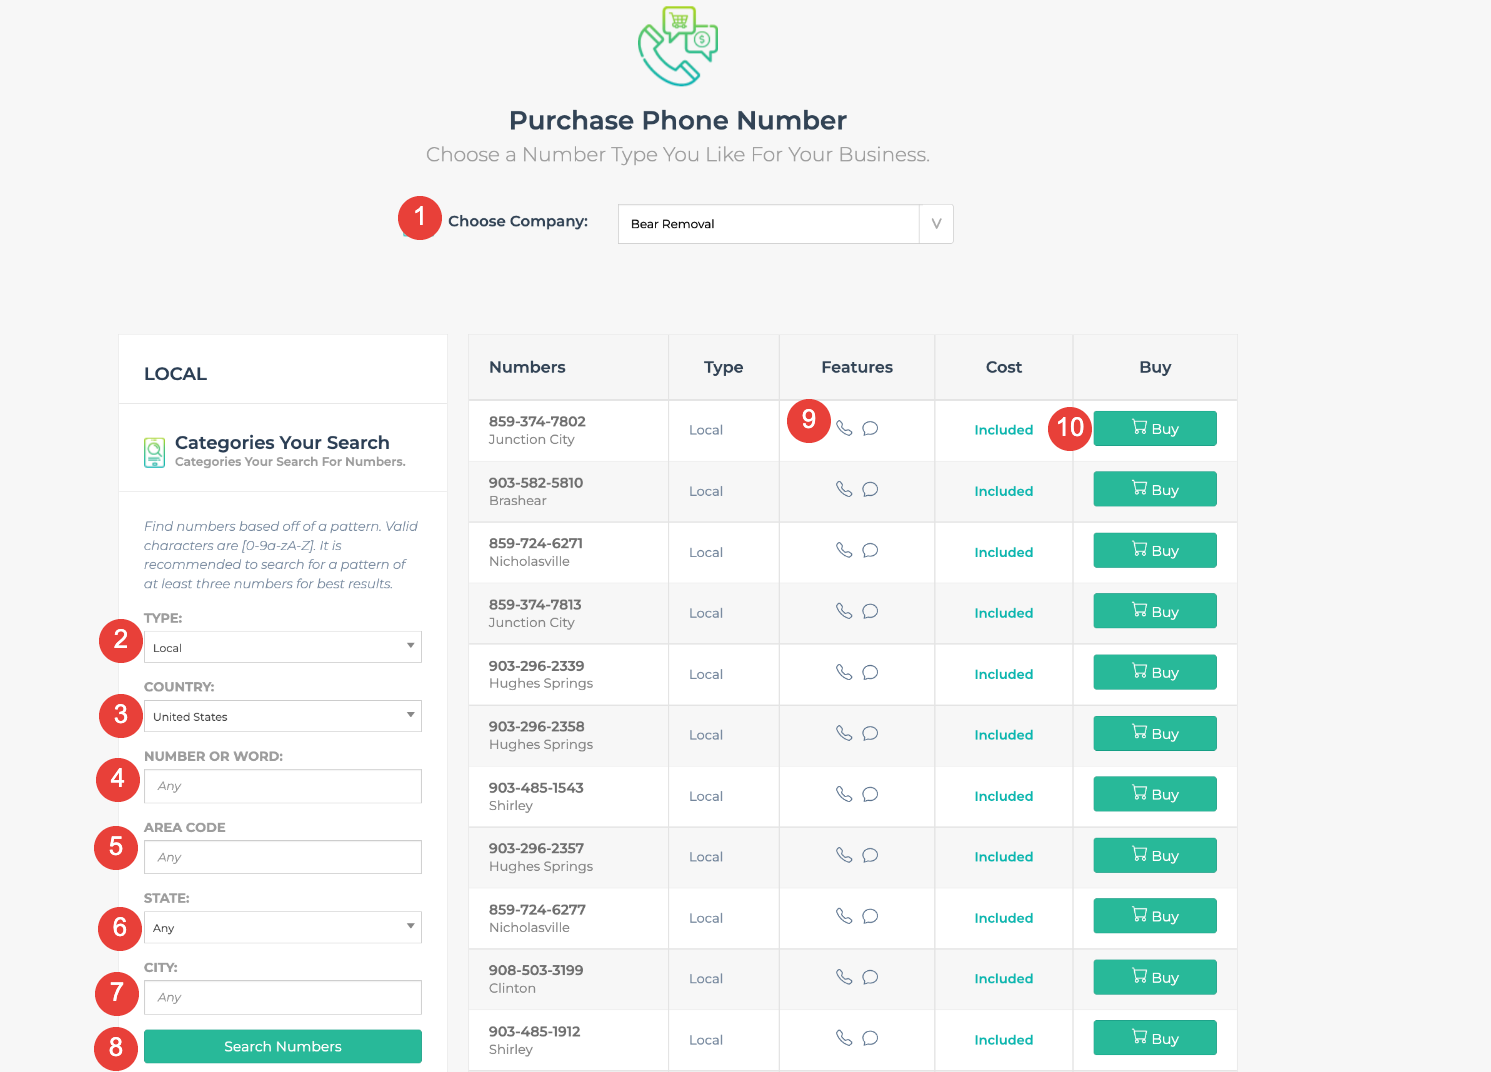
Now that we have selected the company we should see an image similar to the one below.

Descriptions align with the numbers from the associated picture below.

  1. Company Selection
  2. Type – Select between local or mobile phone numbers. This only applicable for certain countries. In some countries these phone numbers will have different functionality. For instance some countries local phone numbers will not have texting functionality. See the features column (number 9 in the photo below).
  3. Country – Select the country which you would like to purchase a phone number.
  4. Number or word – numbers 2 through 9 on a standard phone letters associated with a key. You can search for words that match up with associated letters from each key. Please see this image for the associated letters with each key.
  5. Area Code – Enter the area code for which you would like to search for available phone numbers.
  6. State – Search for phone numbers by state (United States only).
  7. City – Search for phone numbers by city. This will automatically pull the appropriate phone numbers that are associated with a city.
  8. Search Numbers Button – Click this button to search for phone numbers using your applied search filters.
  9. Features – This column will show you the features that are available for the selected phone number.
    1. Phone Icon – Phone calls are available for this number.
    2. Chat Icon – Texting is available for this number.
  10. Buy Button – Click this button to purchase the selected phone number.

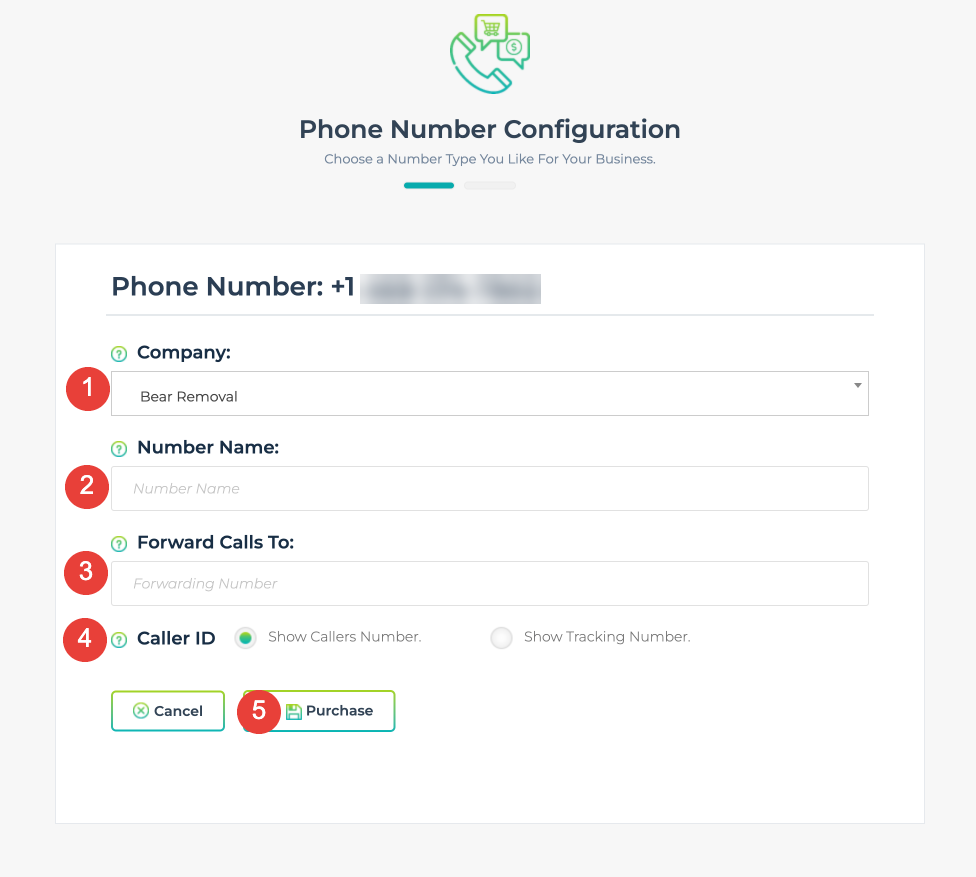
After clicking the buy button your will arrive at the the number configuration screen. The phone number purchase is not final until you complete the items on this screen. For some countries additional information is required, such as an address. These requirements are determined by the compliance regulations of your country.

  1. Company Selection – select the company within LeadSnap that you would like your phone number to be associated with.
  2. Number Name – this is a nickname that can be useful to identify the phone number on reporting screens. Some companies might have more than one phone number, this can help you distinguish between other phone numbers within the same company.
  3. Forward Calls To – All phone numbers are required to have a forwarding number. Our phone numbers are not hardwired to a phone like a land line or your cell phone. We need to know when there is a call. For this reason we require a phone number to forward the calls to as they arrive.
  4. Caller Id – Caller ID is the number that is displayed on your phone when a call is forwarded. You have two options for the number to display.  You can show the number of the caller or you can show the tracking phone number which is the actual phone number that you have purchased.
  5. Purchase Button – Click here to finalize the purchase of your phone number.
Number configuration

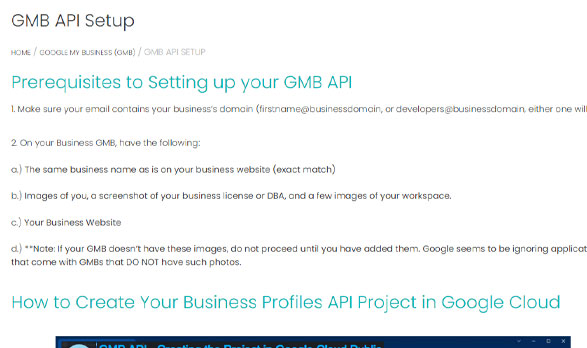
GMB API Setup

Prerequisites to Setting up your GMB API

1. Make sure your email contains your business’s domain (firstname@businessdomain, or developers@businessdomain, either one will work.)

2. On your Business GMB, have the following:

a.) The same business name as is on your business website (exact match)

b.) Images of you, a screenshot of your business license or DBA, and a few images of your workspace. 

c.) Your Business Website

d.) **Note: If your GMB doesn’t have these images, do not proceed until you have added them. Google seems to be ignoring applications that come with GMBs that DO NOT have such photos.

How to Create Your Business Profiles API Project in Google Cloud

1. Open a google account with an email address that has your business/agency domain after the @ symbol. We’ve found it works best with Google Workspace, but we have had a few others be approved. (ie. name@yourbusinessdomain)

a.) **Note: Don’t delete this account or attempt to switch away from Google Workspace if you started there, as you will lose the GMB API project that you’ll have set up and gotten approved.**

b.) If you go the Google Workspace route, you can do the 6 dollars per month plan without an issue.

2. Go to cloud.google.com
3. Create a new project. Note the project id and project number, you’ll need them later.
4. Add a billing account and connect it to the project you just created. You don’t need to activate your cloud account, just connect the billing account.
5. Fill out the Google My Business Form

6. Google will respond with 1 of 2 emails:

a.) Request for Confirmation (that you submitted an application for approval for the GMB API)

b.) “More Questions” Email (if you don’t get this one first, it will come after you respond “yes” to the “Request for Confirmation” email).

Here’s how we recommend answering Google’s questions

After you get Google My Business Approval Email:

Step 1: Enable Libraries for GMB integration

Search for the following libraries and click “Enable”:

– Google My Business API

– Business Business Information API

– Business Notifications API

– Business Account Management API

– My Business Verifications API

– My Business Q&A API

Step 2: Setup OAuth consent screen

-  Select User Type as “External” then click “Create”

-  Enter App name then select user support email from dropdown

-  Add the following Authorize domains

leadsnap.com

Also user’s add white label domain (example: whitelabeldomain.com)

-  Enter your name@bizdomain email in the developer contact information field. Then click “SAVE AND CONTINUE”

-  Click “ADD OR REMOVE SCOPES” button then select the following scopes and “SAVE AND CONTINUE”

-  See this video https://nimb.ws/Bh2Lmy

-  Test users section: Just click “SAVE AND CONTINUE”

-  SUMMARY Section: Click “Go back to dashboard” button

-  Click “Publish App” button and click “Confirm” on pop up

Step 3: Setup Credentials

Click “Create Credentials” and select “OAuth Client ID”

Select Application type as “Web Application”

-  Fill up the name field (We usually put the name of the company followed by “Client ID” example: “Company Client ID”)

-  Add the following “Authorized redirect URIs”

-  Click “Create”. Then a pop up will appear where you can copy the “Client ID” and “Client Secret”. Update the values also in notion.

Step 4: Check Quotas

-  Go to quotas page and check the limit for the following services

Step 5: Setup Pub/Sub for Notifications

-  Go to Pub/Sub page and create a Topic

-  Set the topic ID to “gmb-locations”. Then click “Create Topic”

-  Edit topic

-  On the permissions section click “Add Principal” and add the following:
[email protected] – Pub/Sub Publisher

-  Go to Pub/Sub(Subscription) page

-  Click “Create Subscription”

-  Enter subscription ID: gmb-locations-
gmb-locations-leadsnap

-  Set Delivery type as “Push” and enter endpoint url as:
<server_domain>/pubsub/google/notification
https://app.leadsnap.com/pubsub/google/notification

-  Set expiration period to “Never Expire”

-  Select Retry after exponential backoff delay. Then Click “UPDATE”

-  After creating 3 subscriptions. One for each server. You should see this:

Step 6: Add keys to user’s account

-  Login to the app(LS or LG)
-  Got to “GMB API Integration” under Google

-  Click add integration button

-  Enter the name (example: Company GMB API)

-  Paste the “Project ID”, “Client ID” and “Client Secret” and click save.
Note: make sure that the project id is from here:

-  To test if the setup is working. Go to “Google Accounts” and add one of your GMB accounts.

-  If it gets added without any issues then integration is completed.

Google Business Profile Review Link

Google Business Profile Share Link

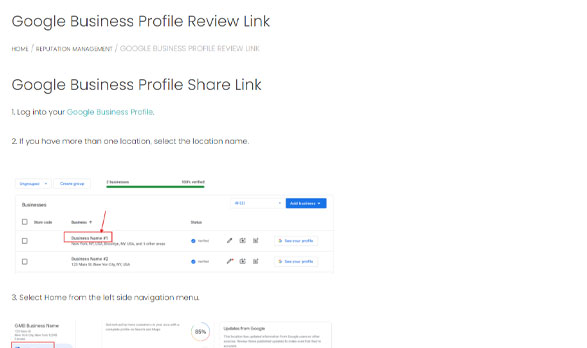
1. Log into your Google Business Profile.

2. If you have more than one location, select the location name.

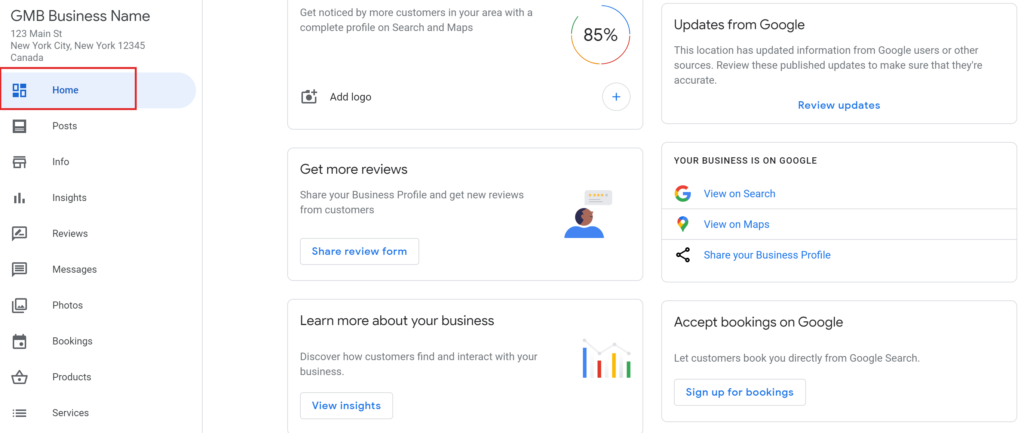
3. Select Home from the left side navigation menu.

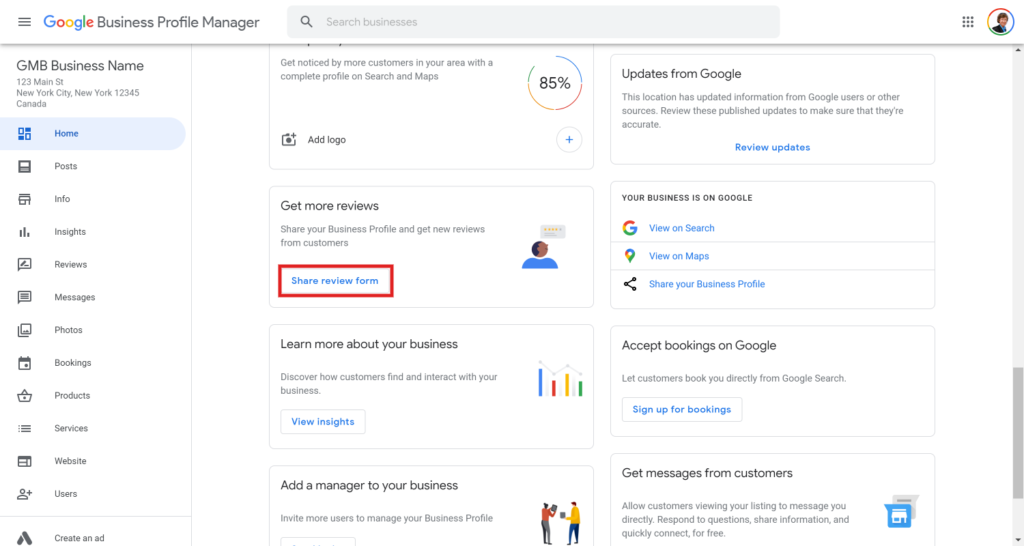
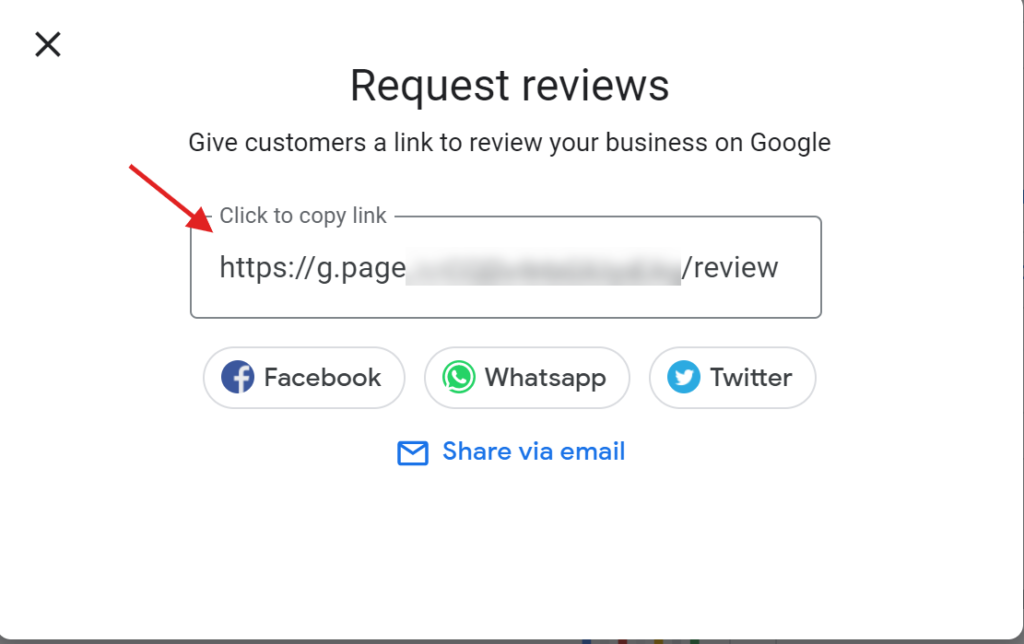
4. Select Share “Review review form“.

5. Copy the review link by clicking within the copy box.

6. Return to LeadSnap and paste this link into the link field.

Connect Gmail Account

This article will teach you how to connect your Gmail account to LeadSnap which will allow you to send emails from within LeadSnap from your Gmail account. There are two requirements from Google that must be set up in order for LeadSnap to be able send from your Gmail account.

  1. You must enable 2 Step authentication for your Gmail account.
  2. You must set up an App Password.


What is an App Password?

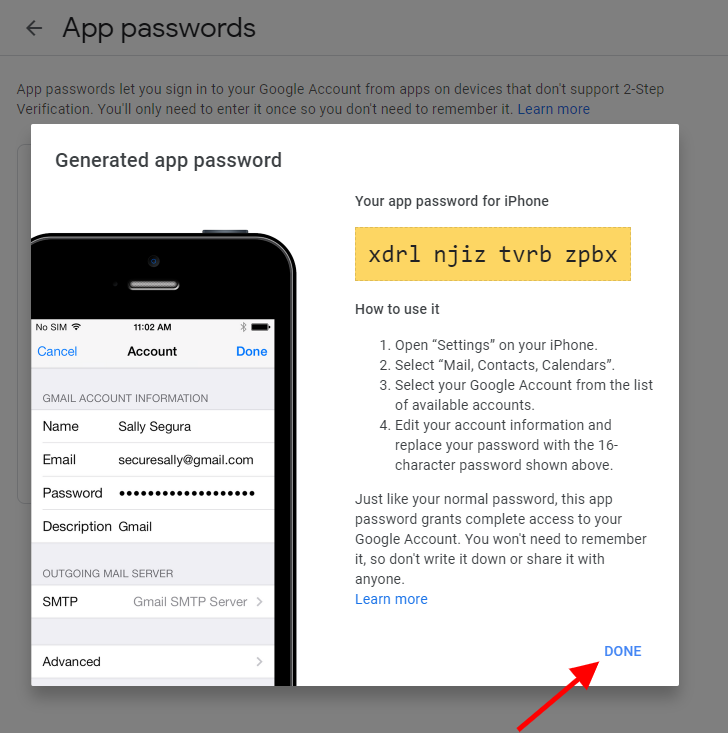
An App Password is a 16-digit passcode that gives an app or device permission to access your Google Account. Instead of adding your normal email password to LeadSnap you will instead add the app password.

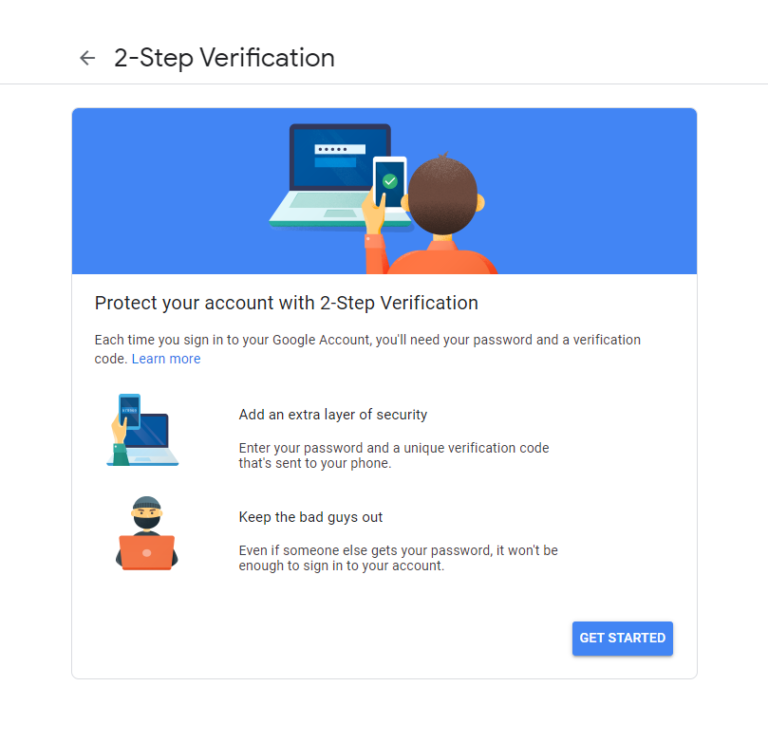
Turn on 2-step Verification:

Google Article On 2 Step Verification

1. Login to your Google Account. 

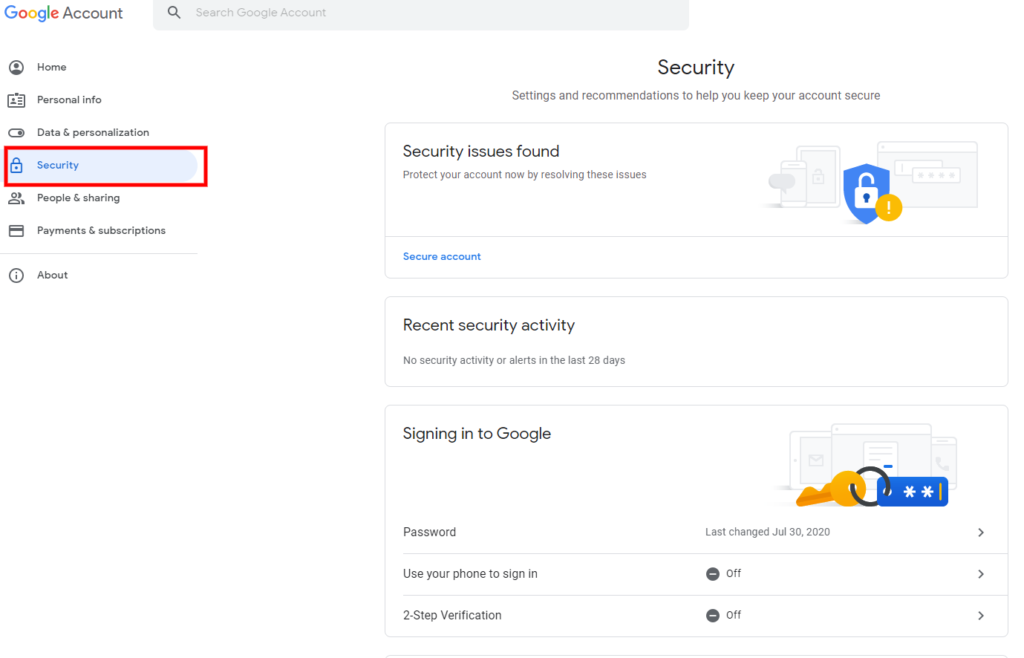
2. In the navigation panel, select security or click this here to open it directly.

3. Under “Signing in to Google,” select 2-Step Verification and then Get started.

Follow the on-screen steps.

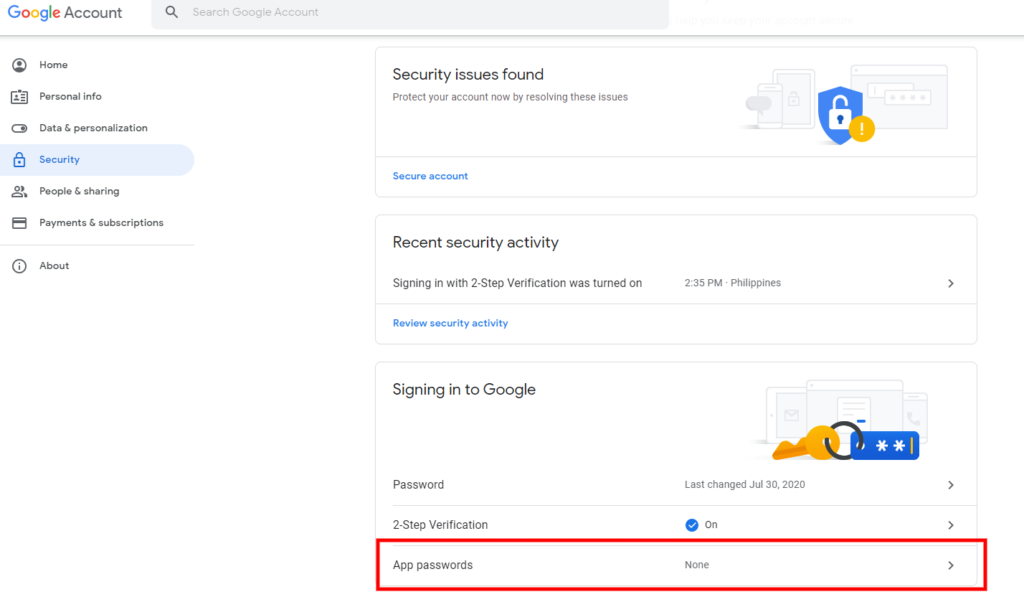
Select Security.

Under “Signing in to Google,” select App Passwords. You may need to sign in. If you don’t have this option, it might be because:

  1. 2-Step Verification is not set up for your account.
  2. 2-Step Verification is only set up for security keys.
  3. Your account is through work, school, or another organization.
  4. You turned on Advanced Protection.

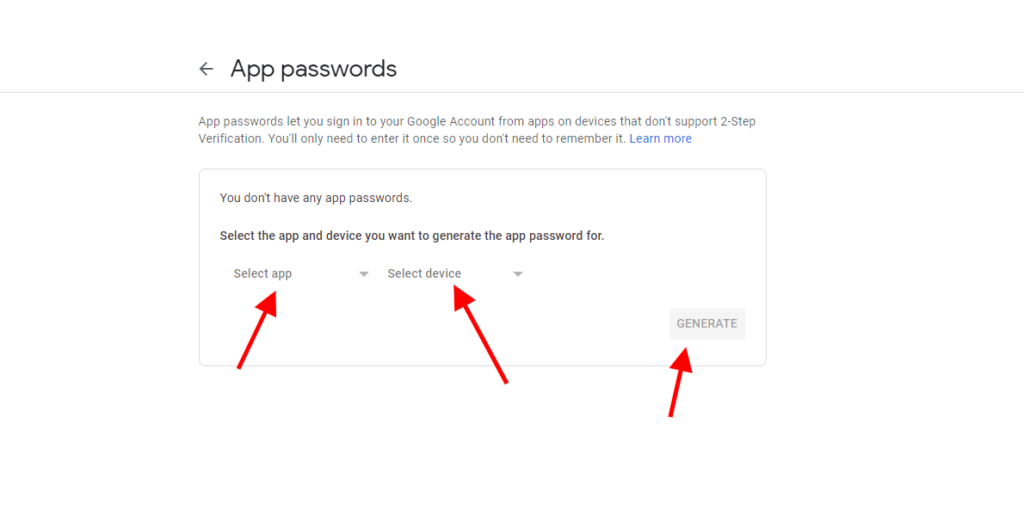
At the bottom, choose Select app and choose the app you using > Select device and choose the device you’re using > Generate.

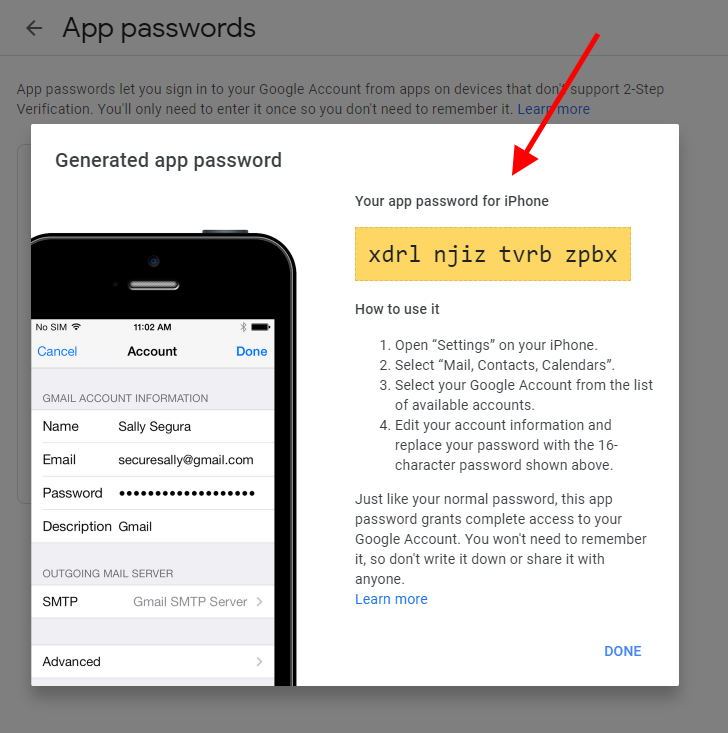
Follow the instructions to enter the App Password. The App Password is the 16-character code in the yellow bar on your device.

Tap Done