Category: Uncategorized
How To Reply To Existing GBP Reviews
How To Create And Schedule GBP Posts In LeadSnap Using AI
Video Walk Through
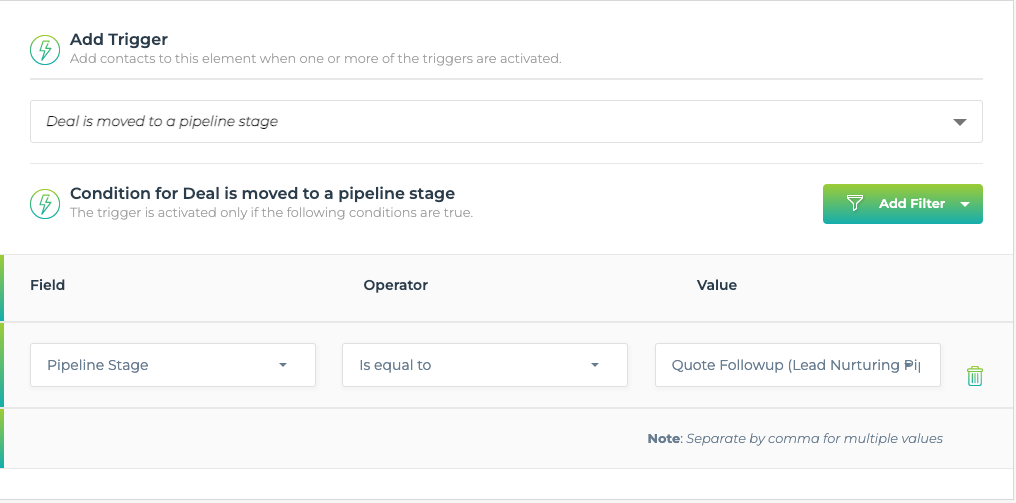
Automation Example Pipeline Stage = Quote Follow-up
Pipeline Stage = Quote Follow-up
Below is an example of an automation that compounds on the automation for Quote Provided
In this automation when you move a deal/contact into a new stage of your pipeline it will trigger automations that will message your contact/customer with a followup message concerning the quote/information they received.
in this first step you can see that when the pipeline stage is equal to your set value it will trigger an automation that will send an email and SMS
The next part of this automation includes an email that will be sent to your contact/customer.
The settings and text that we recommend are as follows:
Company = Default for Reputation Management (configure if different)
Recipient Options = Use Contacts Email Address
Sender Name = Custom Input! Choose what you want here!
Email Body Text:
Hey {{ First_Name }},
This is {{ CLIENT_NAME }} with {{ COMPANY_NAME }}. Just checking in to see if you are ready to move forward with your project. Lets make it happen!
We look forward to hearing back from you!
{{ COMPANY_PHONE }}
Select the “Anytime” Checkbox for “What times do you want the actions to execute?”

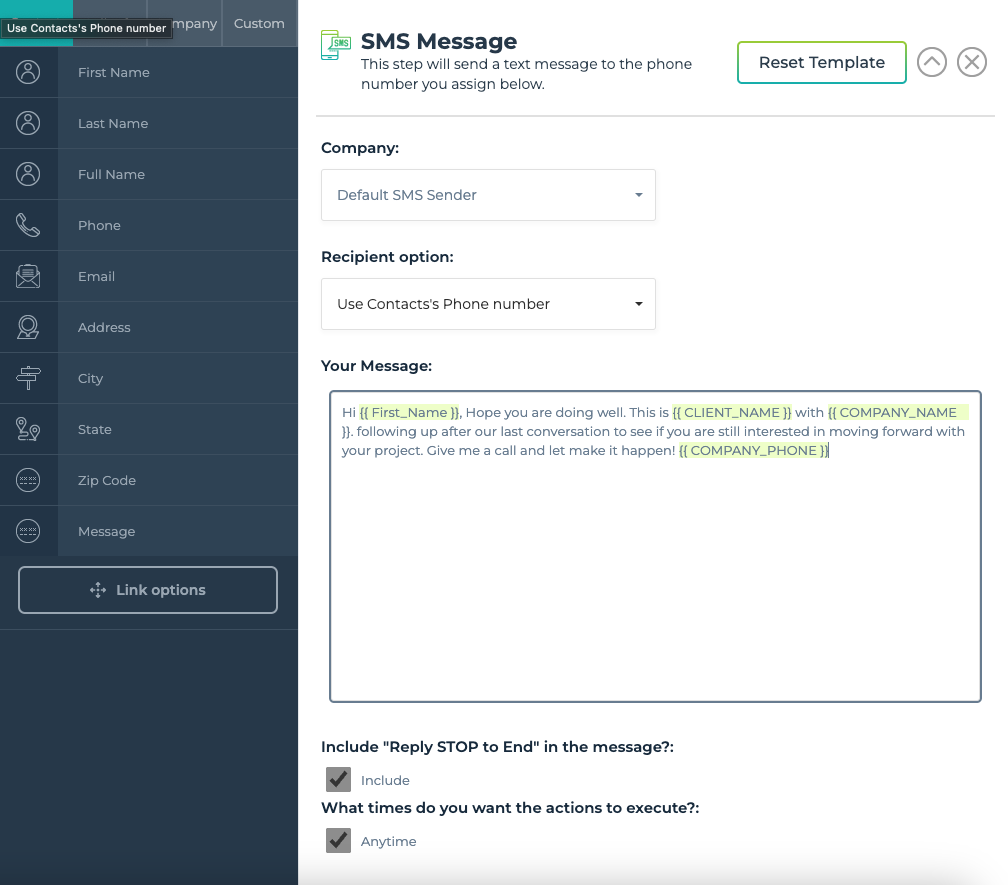
The final part of this automation includes an SMS that will be sent to your contact/customer.
The settings and text that we recommend are as follows:
Company = Default SMS Sender
Recipient Options = Use Contacts Phone Number
SMS Body Text:
Hi {{ First_Name }}, Hope you are doing well. This is {{ CLIENT_NAME }} with {{ COMPANY_NAME }}. following up after our last conversation to see if you are still interested in moving forward with your project. Give me a call and let make it happen! {{ COMPANY_PHONE }}
Select the “Anytime” Checkbox for “What times do you want the actions to execute?”
Automation Example Pipeline Stage = Provided Quote
Pipeline Stage = Provided Quote
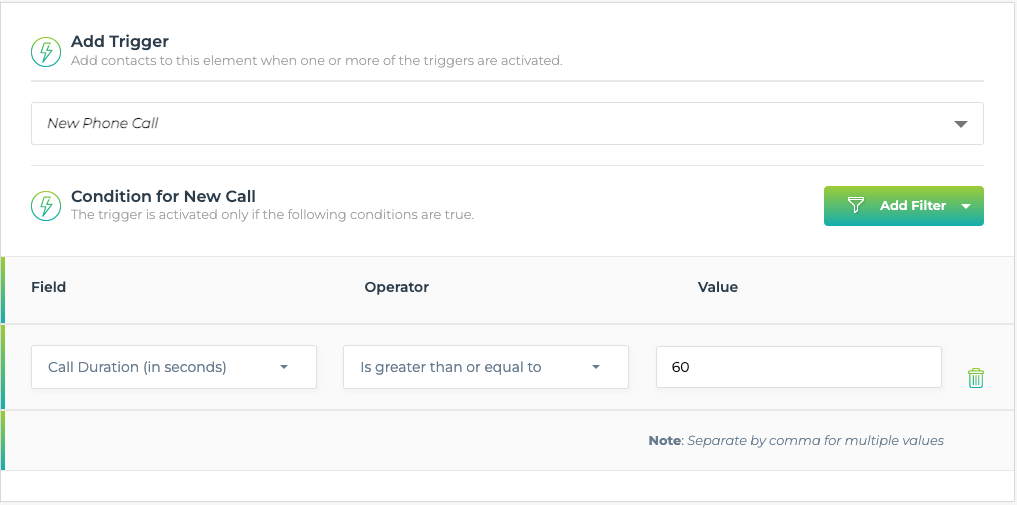
Below is an example of an automation that compounds on the automation for new phone call into a pipeline.
In this automation when you move a deal/contact into a new stage of your pipeline it will trigger automations to your client.
in this first step you can see that when the pipeline stage is equal to your set value it will trigger an automation to fire on the next day.
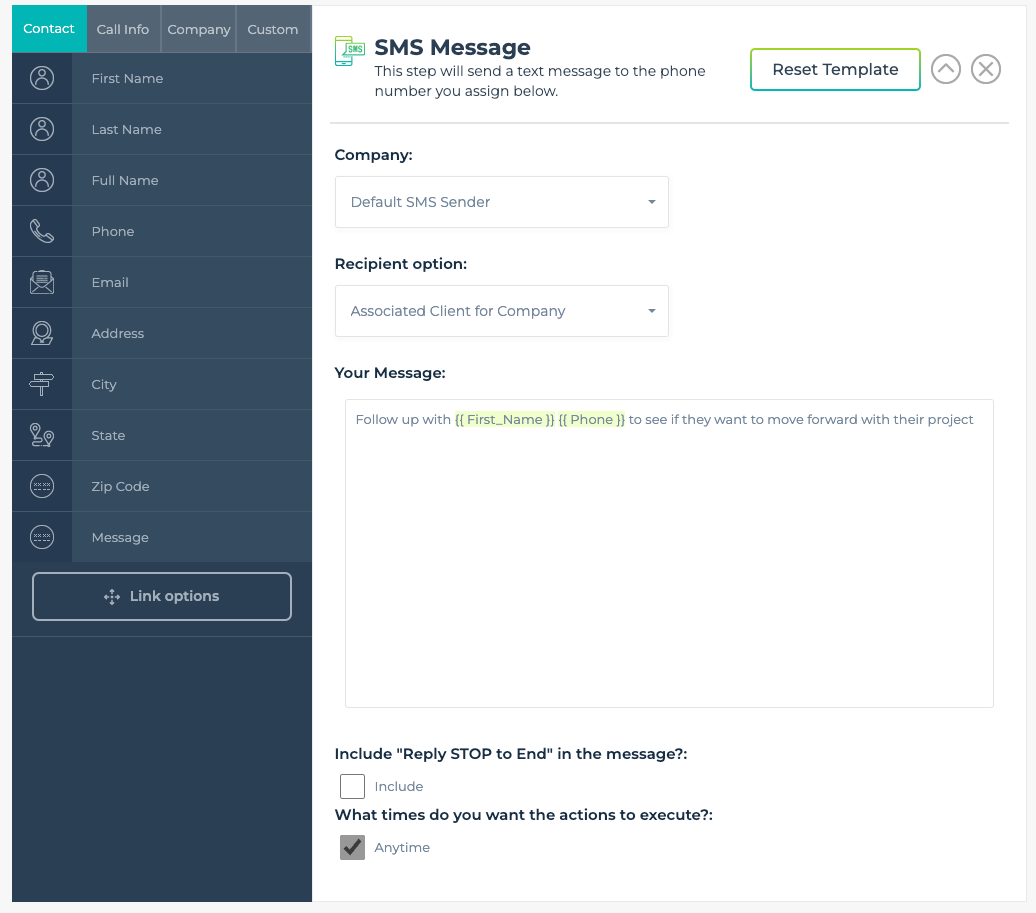
The next part of this automation includes an SMS that will go to the client notifying them that they need to followup with the customer/contact in the pipeline.
The settings and text that we recommend are as follows:
Company = Default SMS Sender
Recipient Options = Associated client for company
SMS Body Text: Follow up with {{ First_Name }} {{ Phone }} to see if they want to move forward with their project!
Select the “Anytime” Checkbox for “What times do you want the actions to execute?”
Remember to save your automation!
Automation Example Phone Lead Nurturing
Phone Lead Nurturing
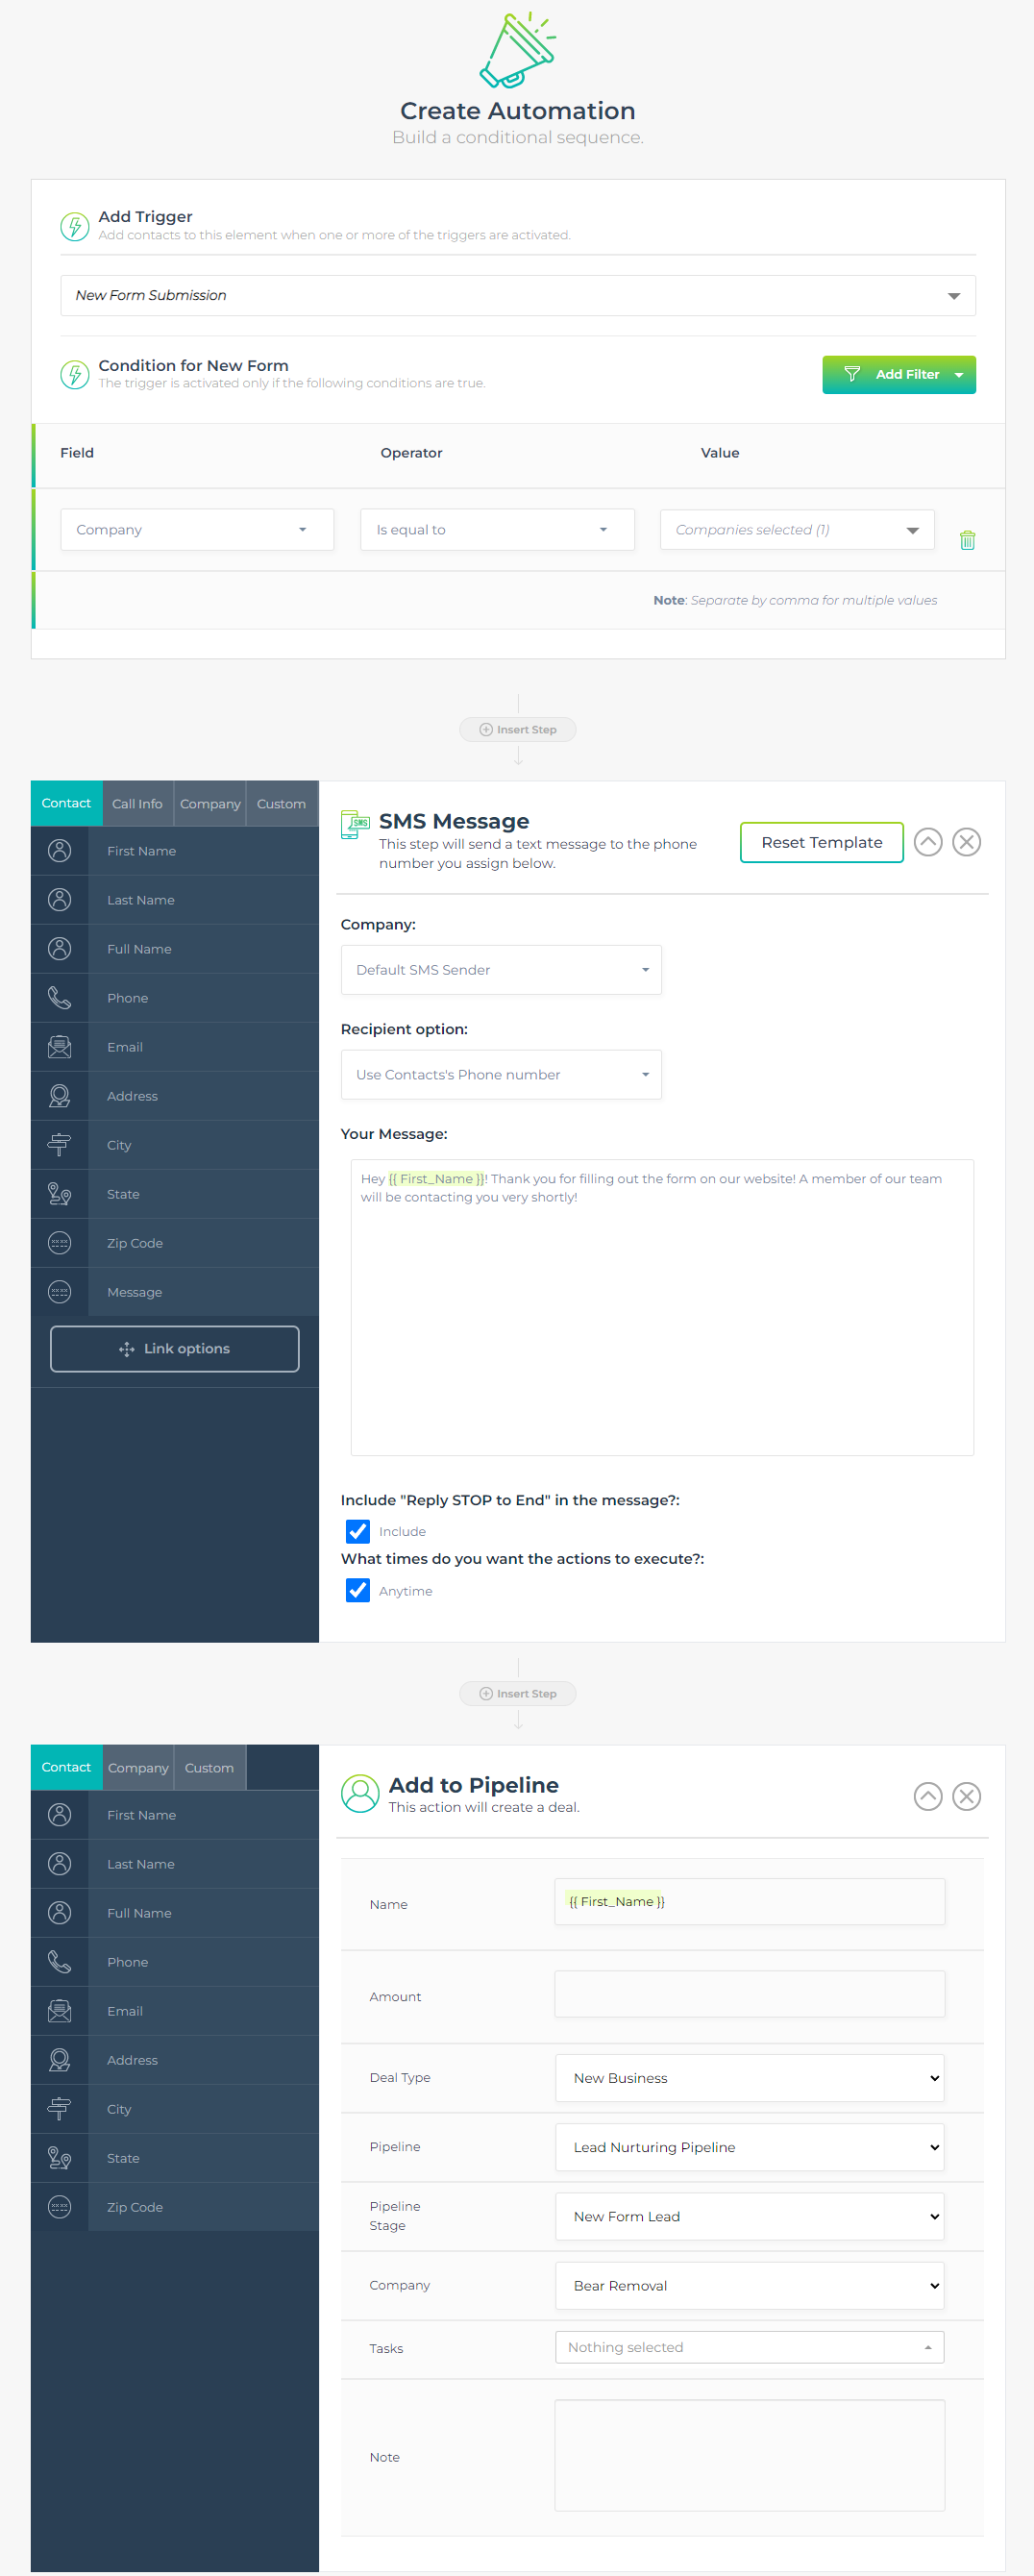
Below is an example of an automation that will take any new phone calls that have met the conditions that you set to be added as ‘deals’ in your pipeline.
The primary use-case for this particular automation is for clients seeking to better track their deals/jobs and the status’ of each. This can be edited slightly to be a pipeline automation that also helps you track interested clients and close them into deals.
The pipeline automation that we provided can be edited to fit any requirements/details that you decide are relevant
Please keep in mind that in this example we HAVE NOT qualified a company assignment; please make sure to add an additional filter to make sure that only the calls from the company you are working with are included in the automation and added to the pipeline.

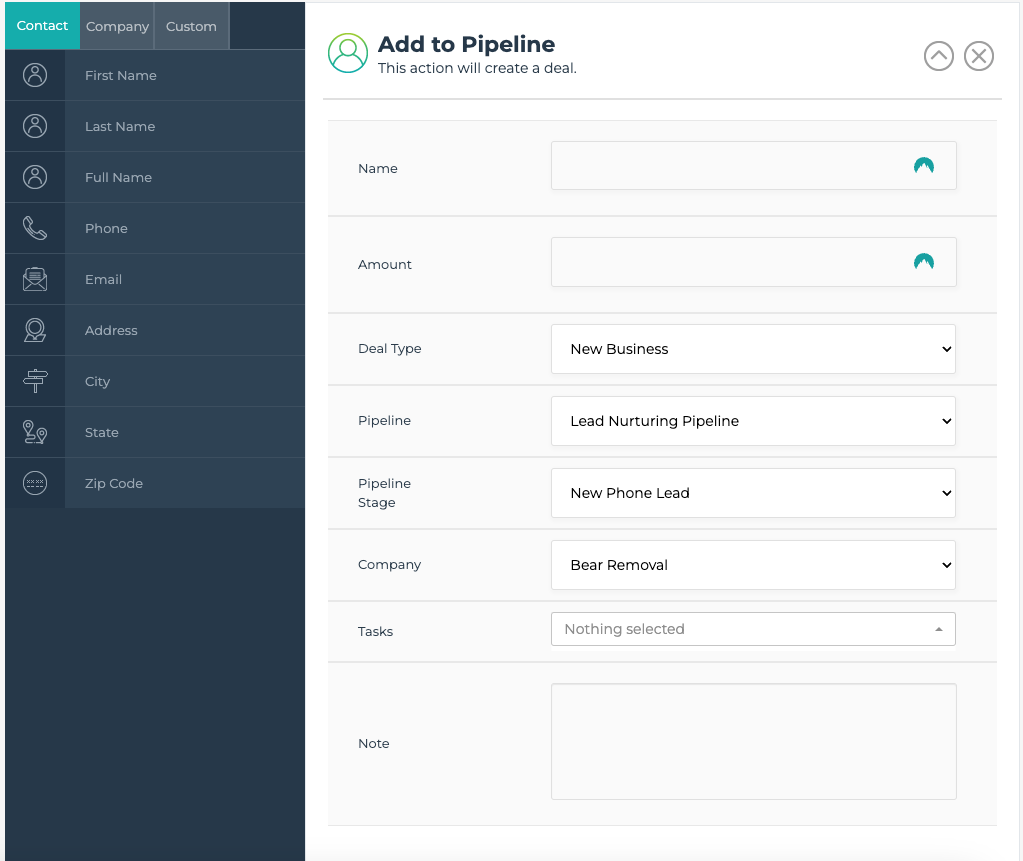
Next in the automation you will configure the details that you would like to have included in your pipeline for each call that you receive.
-Name will be autofilled from the contact details
-Amount will be left blank if not added
-Select the Deal Type – this will be configured from your existing deal types
-Pipeline – select the pipeline that you want the calls from this automation to go to; you may have to configure this pipeline before creating the automation
-Pipeline stage – this stage will be set depending on the settings of the pipeline that you have selected in the last step; use the drop down to select the correct stage
-Company – using the drop down select what company you want the phone call to be associated with within your pipeline.
– If you have any tasks associated with the pipeline you can use the drop down to select them; if you do not have tasks associated with pipeline stages this drop down will be inactive.
– If you want to add any notes to each of the new pipeline records you can add you own custom text; keep in mind this will apply to all pipeline records created by the automation.
Automation Example Missed Call To Text (Client & Lead)
Missed Call To Text (Client & Lead):
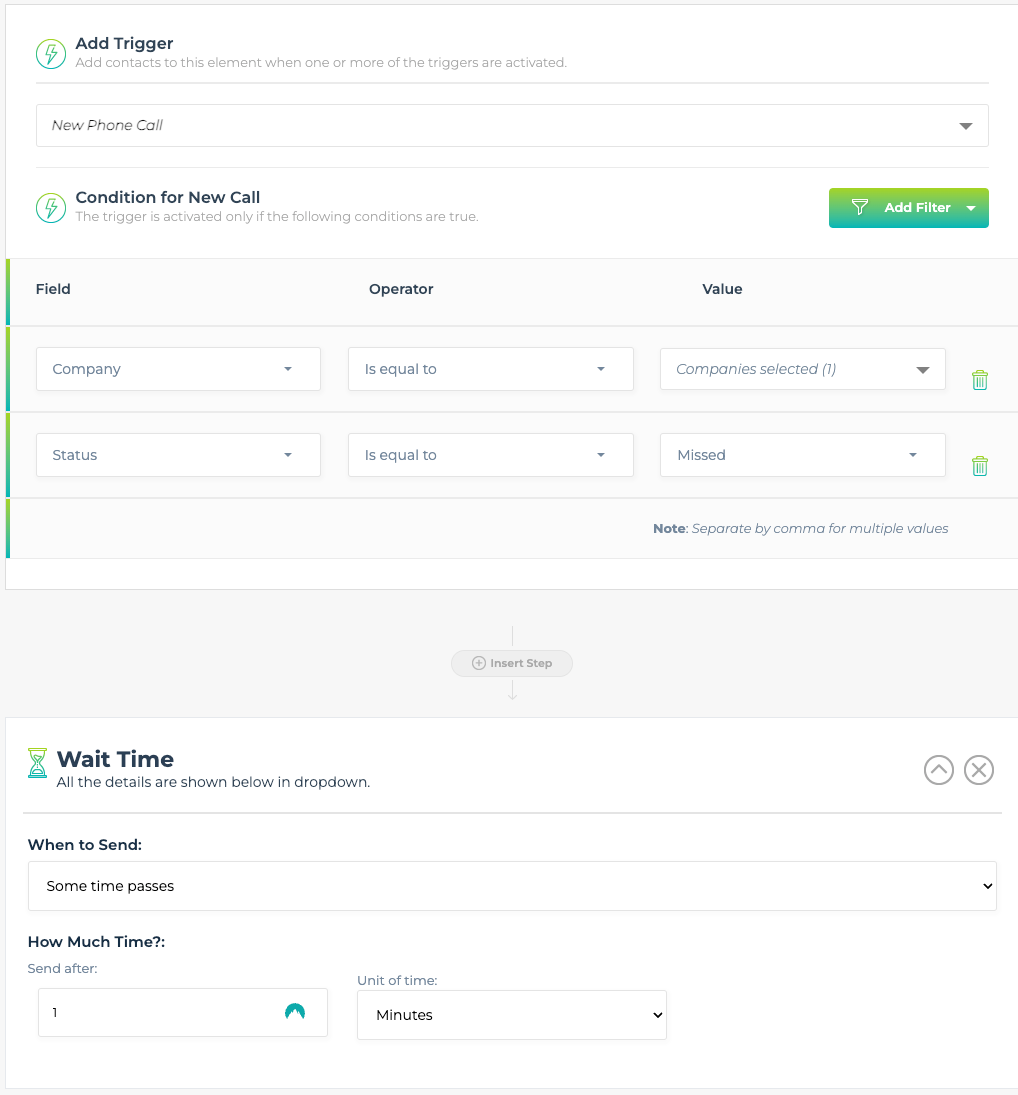
Below is an example of an automation that will send a text message to your client when a call comes in with the status of missed. The use case for this automation is to alert clients of missed calls so that they are able to return them in a timely manner, it will also alert the caller that they will receive a call back from the client. This is to help re-capture potential leads.
In order to set this automation so that it will work properly set company assignment and status = missed. You will also configure a wait step so that the caller and client receive the message in a timely manner.
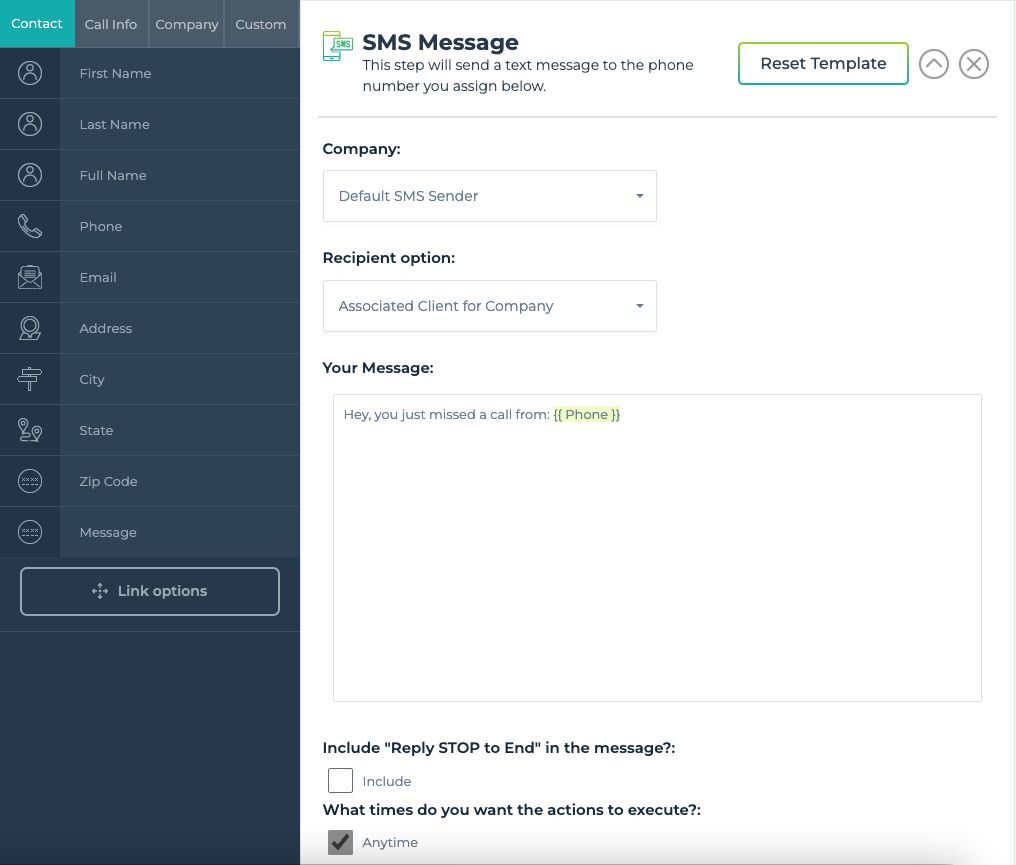
The next step is to configure the SMS Messages. The first SMS Message will be configured to go to the client, company should be set to SMS default sender and recipient should be “client associated with company”.
Your message as it reads from the example is as follows: “Hey {{client name}} you just missed a call from {{phone number}}”
Optional: if your client receives notifications for more than one company you can add the {{company}} qualifier somewhere within your message body.
Example: “Hey {{client name}} you just missed a call from {{company name}} return it at {{phone number}}.”
Select the anytime checkbox for “what times do you want the actions to execute”
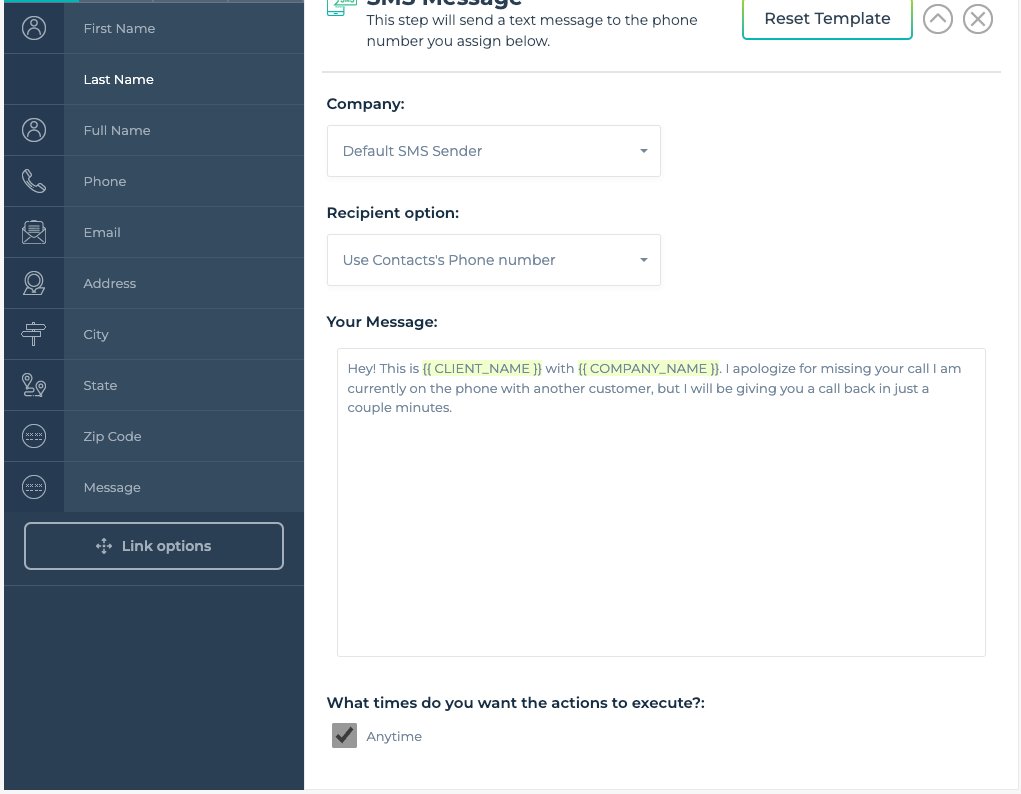
The final step to setup this automation is to configure the SMS Message that will be sent to the customer who’s call was missed.
Company will be the Default SMS Sender, Recipient option will be to “use contact’s phone number”
We suggest that the message of the body is as follows:
“Hey! This is {{ CLIENT_NAME }} with {{ COMPANY_NAME }}. I apologize for missing your call I am currently on the phone with another customer, but I will be giving you a call back in just a couple minutes.”
Select the anytime checkbox for “what times do you want the actions to execute”
Remember to save your automation!
Automation Example Form Lead To Pipeline
Automation Example Form Lead Notification
Form To Text Lead Notification:
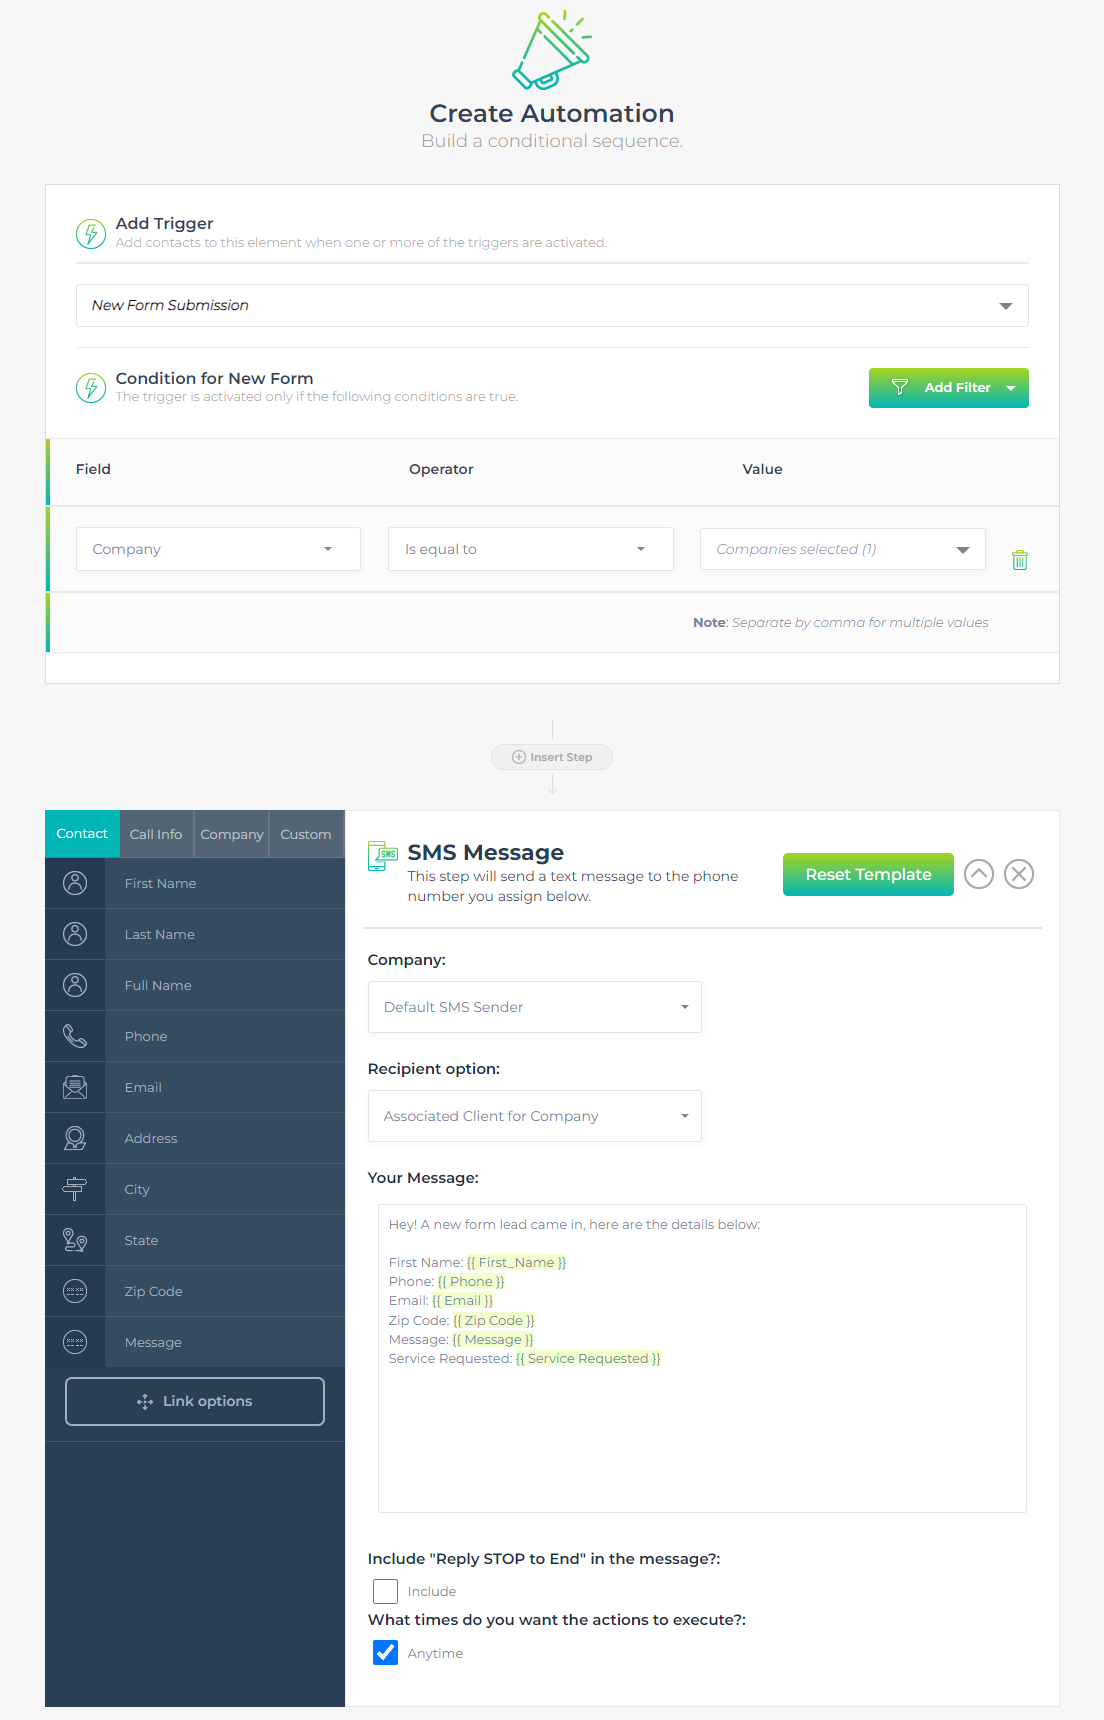
Below is an example of an automation that will send a text message to your client when a new form submission arrives. Please note, the variables as seen in this example may not line up with the fields you have on your form. For this automation to be successful, please make sure to use the fields that align with your web form.
How To Setup Texting In LeadSnap
What is A2P 10DLC?
A2P 10DLC is a new messaging framework introduced by major telecommunications carriers in collaboration with the Mobile Ecosystem Forum (MEF). Its primary goal is to enhance the quality and security of Application-to-Person messaging, which includes messages sent by businesses to their customers through our software.
How Does This Affect You?
While the adoption of A2P 10DLC is a positive step for the messaging industry, it may require some adjustments on your end. Here’s what you need to know:
Message Delivery: A2P 10DLC is designed to improve message delivery rates and reduce the likelihood of messages being marked as spam. This means your messages sent via our software should reach your intended recipients more reliably.
Registration: To continue enjoying the benefits of A2P 10DLC, businesses are required to register their messaging campaigns with the carriers. This registration process helps carriers identify legitimate senders and maintain a high-quality messaging environment.
How Can You Register with Us?
We’ve got you covered! LeadSnap is here to assist you with the A2P 10DLC registration process. Please follow the steps below to get your Toll-Free number and get your number registered!
Step 1. Purchase A Toll-Free Number
Step 2. Fill out the form below to register the number.
Please only do this after you have purchased your Toll Free number / numbers.
