Category: Phone System
Why Are My Calls Not in All Leads?
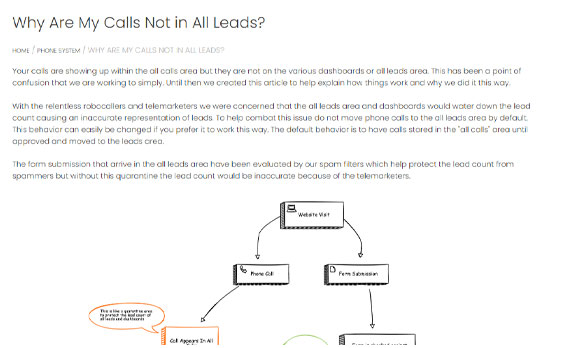
Your calls are showing up within the all calls area but they are not on the various dashboards or all leads area. This has been a point of confusion that we are working to simply. Until then we created this article to help explain how things work and why we did it this way.
With the relentless robocallers and telemarketers we were concerned that the all leads area and dashboards would water down the lead count causing an inaccurate representation of leads. To help combat this issue do not move phone calls to the all leads area by default. This behavior can easily be changed if you prefer it to work this way. The default behavior is to have calls stored in the “all calls” area until approved and moved to the leads area.
The form submission that arrive in the all leads area have been evaluated by our spam filters which help protect the lead count from spammers but without this quarantine the lead count would be inaccurate because of the telemarketers.

The video below will explain this in more detail and show you the two most common ways to move a phone call over to the leads area.
Purchase Phone Number
The LeadSnap phone system is powerful and flexible. For our system to function properly it is required to have your phone numbers within our system. You have two options on how you can get phones into our system. You can port phone numbers (transfer phone numbers into our system from another carrier) or you can purchase the phone numbers directly from within LeadSnap. In this article we will take you through the process of purchasing phone numbers from within our system.
- Select/expand Phone System from the left navigation.Â
- Select/expand Numbers.Â
- Select new number.
- Select the company that will be associated with the new phone number.
- Each phone number is required to be associated with a company. We use companies to organize the phone numbers and call reports. The good news is there is no charge for companies and you can get one set up in less than 30 seconds. Check out this article for more information on how to create a company.

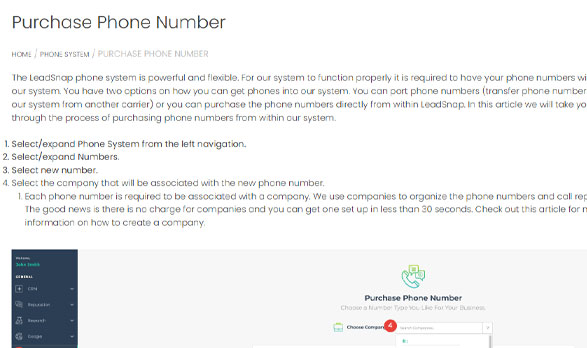
Now that we have selected the company we should see an image similar to the one below.
Descriptions align with the numbers from the associated picture below.
- Company Selection
- Type – Select between local or mobile phone numbers. This only applicable for certain countries. In some countries these phone numbers will have different functionality. For instance some countries local phone numbers will not have texting functionality. See the features column (number 9 in the photo below).
- Country – Select the country which you would like to purchase a phone number.
- Number or word – numbers 2 through 9 on a standard phone letters associated with a key. You can search for words that match up with associated letters from each key. Please see this image for the associated letters with each key.
- Area Code – Enter the area code for which you would like to search for available phone numbers.
- State – Search for phone numbers by state (United States only).
- City – Search for phone numbers by city. This will automatically pull the appropriate phone numbers that are associated with a city.
- Search Numbers Button – Click this button to search for phone numbers using your applied search filters.
- Features – This column will show you the features that are available for the selected phone number.
- Phone Icon – Phone calls are available for this number.
- Chat Icon – Texting is available for this number.
- Buy Button – Click this button to purchase the selected phone number.

After clicking the buy button your will arrive at the the number configuration screen. The phone number purchase is not final until you complete the items on this screen. For some countries additional information is required, such as an address. These requirements are determined by the compliance regulations of your country.
- Company Selection – select the company within LeadSnap that you would like your phone number to be associated with.
- Number Name – this is a nickname that can be useful to identify the phone number on reporting screens. Some companies might have more than one phone number, this can help you distinguish between other phone numbers within the same company.
- Forward Calls To – All phone numbers are required to have a forwarding number. Our phone numbers are not hardwired to a phone like a land line or your cell phone. We need to know when there is a call. For this reason we require a phone number to forward the calls to as they arrive.
- Caller Id – Caller ID is the number that is displayed on your phone when a call is forwarded. You have two options for the number to display. You can show the number of the caller or you can show the tracking phone number which is the actual phone number that you have purchased.
- Purchase Button – Click here to finalize the purchase of your phone number.

Phone System Overview
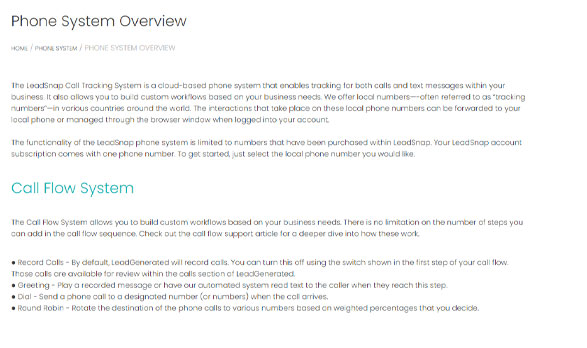
The LeadSnap Call Tracking System is a cloud-based phone system that enables tracking for both calls and text messages within your business. It also allows you to build custom workflows based on your business needs. We offer local numbers—-often referred to as “tracking numbersâ€â€”in various countries around the world. The interactions that take place on these local phone numbers can be forwarded to your local phone or managed through the browser window when logged into your account.
The functionality of the LeadSnap phone system is limited to numbers that have been purchased within LeadSnap. Your LeadSnap account subscription comes with one phone number. To get started, just select the local phone number you would like.
Call Flow System
The Call Flow System allows you to build custom workflows based on your business needs. There is no limitation on the number of steps you can add in the call flow sequence. Check out the call flow support article for a deeper dive into how these work.
â— Record Calls – By default, LeadGenerated will record calls. You can turn this off using the switch shown in the first step of your call flow. Those calls are available for review within the calls section of LeadGenerated.
â— Greeting – Play a recorded message or have our automated system read text to the caller when they reach this step.
â— Dial – Send a phone call to a designated number (or numbers) when the call arrives.
â— Round Robin – Rotate the destination of the phone calls to various numbers based on weighted percentages that you decide.
â—‹ Example: Send 70% of phone calls to these two numbers and send 30% of phone calls to this other set of numbers.
â— Menu – Allows the caller to press a button and get routed to a destination phone number.
â—‹ Example: Press 1 for sales, press 2 for support.
â— Schedule – Allows for different actions based on the time of day when a phone call arrives.
â—‹ Example: Send calls to phone number A on weekdays from 8:00 am to 5:00 PM and send phone calls to phone number B during other time periods.
â— Tags – Tag a phone call with a certain tag that can be used to organize calls in the system.
â—‹ Example: If the user presses 1 for sales, you can tag a call as a sales call.
â— Voicemail – Play a recorded message or have our automated system read text to the caller when they reach this step. If you choose to use a voicemail, this will be the final step in the call flow sequence.
â— Hang Up – End the call.
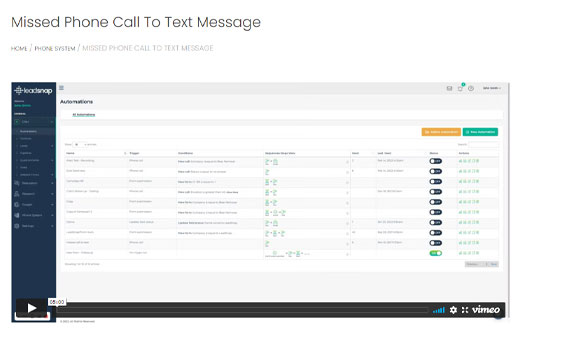
Automations
The phone system plays a strong supporting role for the automation functionality. Automations can be triggered by both phone calls and text messages. Text messages can be used as an action within the sequence.
Calls
In the calls area, you will find the call history for each of your tracking numbers. Any calls that have been recorded can be played back from the calls screen. You can use the filters at the top to limit the calls showing based on your own custom criteria. Check out the calls documentation article for more information.
Texts
Using your tracking phone numbers, you can send and receive text messages throughout the LeadSnap system. Texting options appear on the lead detail screen, the calls screen, the text screen, tasks, contacts and within the automations area as both actions and triggers. In addition, you can set notifications to be sent via based on your own custom criteria. Notifications and other system messages will come from the phone number set as the default SMS number within your account.
Browser Phone
You can make and receive phone calls through the browser. You’ll be required to allow microphone access to LeadSnap if you would like to take advantage of the browser phone. Throughout the system (lead details, contacts, calls, texts) you will see several options that say “dialer.†Calls can be made through the browser from any of these locations. In addition, within the phone system you will notice there is a browser phone option.
Outgoing Phone Calls:
Making an outgoing call through LeadSnap can happen either through the browser or through a local phone. In either case, the call will be made from the tracking phone number. If the person you’re calling is using caller ID, they will see the tracking phone number instead of your phone number.
Make Outgoing Phone Call
1. Select the company from which you would like to call from. You must have a tracking number within our system associated with this company to make an outgoing call.
2. Select the associated tracking number from the tracking number dropdown.
3. Enter the phone number of the customer you would like to call.
4. You will notice there is a “connect with your phone†checkbox. If you choose this option, then our phone system will first call your phone number. You will hear a recorded message asking you to press 1 to connect to the phone number specified. Once you press 1, our phone system will connect the call.

Phone Plans
Currently we have two types of plans—the plan that only includes the tracking phone numbers, and the plan that includes tracking phone numbers as well as all of the other functionality of the LeadSnap CRM. The latter comes with one free phone number, you just need to select your local area and activate it. Depending on the country you are in, the costs for minutes and phone numbers can vary. The pricing also varies depending on the plan that you choose, with the higher level plans providing bulk discounts for both numbers and minutes.
Edit Phone Number
1. Expand the Phone System item from the left navigation.
2. Expand Numbers from the submenu within the Phone System item.
3. Click All Numbers.
4. Click Edit next to the number you would like to edit.

Company – This is where you’ll assign the current number to a different company within LeadSnap.
Number Name – A nickname for the phone number.
Forward Calls To: – Enter the default phone number where you would like forward incoming calls placed to your tracking number.
Call Whisper – This turns on and off the whisper message for the receiver of the call.
Whisper Message – A message heard by the receiver of the phone call when they answer the call. The caller will not hear this message. From the caller’s perspective, the phone will continue to ring until the whisper message has been completed.
Use Call Flow – This allows you to choose if you would like to use a Call Flow for incoming calls or have the call forward directly to a phone number without the call flow work flow.
Call Flow Selection – Select the Call Flow that should be used by this phone number for incoming calls. Call Flows are implemented at the company level, so if you do not have one for a company, you can create one and then assign it to a phone number.
Call Recording – This turns on and off call flow recordings. If turned on, incoming calls will be recorded. This option is only available if Call \Flows are disabled. This will enable recording of incoming phone calls. If a call flow is selected, this option is handled from within the Call Flow.
Call Greeting –Â When turned on, our system will read an automated message to the caller of incoming calls. You can specify the message to be read in the text box. This text box will only be visible if the switch is enabled for call greeting. Thiscall greeting option is also only available if Call Flows are disabled. If a Call Flow is selected, this option will be handled there.
Port Number
Call porting allows you to import your tracking phone numbers from other carriers into LeadSnap. By law, every carrier is required to allow phone numbers to be ported out of their system. Once you have ported a phone number, you will no longer have financial responsibility to the previous carrier. It may be necessary to inform this carrier to cancel service on the phone number. Please ensure the phone number is within LeadSnap and functional before making this request.
Port Number Steps
1. Expand the Phone System item from the left navigation.
2. Expand Numbers from the submenu within the Phone System item.
3. Expand Port Number.
4. Select New.

5. Select the country from the drop down menu.
6. Agree to the terms through the checkboxes.

7. Complete the form with your phone numbers. Use the address on file associated with the current carrier where you will be porting the phone numbers from.
8. Provide the signed letter of authorization.
9. Include a billing statement from your current provider.
