Assign companies to a user

LeadSnap gives you the flexibility of being able to assign one company to multiple clients or multiple companies to a single client, aside from a one to one relationship.

You may have one lead generation website that produces so many leads you divide them between several clients or you may have a few websites producing lots of leads to a single client.

Either way, in this section you will learn how to assign a company or more to a single user.

Steps

  1. On the left menu, click on “Users”, then “All Users”.
  2. Find the user you wish to assign a company to. Click on “View”.
  3. Click on “Profile”.
  4. Click on “Edit User”.
  5. Click on “Companies List” by “Assign Companies” and select the company or companies you want to link this user to.
  6. Click on the Update button.

Video Tutorial

Need more details or just want to see how it’s done? Watch the video below.

Edit Company

The edit company screen allows you to edit any of the settings associated with a company such as:

  • Company Name
  • Website Address
  • Assigned Client
  • Lead Intake Form
  • Timezones
  • Auto-forwarding settings
  • Phone mapping settings
  • Qualified call filters

The edit company screen can be accessed in a lot of different ways. Below are two different ways.

From the company dashboard, you will see an edit button in the top right corner.

Through Company Dashboard

Click on a company’s name anywhere within the application to get the company dashboard. From the company dashboard click the edit button in the top right corner.

Through All Companies Page

  1. Expand settings from the left navigation menu
  2. All Companies
  3. Choose Edit next to the company you wish to edit

Connect Clients and Companies

Companies are a central building block within the LeadSnap platform. When you first create a company it will not have many of the associations necessary to take full advantage of our system. One of the first connections you will want to make is the connection between the client and the company. This is a quick and simple process.  Like many things in LeadSnap, there are several ways to do things. You can either assign the client to the company or the company to the client.

Why Connect Clients and Companies

  • Leads get auto-assigned to clients as they arrive or are created.
  • Allows for auto-forwarding of leads to clients.
  • Clients can only see the leads they are assigned to when they log in.
  • Allows for automated reporting of “Leads by Client” throughout our lead management module.


Assign Company to Client

  1. Settings from the left navigation menu.
  2. Expand companies from within the settings menu on the left navigation menu.
  3. Select All Companies.
  4. Select the Edit button next to the company for which you would like to assign a client.
  5. Click into the “Assign Clients” box and you should see a list of the clients you have created within LeadSnap.
    1. If your client is not listed here, please see the help article on creating new clients. 
  6. Click Update at the bottom of the screen to save your changes.

Assign Client to Company

  1. Settings from the left navigation menu.
  2. Expand Users from within the settings menu on the left navigation menu.
  3. Select All Users.
  4. Select the View button next to the user for which you would like to assign a company.
  5. In the top right corner select the “Edit User” button.
  6. Click the “Companies List” button and click the checkboxes next to the companies you would like to associate with this user.
    1. Note if you do not see your company here than you need to see the help article on creating new companies. 
    2. If you do not have the Assign Companies button, check to make sure the user is not an Admin user as this button will not be visible for admin users. Admin users can see all companies within your account. 
  7. Click Update at the bottom of the screen to save your changes.

Add a new company

Companies are a central building block within LeadSnap system. The Lead Management and Reputation Management modules both work on a company level. Google My Business or GMB locations have an association with companies as well. There are no charges or credits needed to create companies. Each company can have only one website associated with it. If you are new to LeadSnap creating your first company is a great starting spot.

Step by Step Guide

Opening the New Company Wizard

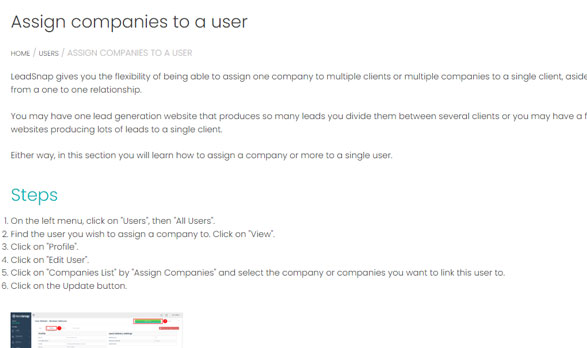
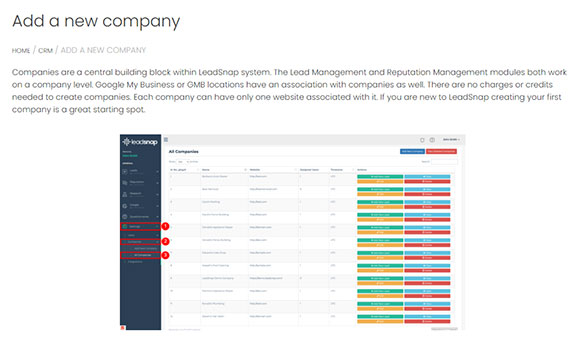
On the left navigation menu, click to expand the “Settings” item, then “Companies” and select “Add New Company”. This can also be achieved by clicking the “Add New Company” button in the “All Companies” screen.

Adding Company Details

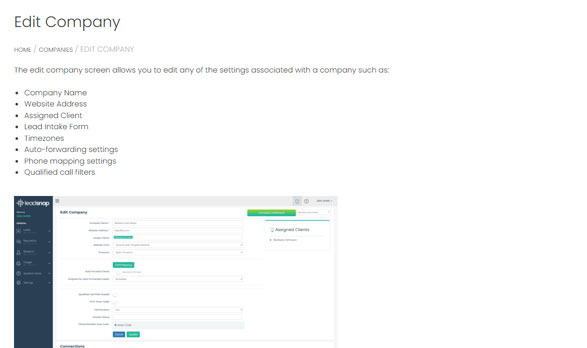
Complete the required fields as recommended below:

  1. Company Name – Enter a name that will help you identify this company. We recommend using some name that will help you associate your company with your website such as variation of URL.
  2. Website URL – Enter the URL or website address for the website associated with the company.
  3. Website Form – This is the form you wish to use within LeadSnap. This allows for the mapping of the fields of your website to fields within LeadSnap. If you have not already created one for your company then select the “Default” form. You can follow the “Add New Website Form” support guide at a later date.
  4. Timezone – Select the timezone for your company. This most likely is the city where your website is located.

Click on the “Submit” button. This will will create the new company in LeadSnap and take you to it’s Dashboard.

Activating Lead Management and Reputation Modules

You will also be presented with a pop-up box telling you the Company was created successfully and asking if you wish to activate additional the Lead Management and Reputation modules.

LeadSnap modules work on a credit basis, so it is up to you if you wish to activate them now or later. You can click on the “View Plans” button to see the associated costs.

To do this later then click on the “No Thanks” button and you will be returned to the company Dashboard.

To activate them now, tick the checkboxes and click the “Activate” button.

You will be presented with “Features Activated Successfully” messagebox. Click “OK” and you will be returned to your new Company Dashboard.

How To Edit The Time Zone For A Company

How To Edit The Time Zone For A Company.

If your leads are showing up with a different time then they are supposed to be, then its likely that your company has the incorrect time zone selected.

To change the time zone for a company you will need to go to settings in the left navigation, companies, then select all companies. From here find the company you want to change the time zone for and click edit. One you have clicked edit, you will be able to change the time zone to the time you prefer.