Add Email Account

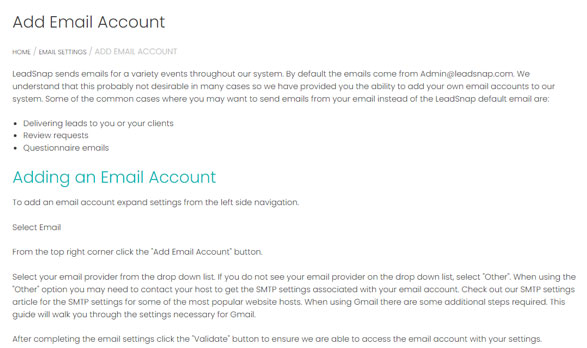
LeadSnap sends emails for a variety events throughout our system. By default the emails come from [email protected]. We understand that this probably not desirable in many cases so we have provided you the ability to add your own email accounts to our system. Some of the common cases where you may want to send emails from your email instead of the LeadSnap default email are:

  • Delivering leads to you or your clients
  • Review requests
  • Questionnaire emails

Adding an Email Account

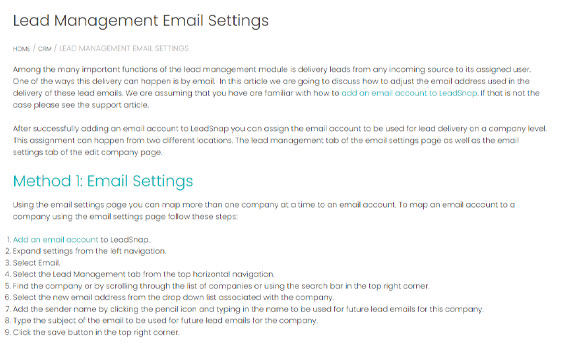
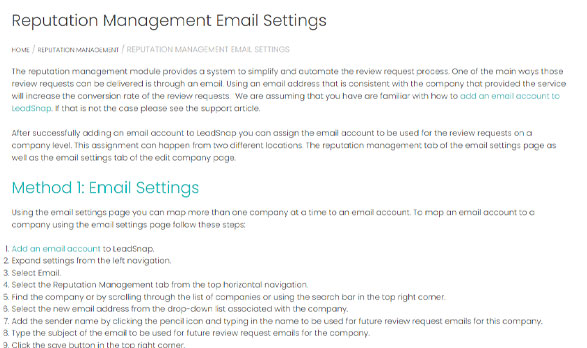
To add an email account expand settings from the left side navigation.

Select Email

From the top right corner click the “Add Email Account” button.

Select your email provider from the drop down list. If you do not see your email provider on the drop down list, select “Other”. When using the “Other” option you may need to contact your host to get the SMTP settings associated with your email account. Check out our SMTP settings article for the SMTP settings for some of the most popular website hosts. When using Gmail there are some additional steps required. This guide will walk you through the settings necessary for Gmail.

After completing the email settings click the “Validate” button to ensure we are able to access the email account with your settings.

Assuming your connection is successful you should see a message like this:

After a successful validation message it is a good idea to send a test email by clicking the “Send Test” button.

In the popup menu enter an email address where you can receive our test email message. If you did not receive the email test, please check your spam email. The test email should be from the email address you just added to our system.

After receiving the test email message you can now save the email address to our system.

Once the email address is saved to our system you can start send emails from our system for Lead Emails, Review requests and Questionnaires.

For Gmail and Gsuite there are some special settings to make in order to get things to work correctly. You can find out more about these settings within this article.

Gmail/Gsuite Email Settings


Check out these articles for more information about sending emails for the associated modules.

Email Settings for Leads

Email Settings Reputation Management Module

Email Settings Questionnaire Module

Lead Management Email Settings

Among the many important functions of the lead management module is delivery leads from any incoming source to its assigned user. One of the ways this delivery can happen is by email.  In this article we are going to discuss how to adjust the email address used in the delivery of these lead emails. We are assuming that you have are familiar with how to add an email account to LeadSnap. If that is not the case please see the support article.

After successfully adding an email account to LeadSnap you can assign the email account to be used for lead delivery on a company level. This assignment can happen from two different locations. The lead management tab of the email settings page as well as the email settings tab of the edit company page.

Method 1: Email Settings

Using the email settings page you can map more than one company at a time to an email account. To map an email account to a company using the email settings page follow these steps:

  1. Add an email account to LeadSnap.
  2. Expand settings from the left navigation.
  3. Select Email.
  4. Select the Lead Management tab from the top horizontal navigation.
  5. Find the company or by scrolling through the list of companies or using the search bar in the top right corner.
  6. Select the new email address from the drop down list associated with the company.
  7. Add the sender name by clicking the pencil icon and typing in the name to be used for future lead emails for this company.
  8. Type the subject of the email to be used for future lead emails for the company.
  9. Click the save button in the top right corner.

Using the Bulk Apply

The bulk apply allows assigning an email address to more than one company at a time.

  1. Select the checkboxes next to more than one company.
  2. Select the email account you wish to assign to the selected companies from the bulk apply dropdown box.
  3. Click save to apply your changes to the selected companies.

Method 2: Edit Company

The second method for assigning an email account to a company can be done from the edit company screen.

  1. Add an email account to LeadSnap.
  2. Expand settings from the left navigation menu.
  3. Expand the companies sub-menu item.
  4. Select all companies.
  5. Select edit next to the company for which you would like to update the email account.
  6. Select the email settings tab.
  7. Choose the email account from the dropdown list next to lead management.
  8. Click the update button.

Reputation Management Email Settings

The reputation management module provides a system to simplify and automate the review request process. One of the main ways those review requests can be delivered is through an email. Using an email address that is consistent with the company that provided the service will increase the conversion rate of the review requests.  We are assuming that you have are familiar with how to add an email account to LeadSnap. If that is not the case please see the support article.

After successfully adding an email account to LeadSnap you can assign the email account to be used for the review requests on a company level. This assignment can happen from two different locations. The reputation management tab of the email settings page as well as the email settings tab of the edit company page.

Method 1: Email Settings

Using the email settings page you can map more than one company at a time to an email account. To map an email account to a company using the email settings page follow these steps:

  1. Add an email account to LeadSnap.
  2. Expand settings from the left navigation.
  3. Select Email.
  4. Select the Reputation Management tab from the top horizontal navigation.
  5. Find the company or by scrolling through the list of companies or using the search bar in the top right corner.
  6. Select the new email address from the drop-down list associated with the company.
  7. Add the sender name by clicking the pencil icon and typing in the name to be used for future review request emails for this company.
  8. Type the subject of the email to be used for future review request emails for the company.
  9. Click the save button in the top right corner.

Using the Bulk Apply

The bulk apply allows assigning an email address to more than one company at a time.

  1. Select the checkboxes next to more than one company.
  2. Select the email account you wish to assign to the selected companies from the bulk apply dropdown box.
  3. Click save to apply your changes to the selected companies.

Method 2: Edit Company

The second method for assigning an email account to a company can be done from the edit company screen.

  1. Add an email account to LeadSnap.
  2. Expand settings from the left navigation menu.
  3. Expand the companies sub-menu item.
  4. Select all companies.
  5. Select edit next to the company for which you would like to update the email account.
  6. Select the email settings tab.
  7. Choose the email account from the dropdown list next to reputation management.
  8. Click the Update button.

Questionnaire Email Settings

The questionnaire module makes it easy to gather information from our clients or prospective clients. First, we build our questionnaire using the LeadSnap form builder. Next, we send an email that contains a link to our questionnaire. When the user clicks on the link they are taken to the questionnaire that gathers the requested information and saves it safely in our system. By default, this questionnaire comes from [email protected], which we realize may not be ideal in all situations. You are free to customize this to your own email account and have those requests come from an email address that your client will recognize. The first step is to add an email account to LeadSnap.

After successfully adding an email account to LeadSnap you can assign the email account to be used for the questionnaire delivery on a questionnaire level. This assignment can happen from the edit questionnaire page.

Assign Email Account

There are two prerequisites before assigning an email account to a questionnaire. First, you must have already added the email account to LeadSnap. Second, you must have an existing questionnaire. To map an email account to a questionnaire follow these steps:

  1. Expand Questionnaires from the left navigation.
  2. Select All Questionnaires.
  3. Select Edit next to the questionnaire for which you would like to update the sending email account.
  4. Select the new email account from the “Sender Email” drop-down box.
  5. Click the submit button to save the new email settings for the questionnaire.

Gmail and G Suite Settings

This guide will help you connect your Gmail or G Suite email accounts to LeadSnap within our SMTP settings area. Depending on the specific account settings within your Gmail or G Suite account one or both of these steps may be necessary. To learn more about SMTP settings please read the associated support guide.

Reputation Management SMTP

  1. Expand Reputation Management from the left side navigation.
  2. Click Email.
  3. Select the SMTP Settings tab.

Allow Less Secure Apps

Here is an article from Gmail that explains more about the process.

While logged into your account this link should take you to the area to adjust the settings.

Google App Password

As an extra level of security Google has a feature that you can use with its products (such as Gmail) called app passwords or app-specific passwords.  The way this works is you can create a unique password for each application (in this case LeadSnap), this will not affect the main password for your account. You then use this password just like you would your normal password within the chosen application. In a sense, it is like an alternative password that will only apply to one application.

For more information about how to set this up please check out this support article from Gmail: App Passwords.

SMTP Email Settings

The SMTP settings tab within reputation management allows you to send a review request from any email address that you select. This is important because if you try to request a review from LeadSnap and the customer does not recognize our company they are unlikely to provide a review.

In order for this to work properly, you must authenticate your email address in our system. Below is a list of common hosting companies and email providers that you can you use for our settings.

With Gmail, it may be necessary to take some extra steps in order to authenticate properly. Please check out this guide: STMP settings for Gmail and Gsuite.

SMTP Settings Explained

  • Enable SMTP – In order to take advantage of the SMTP email system, you must enable it here. These setting apply on a company level.
  • Email Address – Enter the email address you would like to send review requests from.
  • Password – Enter the password for the email account that you would like to send review requests from.
  • Sender Name – Enter the name you would like displayed in the review request email.
  • Host – Enter the SMTP host settings. This will be different depending on your email host. If it is a branded email account such as [email protected] the email account is usually controlled by the web host (in this case wherever bobsplumbing.com is hosted). If you are using Gmail, Outlook, Hotmail, etc. they have their own SMTP settings. We have listed many of the common providers in the table below.
  • Outgoing Port – This can vary depending on the level of security you are using and the email host. Port 25, 587, and 465 are commonly used.
  • Security – The type of security you would like to use for your email server. This will vary depending on your host and this choice will affect the port number.

Common SMTP Settings

PROVIDER

URL

SMTP

1&1

1and1.com

Smtp.1and1.com

Airmail

Airmail.net

Mail.airmail.net

AOL

Aol.com

Smtp.aol.com

AT&T

Att.net

Outbound.att.net

Bluewin

Bluewin.ch

Smtpauths.bluewin.ch

BT Connect

Btconnect.com

Mail.btconnect.tom

Comcast

Comcast.net

Smtp.comcast.net

Earthlink

Earthlink.net

Smtpauth.earthlink.net

Gmail

Gmail.com

Smtp.gmail.com

Gmx

Gmx.net

Mail.gmx.net

HotPop

Hotpop.com

Mail.hotpop.com

Libero

Libero.it

Mail.libero.it

Lycos

Lycos.com

Smtp.lycos.com

O2

o2.com

Smtp.o2.com

Orange

Orange.net

Smtp.orange.net

Outlook.com (former Hotmail)

Outlook.com

Smtp.live.com

Tin

Tin.it

Mail.tin.it

Tiscali

Tiscali.co.uk

Smtp.tiscali.co.uk

Verizon

Verizon.net

Outgoing.verizon.net

Virgin

Virgin.net

Smtp.virgin.net

Wanadoo

Wanadoo.fr

Smtp.wanadoo.fr

Yahoo

Yahoo.com

Mail.yahoo.com

Email SPF Record Validation