Google Business Profile Review Link

Google Business Profile Share Link

1. Log into your Google Business Profile.

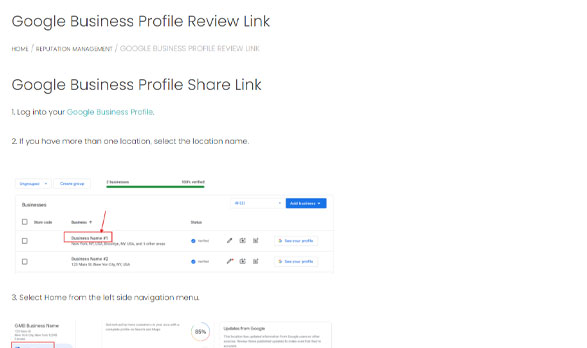
2. If you have more than one location, select the location name.

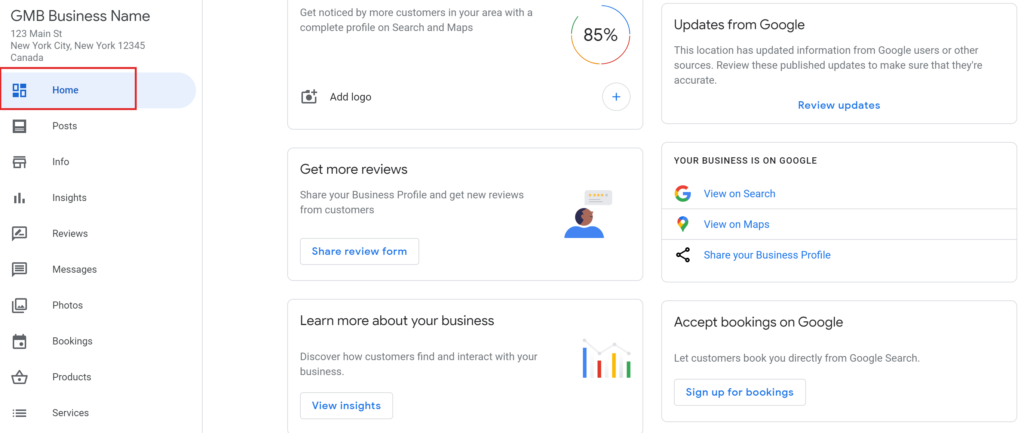
3. Select Home from the left side navigation menu.

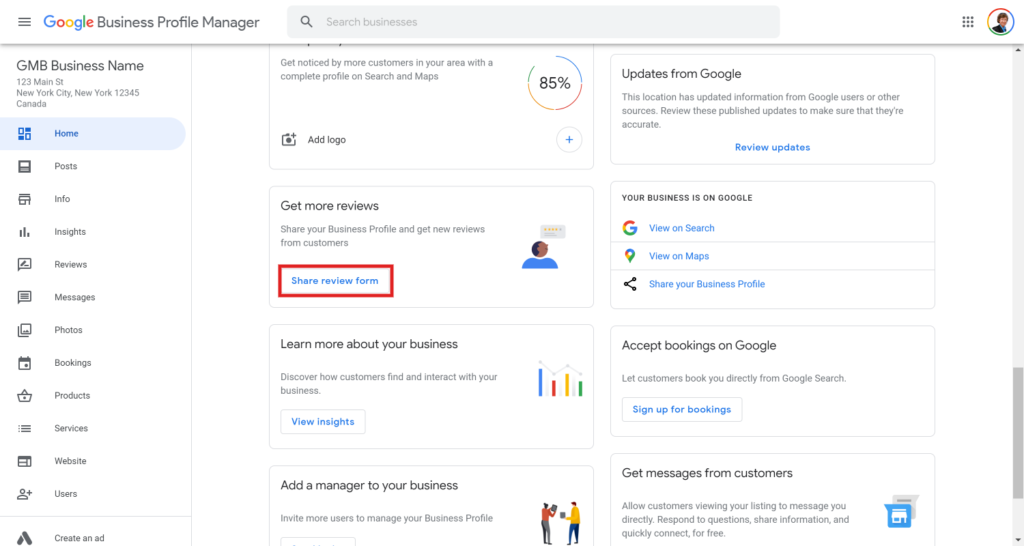
4. Select Share “Review review form“.

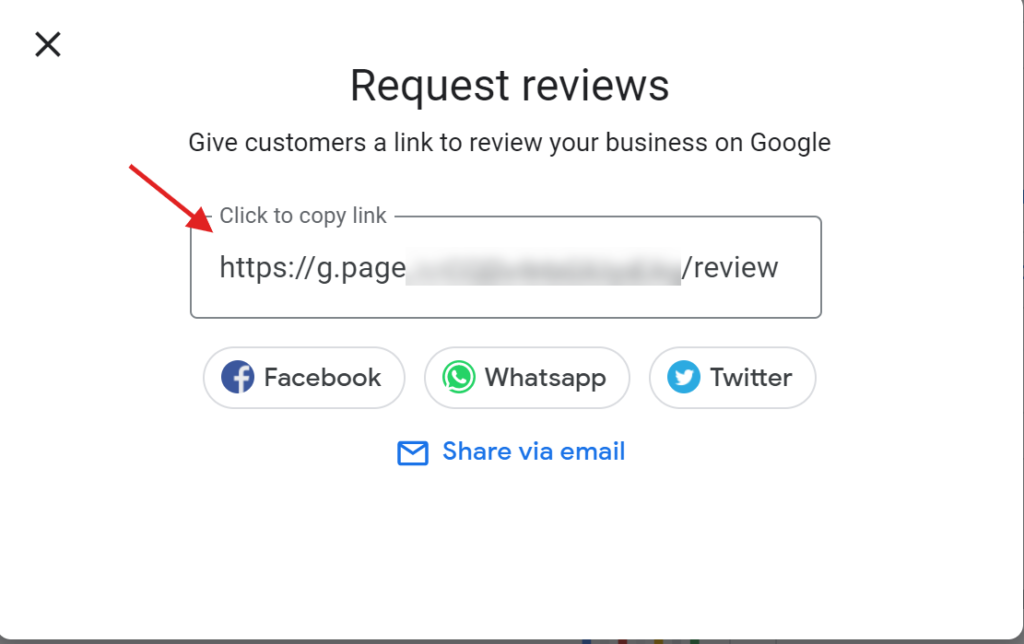
5. Copy the review link by clicking within the copy box.

6. Return to LeadSnap and paste this link into the link field.

Add Email Account

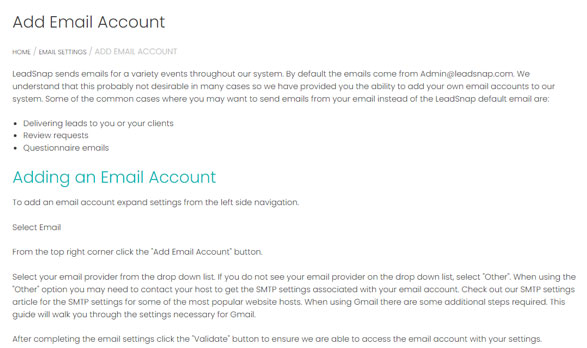
LeadSnap sends emails for a variety events throughout our system. By default the emails come from [email protected]. We understand that this probably not desirable in many cases so we have provided you the ability to add your own email accounts to our system. Some of the common cases where you may want to send emails from your email instead of the LeadSnap default email are:

  • Delivering leads to you or your clients
  • Review requests
  • Questionnaire emails

Adding an Email Account

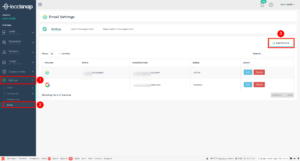
To add an email account expand settings from the left side navigation.

Select Email

From the top right corner click the “Add Email Account” button.

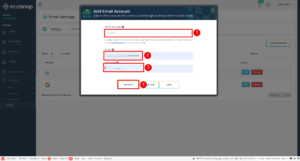
Select your email provider from the drop down list. If you do not see your email provider on the drop down list, select “Other”. When using the “Other” option you may need to contact your host to get the SMTP settings associated with your email account. Check out our SMTP settings article for the SMTP settings for some of the most popular website hosts. When using Gmail there are some additional steps required. This guide will walk you through the settings necessary for Gmail.

After completing the email settings click the “Validate” button to ensure we are able to access the email account with your settings.

Assuming your connection is successful you should see a message like this:

After a successful validation message it is a good idea to send a test email by clicking the “Send Test” button.

In the popup menu enter an email address where you can receive our test email message. If you did not receive the email test, please check your spam email. The test email should be from the email address you just added to our system.

After receiving the test email message you can now save the email address to our system.

Once the email address is saved to our system you can start send emails from our system for Lead Emails, Review requests and Questionnaires.

For Gmail and Gsuite there are some special settings to make in order to get things to work correctly. You can find out more about these settings within this article.

Gmail/Gsuite Email Settings


Check out these articles for more information about sending emails for the associated modules.

Email Settings for Leads

Email Settings Reputation Management Module

Email Settings Questionnaire Module

Reputation Management Email Settings

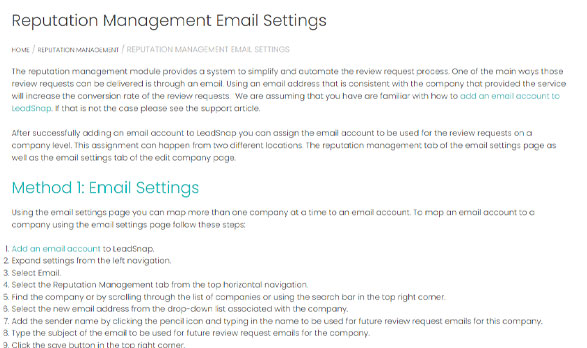
The reputation management module provides a system to simplify and automate the review request process. One of the main ways those review requests can be delivered is through an email. Using an email address that is consistent with the company that provided the service will increase the conversion rate of the review requests.  We are assuming that you have are familiar with how to add an email account to LeadSnap. If that is not the case please see the support article.

After successfully adding an email account to LeadSnap you can assign the email account to be used for the review requests on a company level. This assignment can happen from two different locations. The reputation management tab of the email settings page as well as the email settings tab of the edit company page.

Method 1: Email Settings

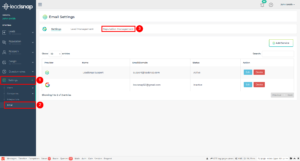
Using the email settings page you can map more than one company at a time to an email account. To map an email account to a company using the email settings page follow these steps:

  1. Add an email account to LeadSnap.
  2. Expand settings from the left navigation.
  3. Select Email.
  4. Select the Reputation Management tab from the top horizontal navigation.
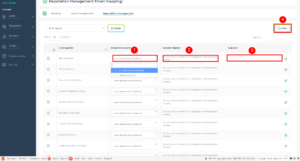
  5. Find the company or by scrolling through the list of companies or using the search bar in the top right corner.
  6. Select the new email address from the drop-down list associated with the company.
  7. Add the sender name by clicking the pencil icon and typing in the name to be used for future review request emails for this company.
  8. Type the subject of the email to be used for future review request emails for the company.
  9. Click the save button in the top right corner.

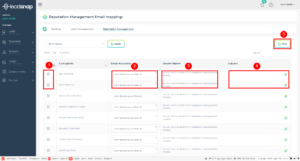
Using the Bulk Apply

The bulk apply allows assigning an email address to more than one company at a time.

  1. Select the checkboxes next to more than one company.
  2. Select the email account you wish to assign to the selected companies from the bulk apply dropdown box.
  3. Click save to apply your changes to the selected companies.

Method 2: Edit Company

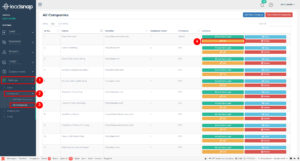
The second method for assigning an email account to a company can be done from the edit company screen.

  1. Add an email account to LeadSnap.
  2. Expand settings from the left navigation menu.
  3. Expand the companies sub-menu item.
  4. Select all companies.
  5. Select edit next to the company for which you would like to update the email account.
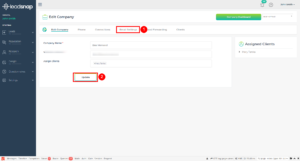
  6. Select the email settings tab.
  7. Choose the email account from the dropdown list next to reputation management.
  8. Click the Update button.

Deactivate Company

LeadSnap works on a credit basis for the lead management, reputation management, and GMB management modules. As you activate a credit in one of these modules the credit is deducted from the credit balance in your subscription. If at some point you would like reclaim the credit and release the connection between the module and the selected company you can do this through the company info tab of the company dashboard.


Step By Step Guide

1. Expand the Settings option from the left navigation menu.

2. Expand the companies sub-menu from within the settings menu item.

3. Select “All Companies”.

4. Click the view button next to company you wish to adjust.

5. Select the “Company Info” tab.

6. Chose Deactivate next to the selected module.

7. Confirm by entering your account password. This process is irreversible.

SMTP Email Settings

The SMTP settings tab within reputation management allows you to send a review request from any email address that you select. This is important because if you try to request a review from LeadSnap and the customer does not recognize our company they are unlikely to provide a review.

In order for this to work properly, you must authenticate your email address in our system. Below is a list of common hosting companies and email providers that you can you use for our settings.

With Gmail, it may be necessary to take some extra steps in order to authenticate properly. Please check out this guide: STMP settings for Gmail and Gsuite.

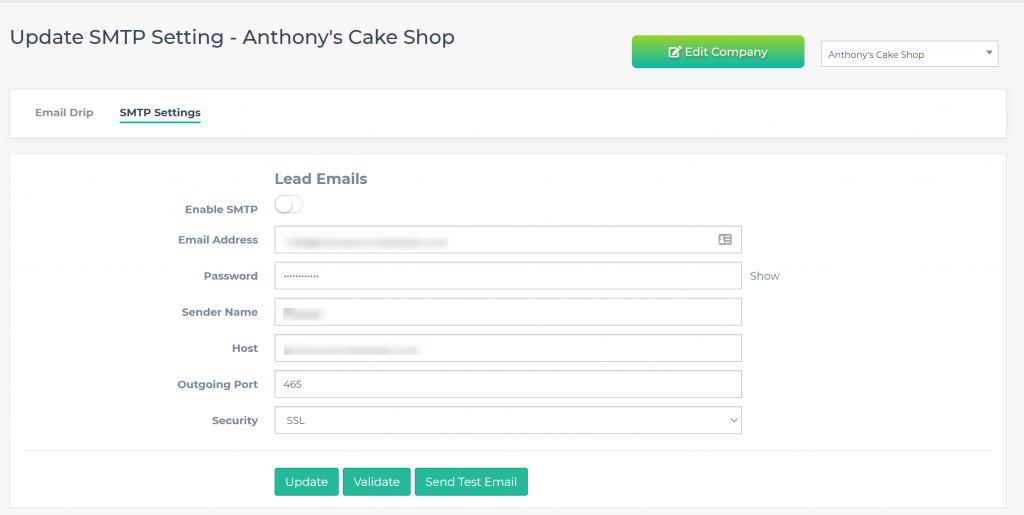
SMTP Settings Explained

  • Enable SMTP – In order to take advantage of the SMTP email system, you must enable it here. These setting apply on a company level.
  • Email Address – Enter the email address you would like to send review requests from.
  • Password – Enter the password for the email account that you would like to send review requests from.
  • Sender Name – Enter the name you would like displayed in the review request email.
  • Host – Enter the SMTP host settings. This will be different depending on your email host. If it is a branded email account such as [email protected] the email account is usually controlled by the web host (in this case wherever bobsplumbing.com is hosted). If you are using Gmail, Outlook, Hotmail, etc. they have their own SMTP settings. We have listed many of the common providers in the table below.
  • Outgoing Port – This can vary depending on the level of security you are using and the email host. Port 25, 587, and 465 are commonly used.
  • Security – The type of security you would like to use for your email server. This will vary depending on your host and this choice will affect the port number.

Common SMTP Settings

PROVIDER

URL

SMTP

1&1

1and1.com

Smtp.1and1.com

Airmail

Airmail.net

Mail.airmail.net

AOL

Aol.com

Smtp.aol.com

AT&T

Att.net

Outbound.att.net

Bluewin

Bluewin.ch

Smtpauths.bluewin.ch

BT Connect

Btconnect.com

Mail.btconnect.tom

Comcast

Comcast.net

Smtp.comcast.net

Earthlink

Earthlink.net

Smtpauth.earthlink.net

Gmail

Gmail.com

Smtp.gmail.com

Gmx

Gmx.net

Mail.gmx.net

HotPop

Hotpop.com

Mail.hotpop.com

Libero

Libero.it

Mail.libero.it

Lycos

Lycos.com

Smtp.lycos.com

O2

o2.com

Smtp.o2.com

Orange

Orange.net

Smtp.orange.net

Outlook.com (former Hotmail)

Outlook.com

Smtp.live.com

Tin

Tin.it

Mail.tin.it

Tiscali

Tiscali.co.uk

Smtp.tiscali.co.uk

Verizon

Verizon.net

Outgoing.verizon.net

Virgin

Virgin.net

Smtp.virgin.net

Wanadoo

Wanadoo.fr

Smtp.wanadoo.fr

Yahoo

Yahoo.com

Mail.yahoo.com

Overview

The Reputation module is responsible for requesting, maintaining and managing client feedback once they have completed a job for your leads. In essence, it is designed to increase the number of positive reviews and decrease the number of negative reviews for each company you have listed in LeadSnap.

In order to utilise this section of LeadSnap, you must first ensure you have a Company setup and activated. If you have not already done this you can follow the create a company support guide. Whilst Lead Management does flow into the Reputation module for future leads, you do not need this setup initially as you can manually add request reviews using a leads email address.

Step by Step Guide

On the left hand navigational menu, click on “Reputation”. This will reveal all the components available in the module for you to manage your reviews. Below each component is given a brief description with a link to a more detailed support guide.

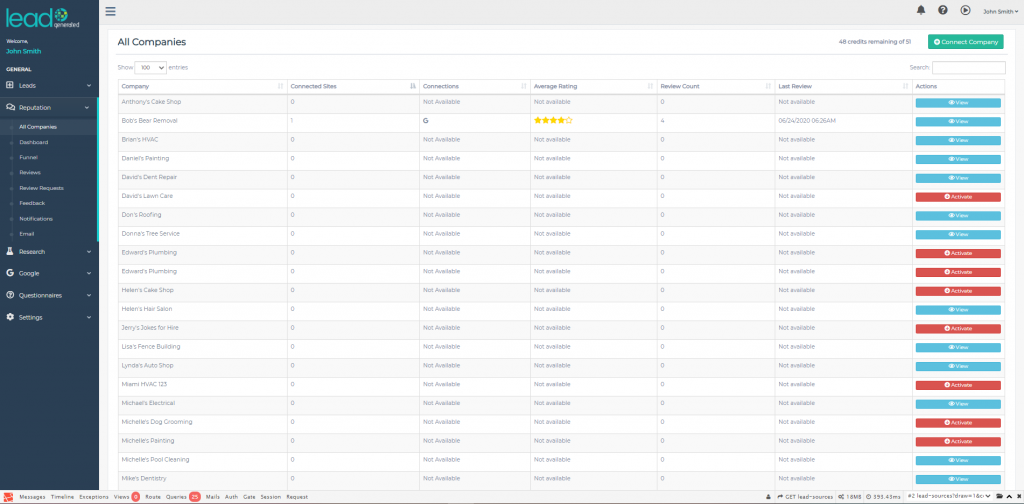
All Companies

This section is where all the companies you have created in the Add New Company settings setup section are listed for use in the  Reputation module. Before you are able to use this module, you will need to activate the company using one of your Reputation credits.

The data shown is a high-level overview of the number of connected review sites, what those sites are (e.g Google), how many reviews each company has, the last time a review was left, and the average review rating. If your company is activated, you will have a “View” button in the far right-hand column. Clicking this will take you to the Dashboard.

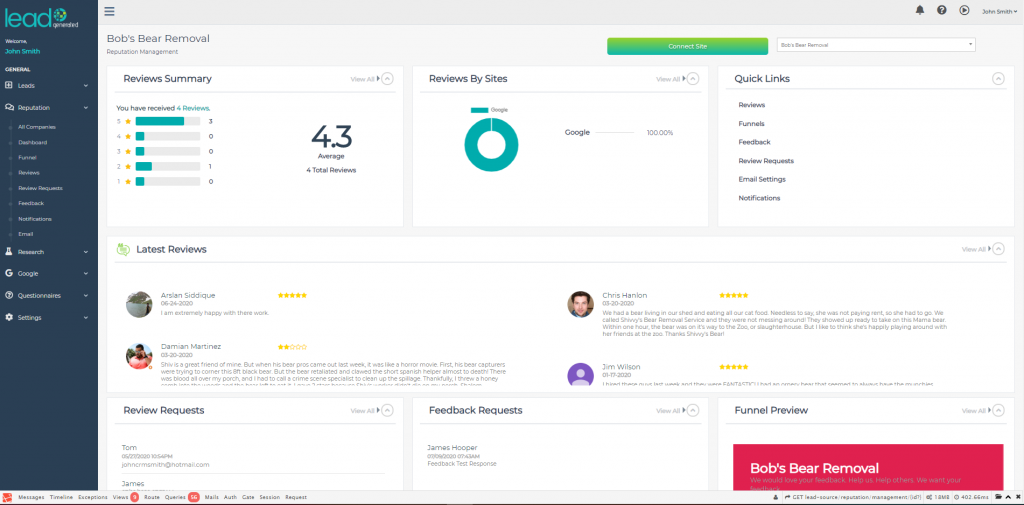
Dashboard

This section provides a number of widgets that relate to the remaining sections in the Reputation navigational menu and provides a snapshot of the company’s reputation status. Each widget has a “View All >” in the top right hand corner. Clicking on this will take you to the corresponding navigational menu option for that widget. So if you click on View All on the Reviews Summary widget it will take you to the “Reviews” section from the menu. There is also a “∧” in the top right hand corner. Clicking this will minimise that particular widget from view. You can maximise it again by clicking the “X” that appears.

To learn more about how to use the widgets and data overview follow the detailed “Reputation Dashboard” support guide

Funnel

The Funnel section is engine that drives the Reputation module. Here you can create the look and feel for the review requests and also configure how bad reviews are managed. You can choose between stars, faces and thumbs up/down. Good reviews can be passed directly to your public review sites, e.g. Google; Facebook or a custom site of your choosing. Bad reviews can be directed to the Feedback component. This prevents negative reviews being made public and impacting your external reputation but also allows you to direct these to the client so they can respond and address the reason for the bad review.

To learn how to configure the look and feel as well as the management of good and bad review, follow one these detailed support guides:

Reviews

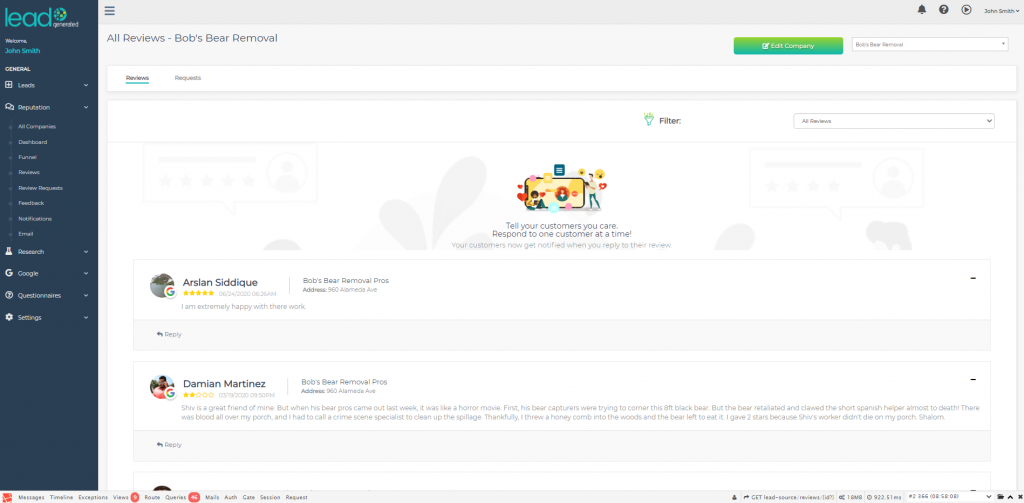
This section enables you to look at all reviews that have been submitted by your leads and reply to them in the Reviews section. You can even edit a reply once it has been sent. It is good practice to acknowledge a review as makes your leads feel like you are providing a personal touch and their opinion matters, they will remember that you commented. This may influence them in recommending your company to others and also coming back for potential repeat business.

To learn more about how to manage your reviews and send review request, follow the detailed “Reputation Reviews” support guide.

Review Requests

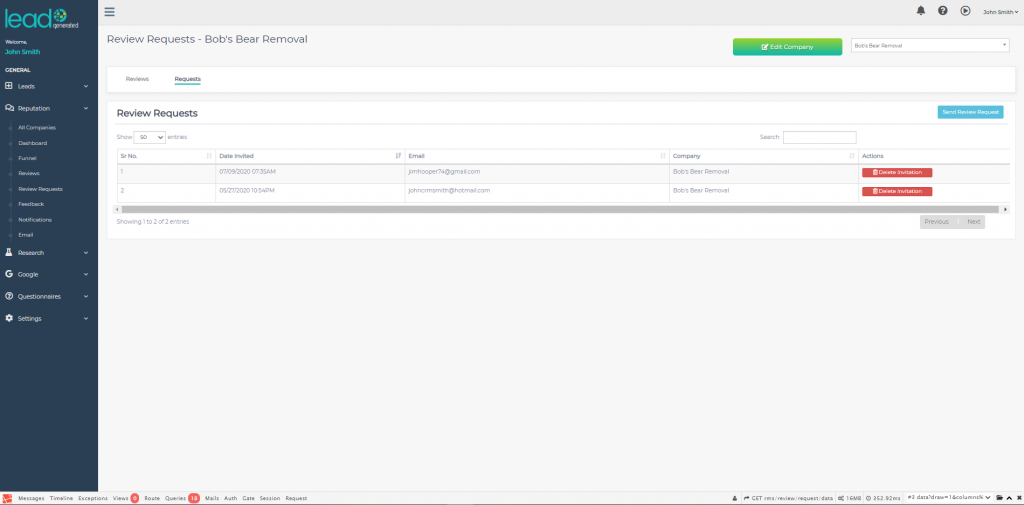
This section allows you send review requests and manage those invitations. All you need is a name and an email address and your lead is sent an invitation, configured in the Funnel and Email sections, to provide a review on the services they received. If necessary, you can delete an invitation as well.

To learn more about how to manage and send review request, follow the detailed “Reputation Review Requests” support guide.

Feedback

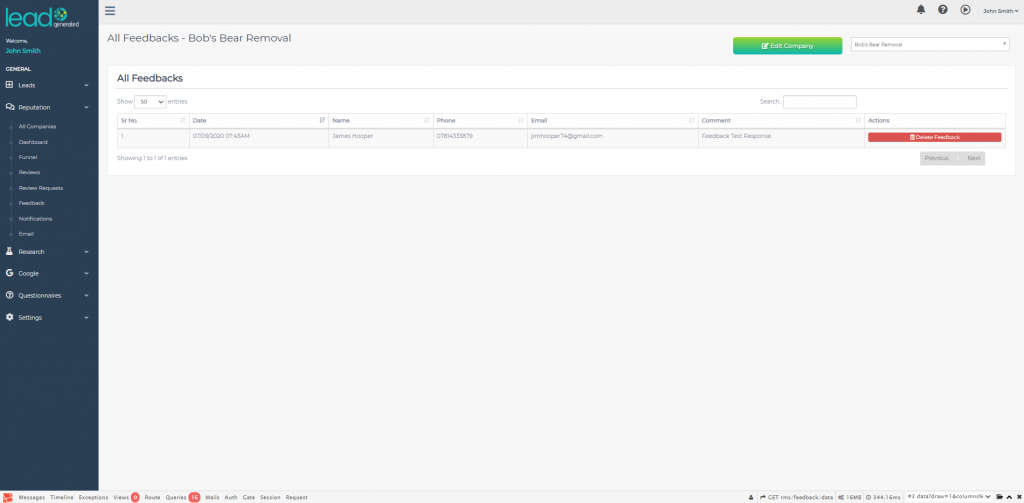
This section is simply an overview of all the negative feedback received from your leads. At present there is little functionality in this section other than to delete the feedback or a link to edit the company details.

Notifications

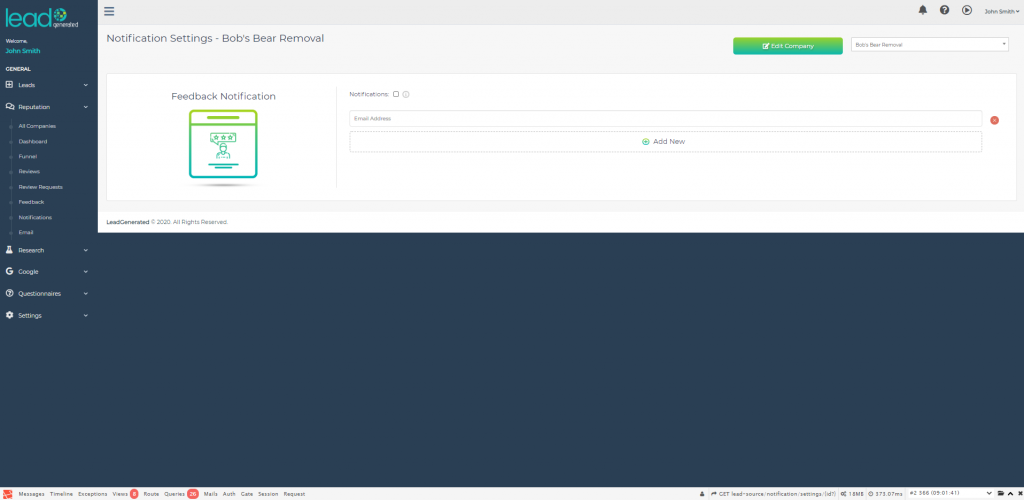
This section is where you can configure how negative feedback is managed once received. You can set up one or more email addresses for the feedback to be automatically forwarded on to. This ensures that you client can take action to mitigate and rectify, if possible, the leads experience with a view to returning a positive review instead.

To learn more about how to automate notification management, follow the detailed “Reputation Notifications” support guide.

Email

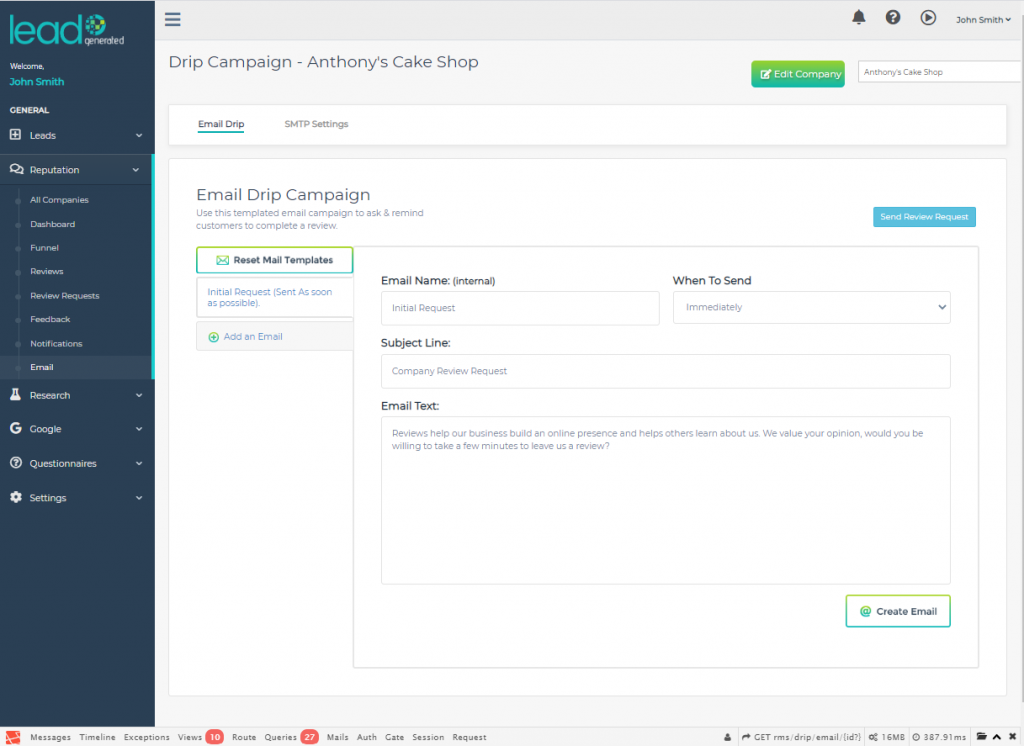
This section is used to create, automate or manually send either single or email drip campaigns requesting reviews from your leads. You can setup scheduled emails to remind leads to complete a review if they have not responded to the initial request. You can configure the Subject Line and Body of the Email for each one sent. Additionally you can setup the email SMTP settings for each company so that the requests, and follow ups, are sent from a recognised company email and not the LeadSnap system, which is the default.

To learn more about how to create email drip campaigns and configure each company’s, follow the detailed “Reputation Email” support guide.

Additional Reference Support Guides

Add a New Company

Lead Management Overview

All Companies

This support guide explains the functionality and how to use the All Companies section of the Reputation Management module.

Step by Step Guide

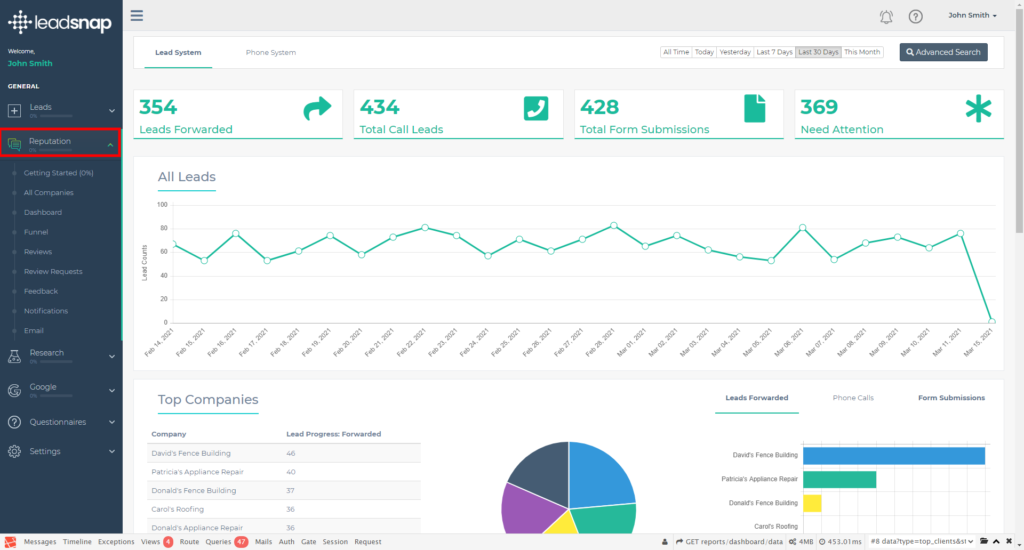
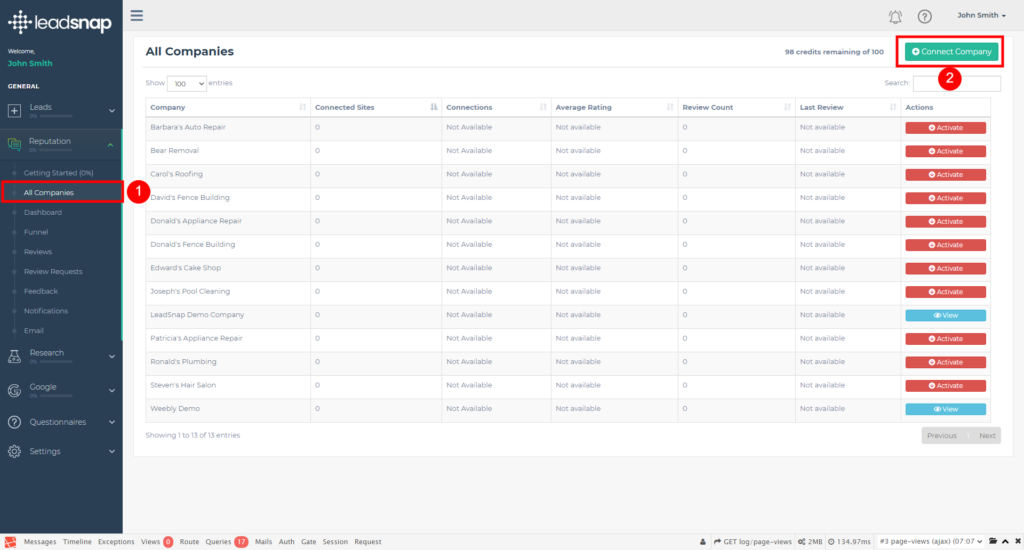
To access this section, click on the Reputation Module header in the left hand navigational menu. This will then expand the module and display all the sections available to you. The very first one is “All Companies”, click on this and the system will then display the list of all activated companies that you have created.
If the company you want to use is not listed, make sure you have set it up correctly by following the Add New Company support guide.

Connecting a Google Account

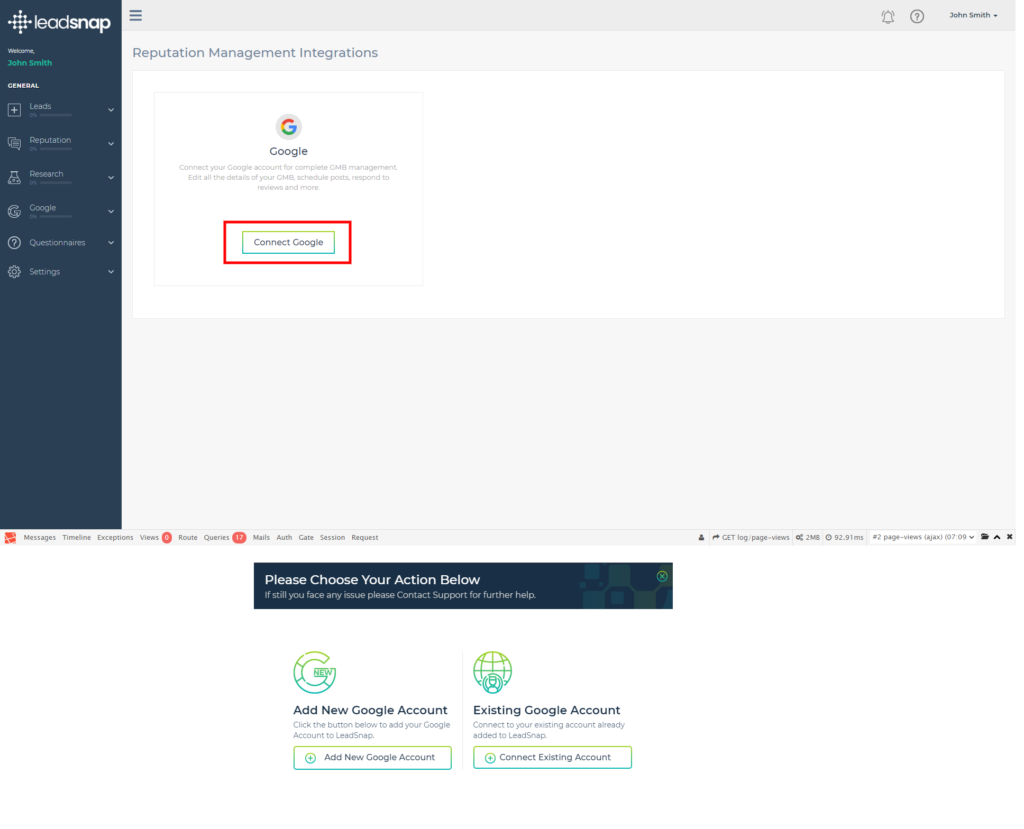
You can connect a new Google Account by clicking on the “Connect Company” button at the top right hand of the screen. This will take you to the “Reputation Management Integrations” screen. Here you will be able to connect via Google or Facebook (Facebook is currently in development). You can then connect your Google account by following the Connect Google Account support guide.

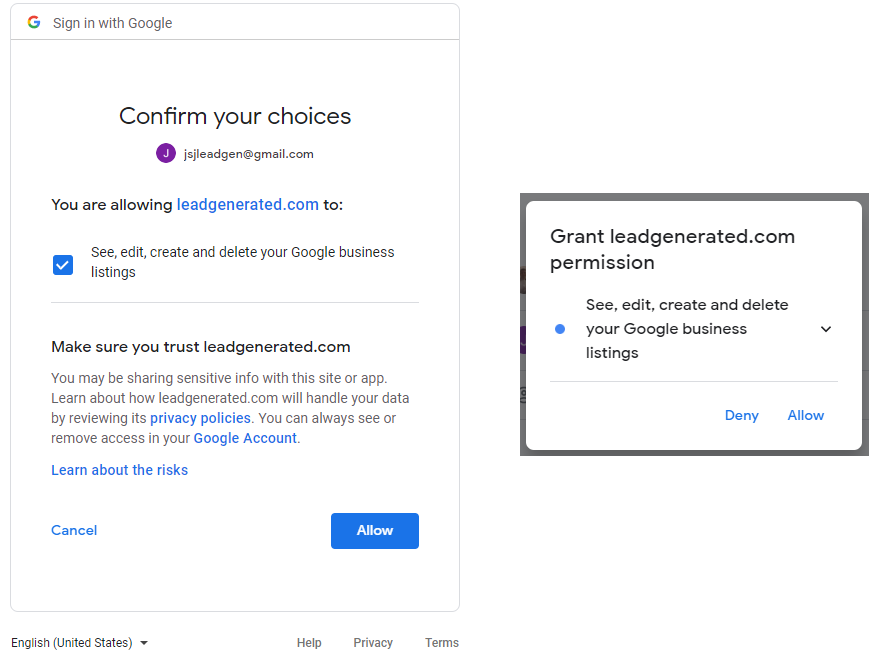
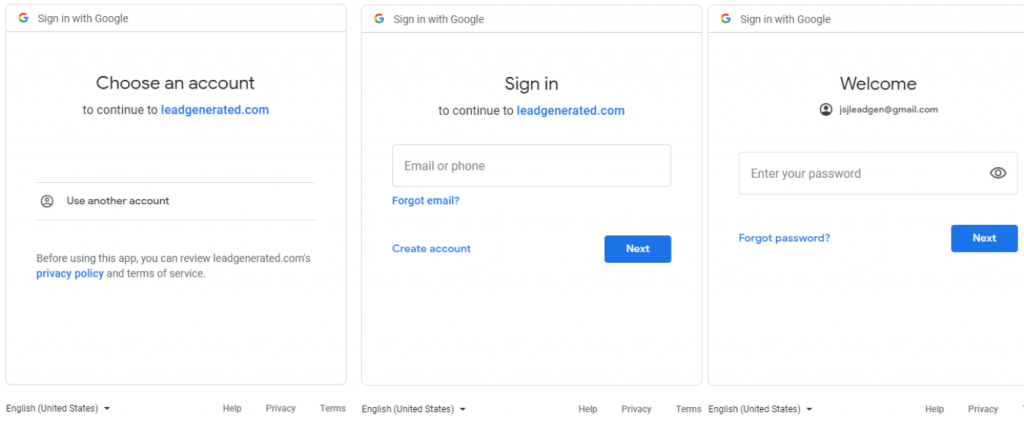
When you click on “Save Changes” you may get directed to a “Sign in with Google” screen like the one below. Simply choose the Gmail account you want to connect to. If it is not listed then choose “Use another account” option and you will be presented with the familiar Google sign in screens.

You will then be redirected back to the LeadSnap console and your new Google Account will be listed in the Google – Google Accounts section of the navigational menu.

Returning to the “All Companies” screen, you will see that it gives you an overview of the current status of your company and it’s reputation, if it has been activated or not, the number of connected review sites, the review sites that are connected (e.g. Google), the average rating, the number of reviews, the date of the last review and a column of actions. All the fields are non-editable, as most of them are simply displaying information from other sections, except the “Actions” column which will have either an “Activate” or “View” button shown.

Activating Company

Before you can use any of the other sections, you must Activate your company’s Reputation Management access via this section. This will require the use of 1 Reputation Credit. To activate your company for use in the Reputation module, go to the far right hand column labelled “Actions”. In the row for the company you wish to activate, you will see a red button titled “Activate” with a down arrow on the left hand side of it.

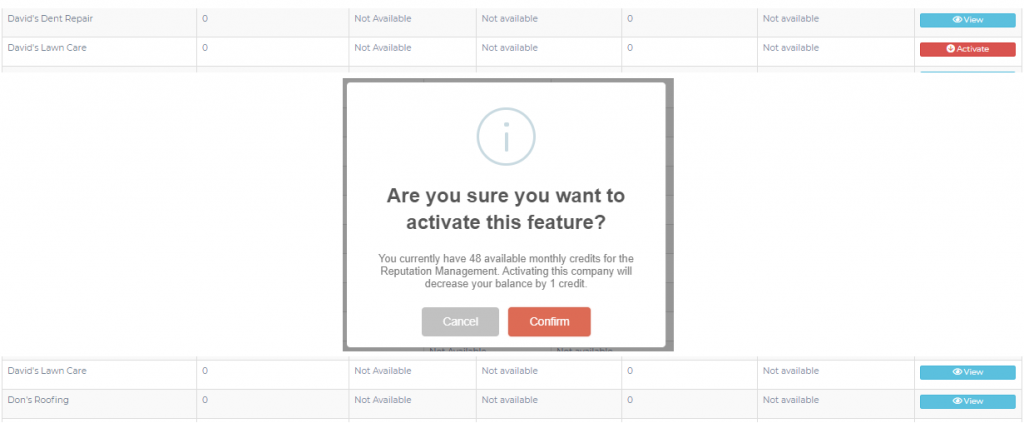
When you click the Activate button, you will be presented with an information box asking “Are you sure you want to activate this feature?” along with a message telling you how many monthly credits you have left for the module and that activating this company will decrease your balance by one. You are then offered the chance to “Cancel” this if you change your mind or “Confirm” if you decide to go ahead with it. If you choose “Cancel” then you will simply be returned to the All Companies list without any changes being made.

When you select “Confirm”, the system will then activate your company and tells you it has been successful in another pop-up information box with a circle ticked. The screen will then automatically refresh and you will notice the red “Activate” button in the far right hand column has now been replaced with a light blue “View” button with an eye icon to the left of it.

You have now successfully activated your company for use with the Reputation Management module of LeadSnap system. If you now click on the “View” button in the “Actions” column you will be taken to the Reputation Dashboard.

Review Funnel

This support guide explains the functionality and how to use the Funnel section of the Reputation Management module.

Step by Step Guide

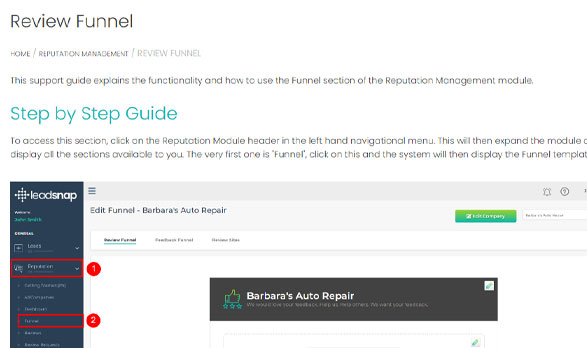
To access this section, click on the Reputation Module header in the left hand navigational menu. This will then expand the module and display all the sections available to you. The very first one is “Funnel”, click on this and the system will then display the Funnel template.
Overview

The Funnel section is the beating heart of the Reputation module and allows you to configure how you want positive and negative reviews to be handled. We will walk you through how to configure each section but the overall essence is to protect your businesses reputation online and prevent negative or unfounded comments being published without your knowledge.
This component is the where you can configure the look and feel of the review requests you send out, what type of review system you want to use and at what point you want reviews to not be published before you have a chance to address any issues and potentially gain a positive review instead.

Selecting the Company

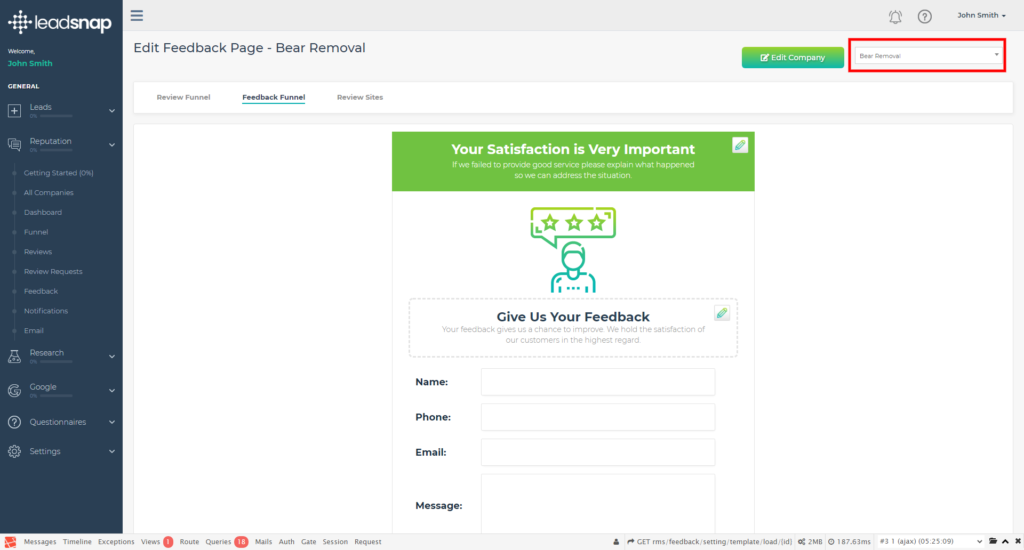
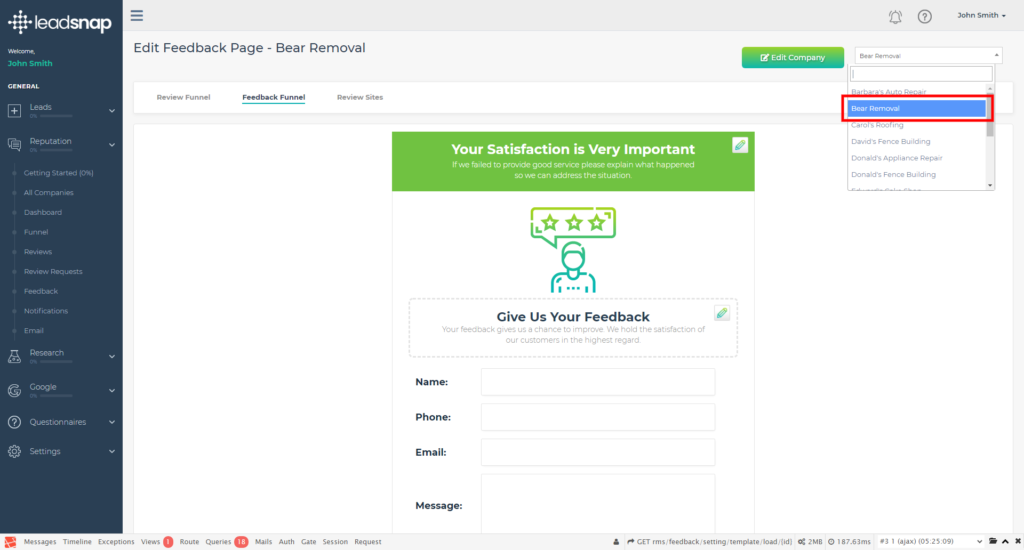
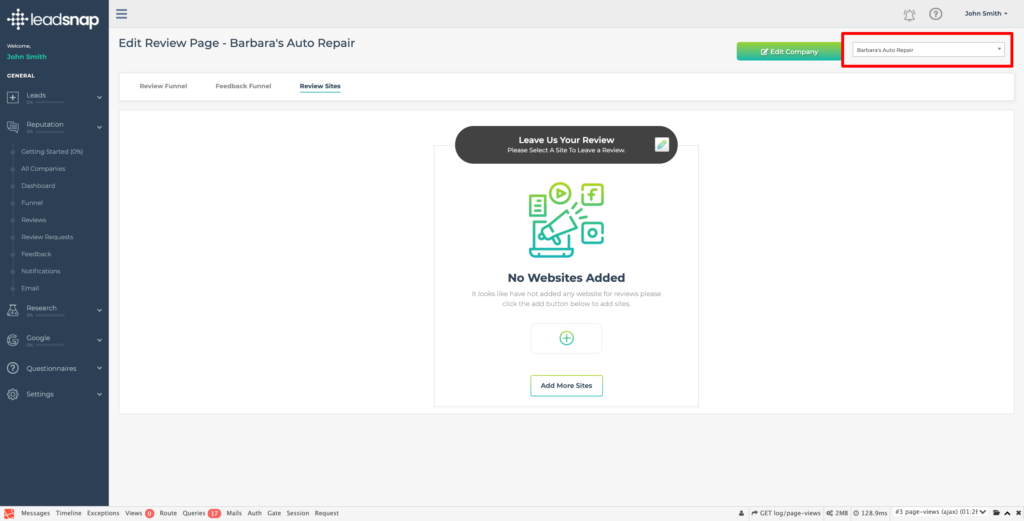
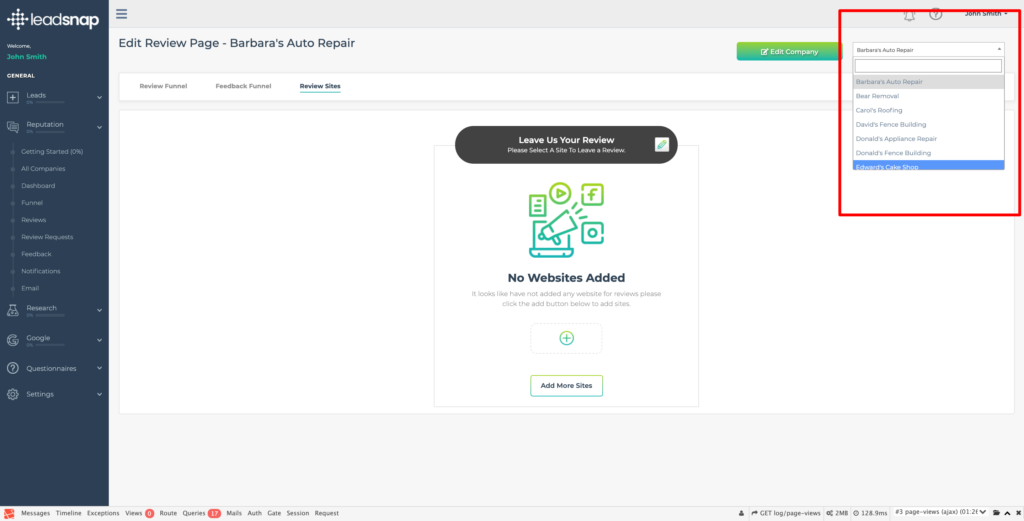
First you need to ensure you are working on the correct company’s Review Funnel. To change the company you need to go to the top right hand corner of the screen and click on the arrow in the dropdown menu, scroll down and click on the company you wish to configure.

You can change the company you are working on from all three of the component screens (Review Funnel; Feedback Funnel and Review Sites) in the Funnel section.

Editing the Company

Once selected, you now also have the option of editing the company information from the Funnel. This can also be done from any of the component screens in this section.

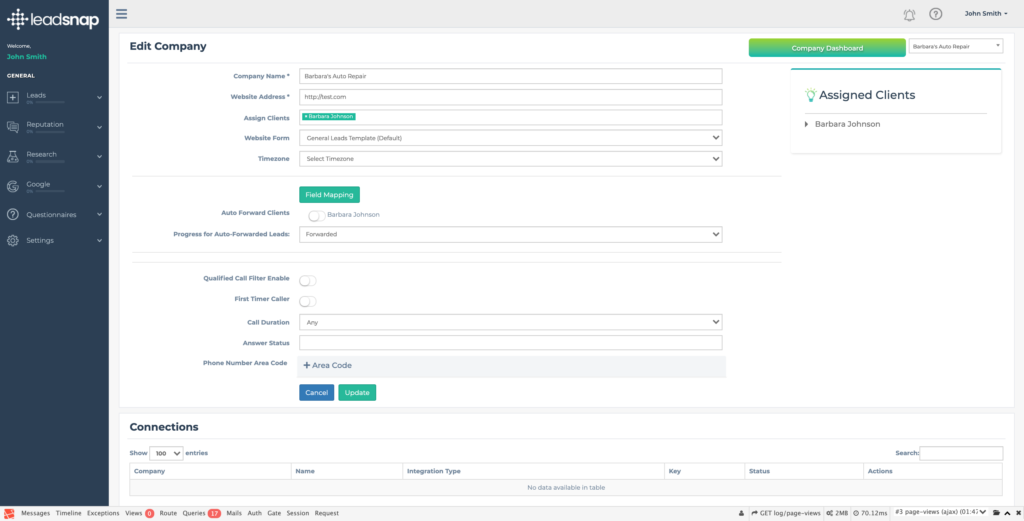
Clicking the button will take you directly to the Edit Company screen that you can would normally have to navigate to via the “Settings-Companies-All Companies” navigational menu.

Once you have updated your company information, you will need to click on the Update button. A green banner at the top of the screen will indicate that the information has been updated successfully.

To return to the Funnel section, you will need to go through the navigational menu again by selection “Reputation – Funnel”.

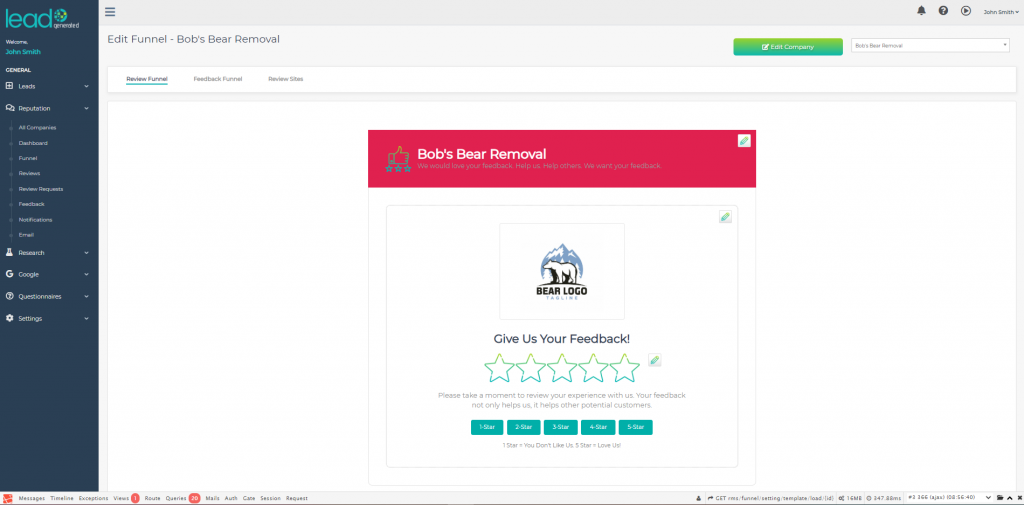
Configuring the Header

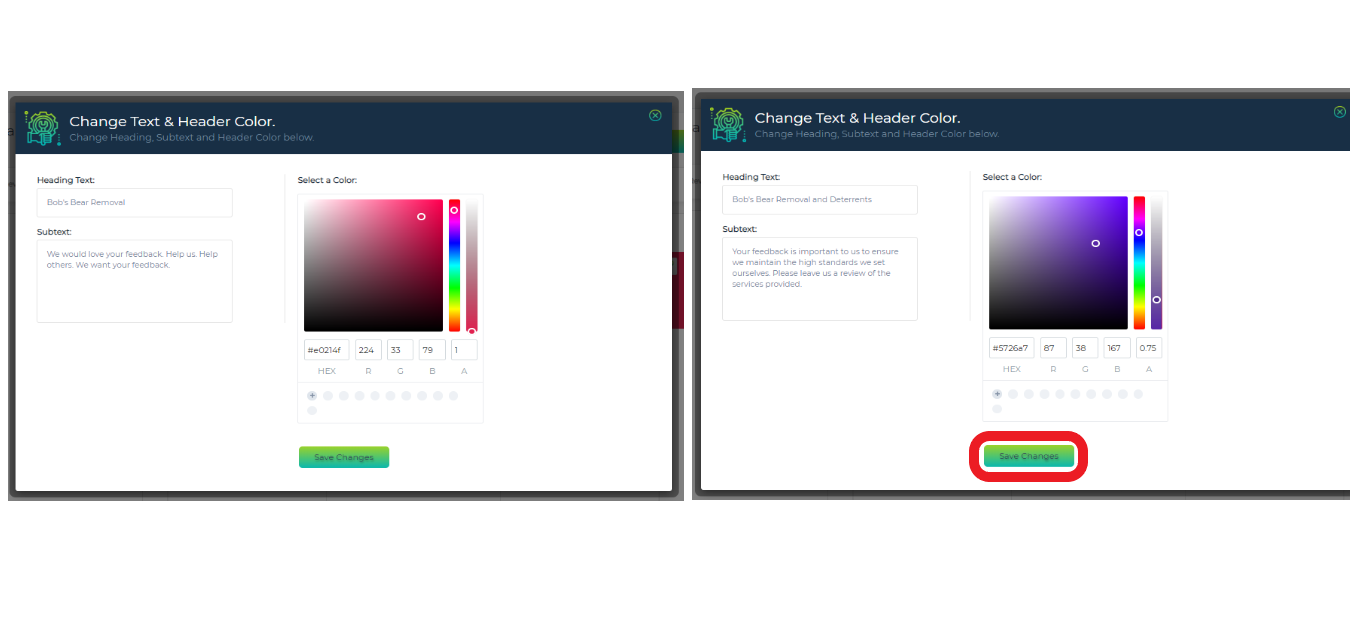
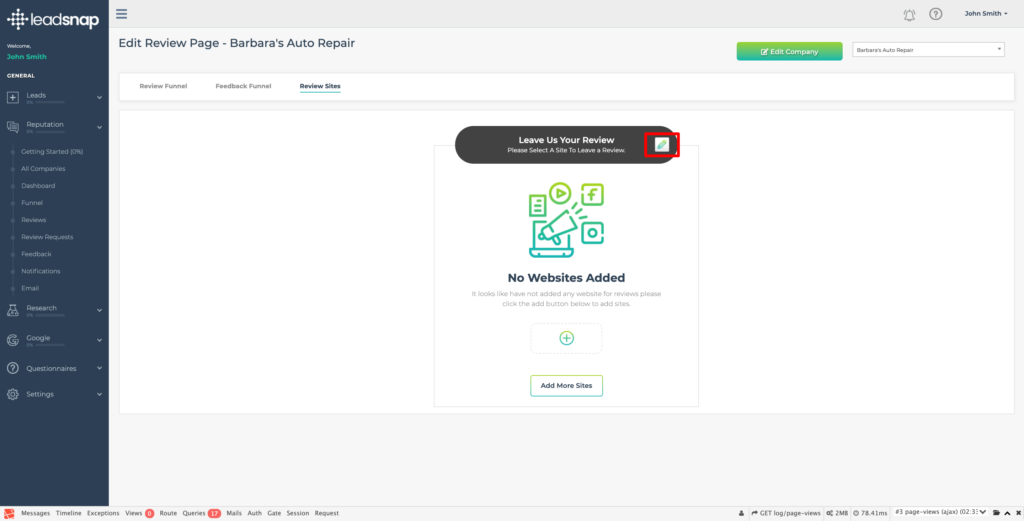
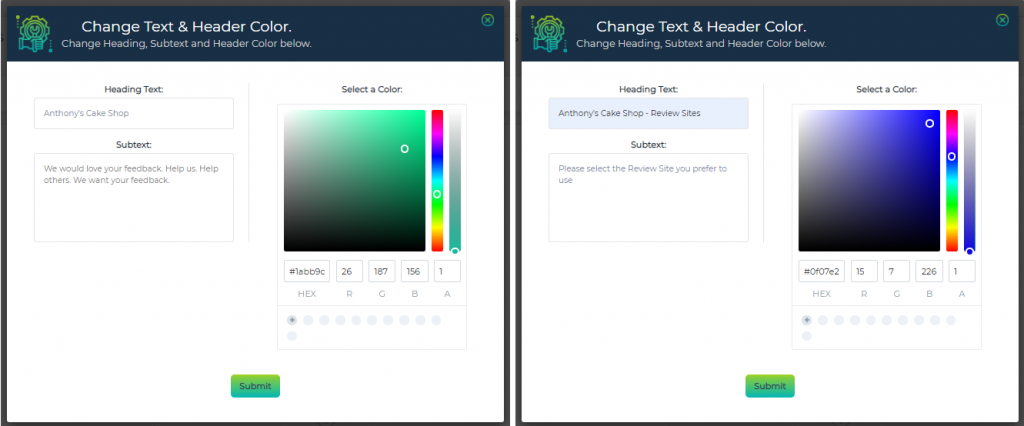
Your next step should be to setup the header to your Review Funnel request form. At the top right of the header section you will see a pencil icon. By clicking this it will open a pop-up screen that will give you the option of editing the Heading Text; Subtext and the colour of the heading banner.

Once you have made the changes then you need to click the “Save Changes” button to apply them to the Review Funnel template. If you decide you want to make further changes then simply click on the pencil icon again and make them, remembering to click the “Save Changes” button.

Configuring the Welcome Message and Logo

The next section you can edit allows you to add your logo and welcome message that is displayed underneath the review rating.

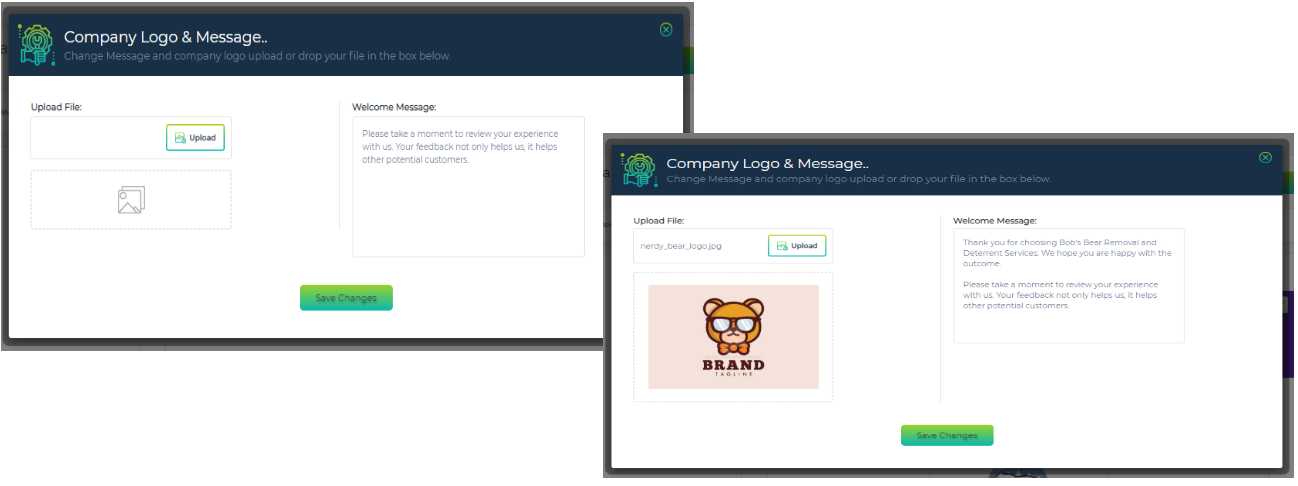
To change the logo you can either upload a file from your computer or drag it into the space outlined for the image. Once uploaded, or dragged into place, it will preview the image.

You can then edit the Welcome Message to make it reflects the image of your company and is of the tone that will appeal to your audience.

Once you have updated these components you will need to click “Save Changes” to apply them and return to the Review Funnel template. If you decide you want to make further changes then simply click on the pencil icon again and make them, remembering to click the “Save Changes” button.

*Logo Dimensions: 124 x 124 pixels

Configuring the Review Rating System

The final piece of the Review Funnel template is the review rating buttons, layout and text selection and configuration.

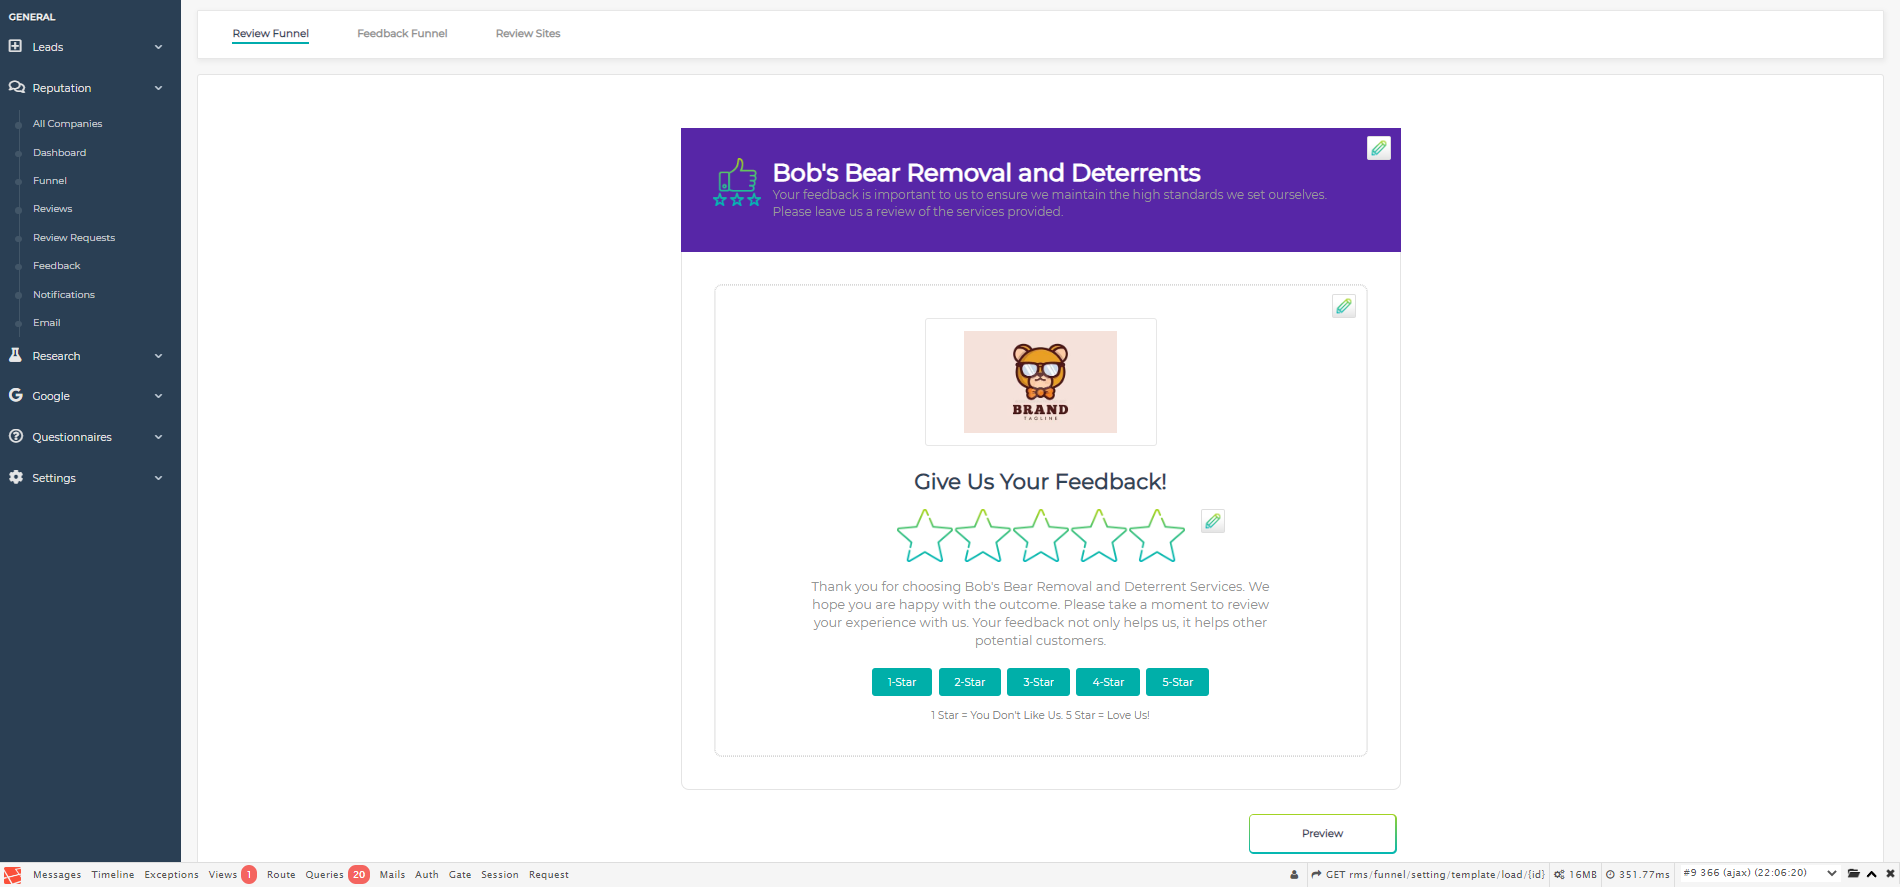
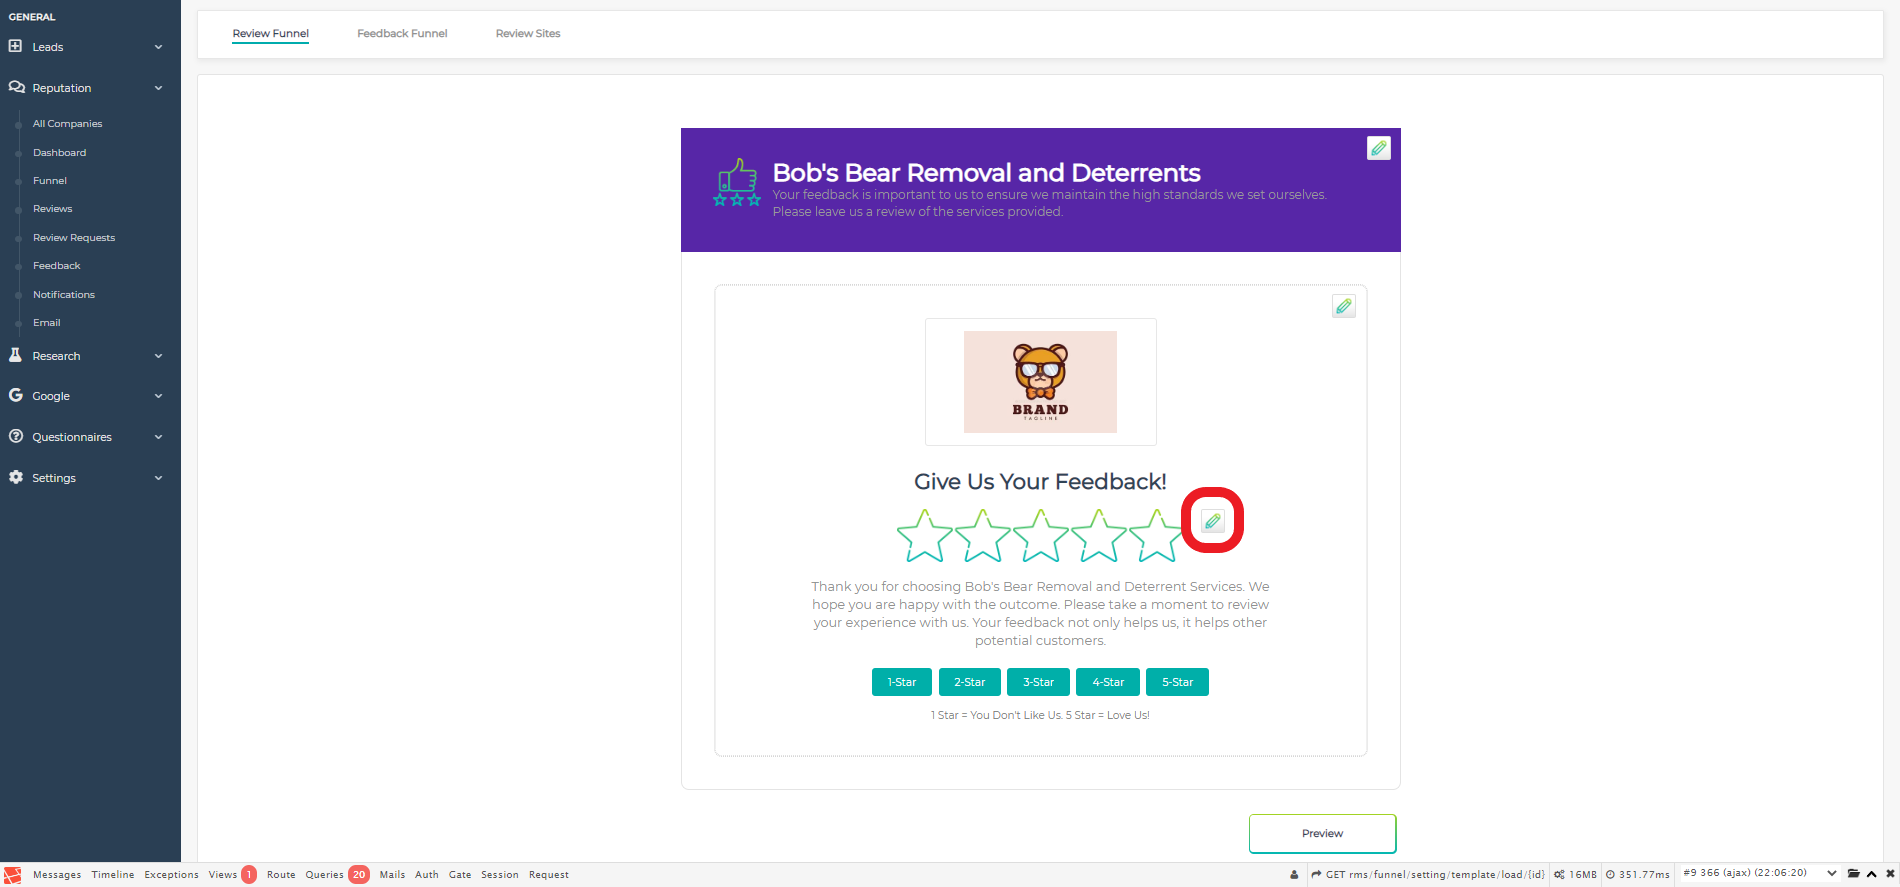
Click on the Pencil Icon next to the 5 Stars below the Logo.

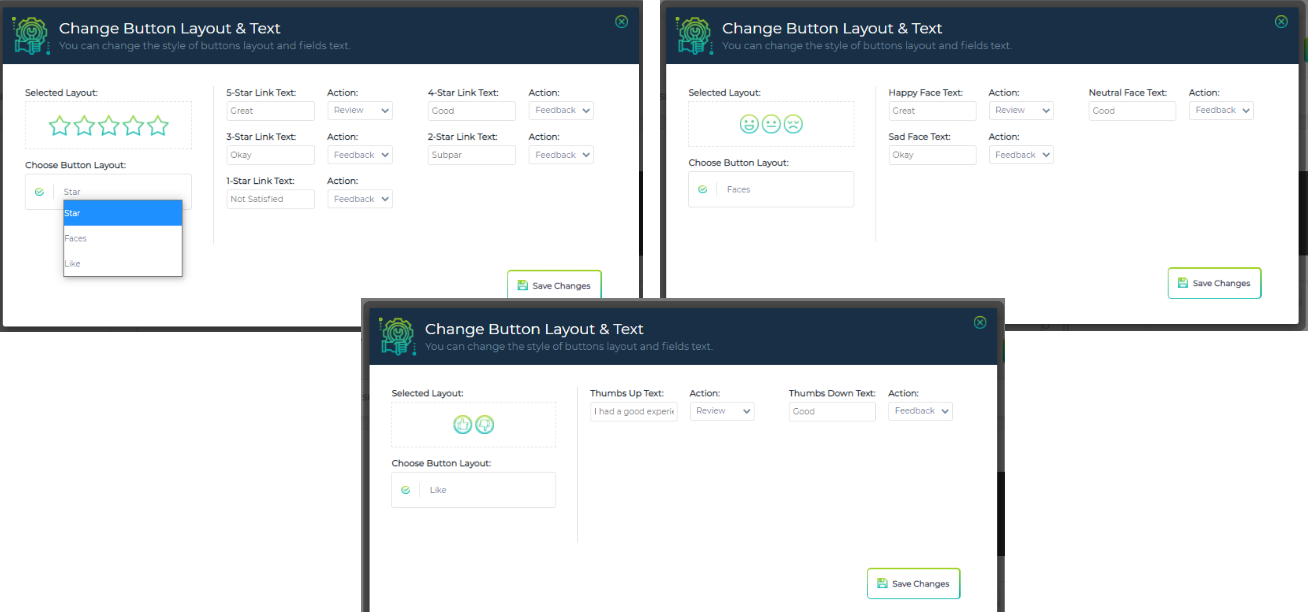
By default LeadSnap sets you up using the star rating system. You will see this indicated by the 5 stars on the left in the “Selected Layout” box and in the “Choose Button Layout” drop down list. On the right hand side of the screen you will see that each of the 5 stars has a Text and Action box assigned. You can change the Text to say whatever you want to align with your company’s image and the tone best suited for your audience.

The Action drop down list allows you to select “Review” or “Feedback”. This is where you can control what type of reviews you want to be published versus the ones you want to gain more feedback on in an attempt to rectify the issues and obtain a more positive review.

For example, If you only wanted 4 and 5 star reviews being published without any intervention, simply select “Review” for those two options. For the rest you will then select “Feedback” and the user will be directed to the Feedback Funnel screen and asked to provide more detail. They will not know the difference and it will be seamless to them but will save your company’s reputation from a negative review being published and affecting your rankings and future business.

Remember, no matter what you do online, the biggest selling tool on the planet is word of mouth. It can also be the biggest business killer.

Feedback Funnel

This support guide explains the functionality and how to use the Feedback Funnel component of the Funnel section in the Reputation Management module.

Step by Step Guide

To access this section, click on the Reputation Module header in the left hand navigational menu. This will then expand the module and display all the sections available to you. The very first one is “Funnel”, click on this and the default Review Funnel will be displayed. Click on the Feedback Funnel option at the top left of the screen.
Overview

The importance and impact of positives reviews is obvious. What is equally important though is the impact of a negative review. A negative reputation sticks in the mind of customers more than a positive one.

Let’s put this into something tangible for you to consider:

  • It is estimated that 90% of people are more likely to trust and buy from a brand recommended by a friend
  • a satisfied customer will tell approximately 4 to 6 people
  • a dissatisfied customer will tell approximately 9 to 15 people

And it is the last point that the Feedback Funnel aims to address. Instead of allowing the customer to leave a negative response to the Review Request, it will instead direct them to the Feedback Funnel. This enables you and the client to intervene, prevent the negative review going public and have a chance of rectifying the issues with a view to gaining a more positive review.

Selecting the Company

First you need to ensure you are working on the correct company’s Feedback Funnel. To change the company you need to go to the top right hand corner of the screen and click on the arrow in the dropdown menu, scroll down and click on the company you wish to configure.

You can change the company you are working on from all three of the component screens (Review Funnel; Feedback Funnel and Review Sites) in the Funnel section.

Editing the Company

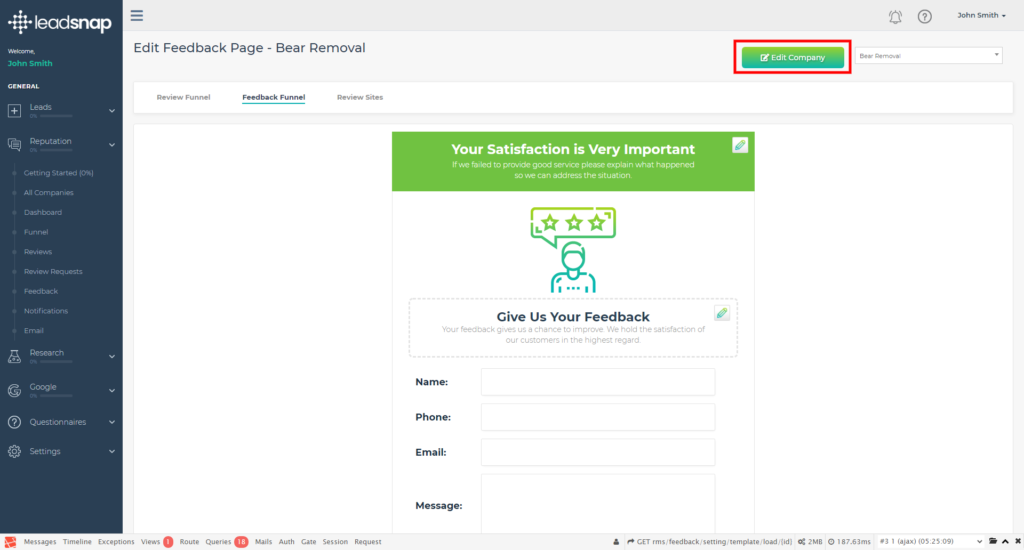
Once selected, you now also have the option of editing the company information from the Funnel. This can also be done from any of the component screens in this section.

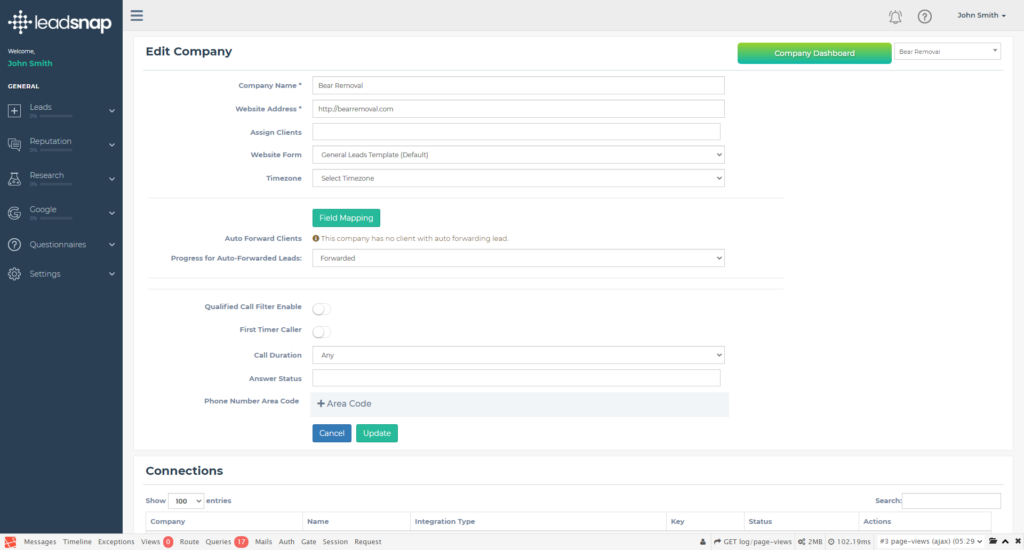
Clicking the button will take you directly to the Edit Company screen that you can would normally have to navigate to via the “Settings-Companies-All Companies” navigational menu.

Once you have updated your company information, you will need to click on the Update button. A green banner at the top of the screen will indicate that the information has been updated successfully.

To return to the Funnel section, you will need to go through the navigational menu again by selection “Reputation – Funnel” and select the Feedback Funnel from the menu at the top left of the screen.

Configuring the Header

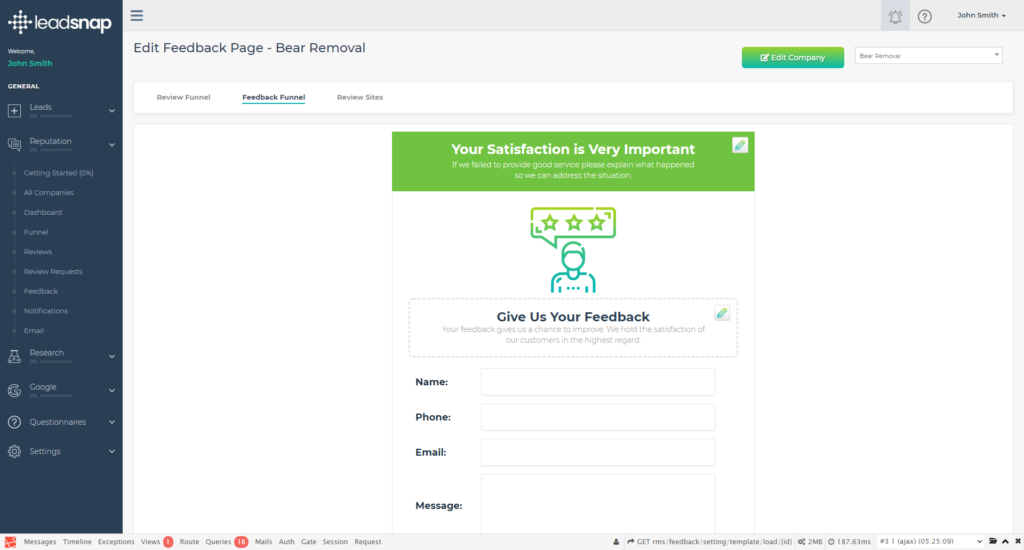
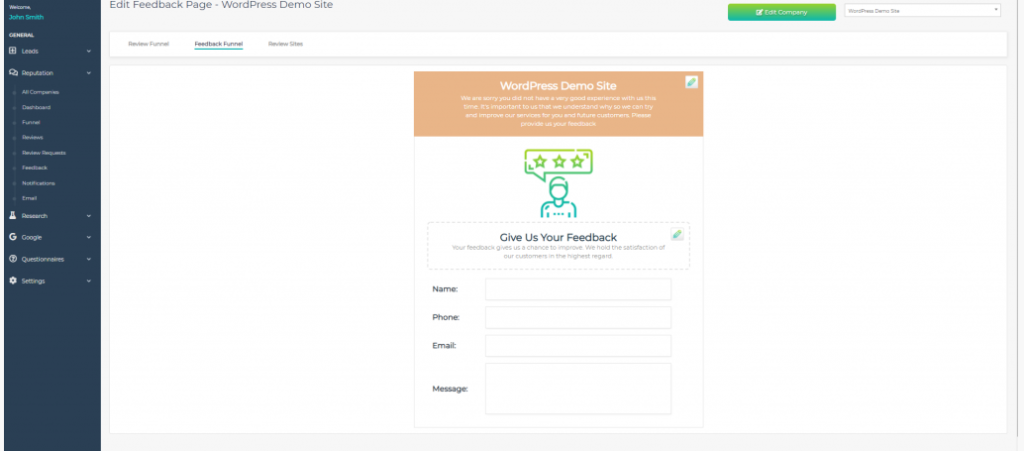
Your next step should be to setup the header to your Feedback Funnel request form. At the top right of the header section you will see a pencil icon. By clicking this it will open a pop-up screen that will give you the option of editing the Heading Text; Subtext and the colour of the heading banner.

Once you have made the changes then you need to click the “Save Changes” button to apply them to the Feedback Funnel template. If you decide you want to make further changes then simply click on the pencil icon again and make them, remembering to click the “Save Changes” button.

Configuring Heading and Subtext

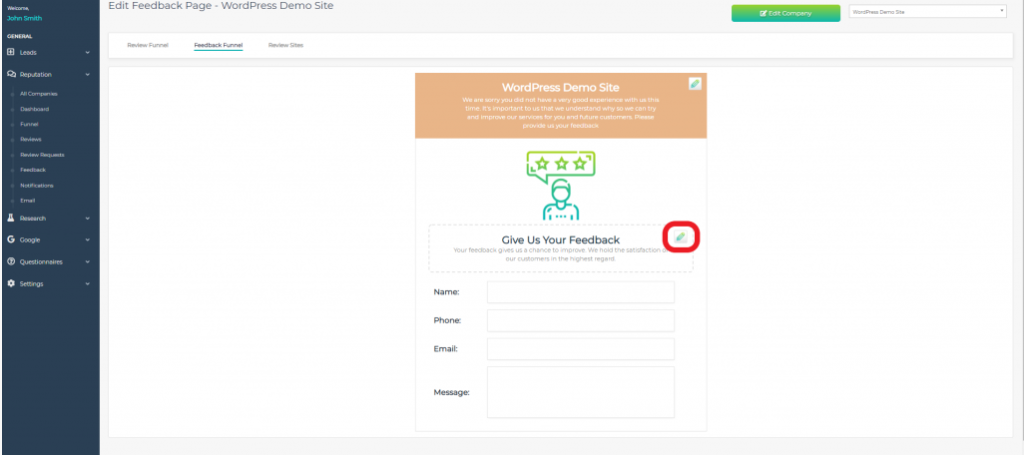
The next section you can edit is the call to action text on the page. At the top right of the central text field you will see a pencil icon. By clicking this it will open a pop-up screen that will give you the option of editing the Heading Text and Subtext.

Once you have updated these components you will need to click “Save Changes” to apply them and return to the Review Funnel template. If you decide you want to make further changes then simply click on the pencil icon again and make them, remembering to click the “Save Changes” button.

You have now completed the Feedback Funnel setup. If you are configuring this company’s Funnel for the first time then you will need to complete the Funnel setup by following the “Review Sites” detailed support guide.

Review Sites

This support guide explains the functionality and how to use the Review Sites component of the Funnel section in the Reputation Management module.

Step by Step Guide

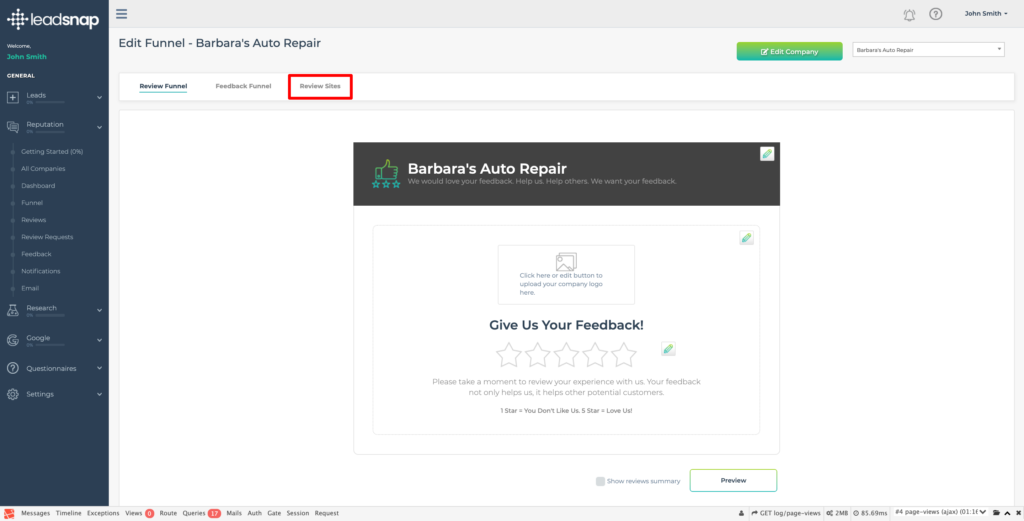
To access this section, click on the Reputation Module header in the left hand navigational menu. This will then expand the module and display all the sections available to you. The very first one is “Funnel”, click on this and the default Review Funnel will be displayed. Click on the Review Sites option at the top left of the screen.

Overview

The final piece to the Funnel component is adding the Review Sites you wish to direct the Leads to. You MUST remember to set this up because failing to do so will leave your Leads with nowhere to leave a review and this could turn a positive experience into a negative one.

The review sites are most often your Facebook Page, GMB or a directory listing such as Yelp. These three sites are listed for you and the Icons will be displayed when you add your specific link.

You can also add Custom Links for other review sites you may be using, such as TripAdvisor for example.

Selecting the Company

First you need to ensure you are working on the correct company’s Review Sites. To change the company you need to go to the top right hand corner of the screen and click on the arrow in the dropdown menu, scroll down and click on the company you wish to configure.

You can change the company you are working on from all three of the component screens (Review Funnel; Feedback Funnel and Review Sites) in the Funnel section.

Editing the Company

Once selected, you now also have the option of editing the company information from the Funnel. This can also be done from any of the component screens in this section.

Clicking the button will take you directly to the Edit Company screen that you can would normally have to navigate to via the “Settings-Companies-All Companies” navigational menu.

Once you have updated your company information, you will need to click on the Update button. A green banner at the top of the screen will indicate that the information has been updated successfully.

To return to the Funnel section, you will need to go through the navigational menu again by selection “Reputation – Funnel” and select the Review Sites from the menu at the top left of the screen.

Configuring the Header

Your next step should be to setup the header to your Review Sites request form. At the top right of the header section you will see a pencil icon. By clicking this it will open a pop-up screen that will give you the option of editing the Heading Text; Subtext and the colour of the heading banner.

Once you have made the changes then you need to click the “Save Changes” button to apply them to the Review Sites template. If you decide you want to make further changes then simply click on the pencil icon again and make them, remembering to click the “Save Changes” button.

Adding Review Websites

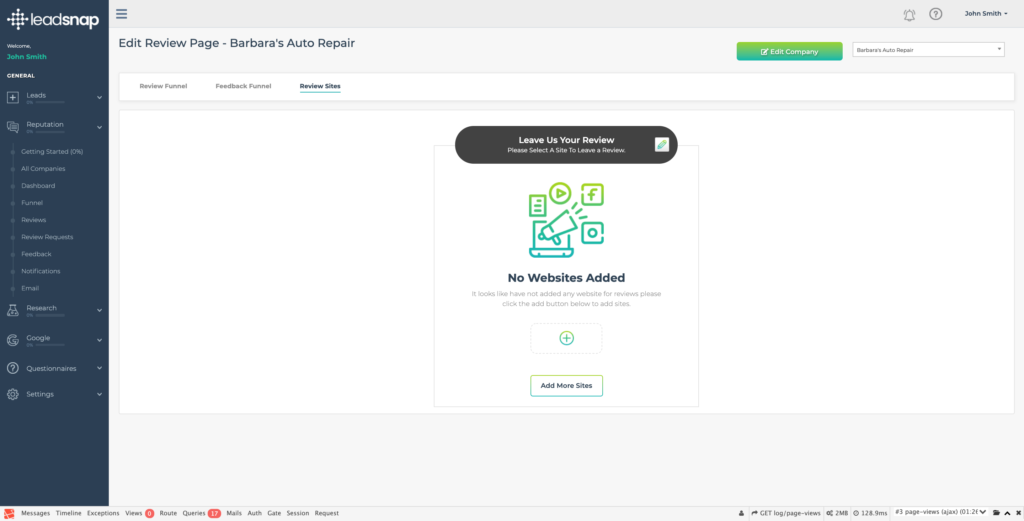
You will initially see a message stating “No Websites Added” and a dotted rectangle with a plus sign in a circle below it. To begin adding review websites, click on the Plus sign.

Facebook/Google and Yelp Review Sites

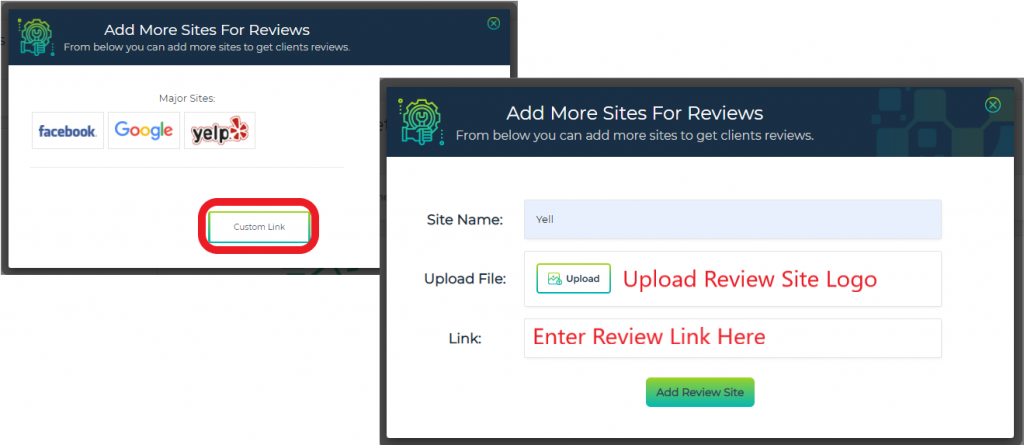
The above 3 sites are already configures in terms of image file and name. All you have to do is enter your Company’s specific Review Link and it will added as a site option for the lead when adding a positive review.

Custom Review Sites

You can add any review site you are using for your company by using the “Custom Link” button on the Adding Review Sites dialog box. You will need to name the site appropriately, so leads can recognise the site clearly, and a logo file so that they can visualise it easily.